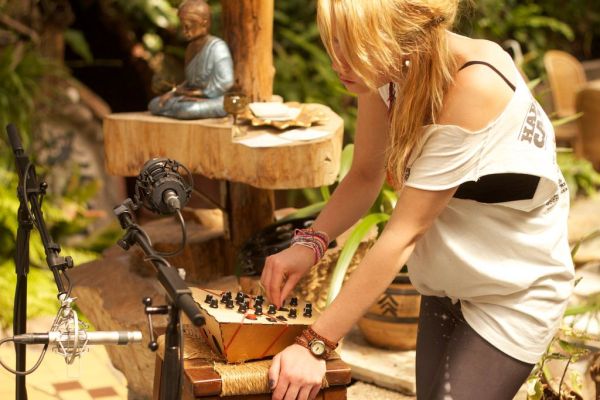
For my internship at Create Digital Music/Meeblip I’ve created quite a fun little synthesizer. This thing is meant to be more flexible than other synthesizer by making it completely independent; it is battery powered, has its own amplifier/speaker and is controlled by a manually operated sequencer. Inspiration for this form comes from my frustrations with most synthesizers: that I can’t just take them out and jam with friends!
 The previous iteration of this Instructable did not feature any sound or video of the actual synth, which is quite essential to see if you want to build something! Other changes include some reworked text, in an effort to make the project more clear for anyone trying to build it.
I’ve entered this Instructable in a few contests, so if you like it, please vote for me by pressing the ‘vote’ button on the upper right corner!
This instructable shows how I made my prototype and describes how you could make your own. It won’t go into super-deep detail, but if want to build it and you need some clarification or help with the code, please don’t hesitate to contact me!
More details can be found in the report I wrote.
This document and all included research and illustrations, are covered by a Creative Commons Attribution-ShareAlike 3.0 Unported License. The hardware designs, schematics and code are provided under GPL v3. This means that you can rebuild and improve on this project as you wish, just let me an Meeblip know!
If you want to know more about me, check me out at http://www.arvidjense.com
Step 1: Concept and design
So, synthesizers are pretty cool instruments, making the sounds for the most of the music I listen to right now. Yet they are quite limited in where and how they can be used. For instance, I can play my guitar at home, but I could take it to the park or to a friend for a quick jam-session. Not so simple for a synth: I’d have to plug it out of my studio setup, take a midi keyboard or laptop and just hope the place where I’m going has the right connections to plug in again.*
Another point where I feel synthesizers are performing worse than traditional instruments, is in their connection to the user. Where I can feel the vibrations of my guitar resonating through my hands and body, the sound of a synthesizer comes from a speaker a few meters away from me. Similar on the control interface; A guitar is quite clear in the fact that if you pluck a string,a sound comes out. But for a synthesizer you will have to learn the function of dozens of knobs which often have several layers of functionality.
On the other hand the palette of different sounds coming from a synthesizer is bigger than that of most traditional instruments. Also the possibilities for programming the notes allow for things not possible on traditional instruments. So why choose one or the other? I wanted to create a synthesizer which has the flexibility and direct connection of a traditional instrument.
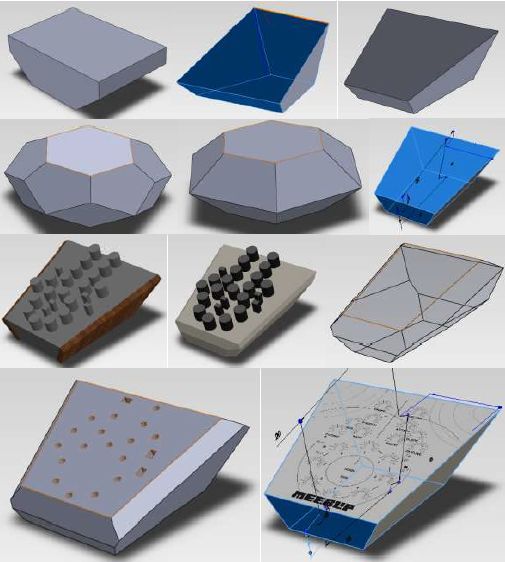
As I’ve done this project for Meeblip, one thing was certain, I would use aMeeblip Micro as the sonic centerpiece. Other than that, everything was still open. Would it become a drumbox or rather a guitar-like synth? After looking at a lot of different synthesizers, reading up on synthesizer design literature and sketching lot of variations, I came up with something.
After making a lot of prototypes of all the individual pieces (interface, electronics, sequencer etc) I finally found the ‘final form’ which is made in the next steps. All functions are directly accessible through the knobs and switches on the interface The internal speaker allows the instrument itself to vibrate, which, especially when you place the instrument in your lap, help you feel what your playing. The instrument is controlled through a circular sequencers, in which you set the notes form a range of -12 to +12 semitones from a center note set by the base knob.
My design is meant to address the issues I have with synthesizers in a few ways. Most obvious is the fact that it runs on battery power and includes a decent hifi amplifier and speaker, allowing it to be used anywhere. By using prettily grained wood, the instrument looks a lot more delicate than if I’d used plastic. This also references its appearance more towards acoustic instruments, which are usually made of wood. Last thing I did is make the interface as direct as possible. It didn’t need to be intuitive, (who makes great music on a guitar the first time (s)he picks it up) but it does need to be reliable and consistent, so you can really learn the instrument. (Please discuss whether or not you feel like these points are valid!)
*Companies like Korg and Casio did make portable synthesizers running on batteries and including a speaker, but these are, at least to me, seen more as toys than as serious musical instruments; Their plastic encasing doesn’t really place it in the same line as for instance an acoustic guitar or a Moog. While the small portable synths often sound great amplified, their raw sound is nearly always weak and I’ve never seen them used in a song.
Step 2: Materials, tools and budget
[box color=”#985D00″ bg=”#FFF8CB” font=”verdana” fontsize=”14 ” radius=”20 ” border=”#985D12″ float=”right” head=”Major Components in Project” headbg=”#FFEB70″ headcolor=”#985D00″]
Things to buy:
Price (total) Item
€ 50,00 1 x Meeblip Micro
€ 20,00 1 x Arduino Leonardo note: most other Arduinos could do, but would need some modifications in the code
€ 10,00 1 x Cheap USB speakers note: these are all really similar, I got mine at Saturn
€ 15,00 1 x 250x500x2mm model airplane beech plywood note: my laser-cutting files will only work for 2mm wood, but they could be modified if needed
€ 30,00 1 x 30minutes of laser-cutting note: this could be free if you have a fablab near you or it could be hugely more expensive if you have to rely on an online laser-cutting service
€ 18,00 18 x Potentiometers (10K)
€ 18,00 18 x Knobs
€ 3,90 6 x Rocker switches
€ 4,00 2 x Arcade buttons modified, by taking out the locking mechanism
€ 0,40 8 x LEDs (5mm yellow)
€ 10,00 1 x Protoboard
€ 0,30 3 x IC mounts
€ 0,10 2 x Resistor (10k)
€ 0,10 2 x Capacitor (10nF)
€ 0,50 1 x Headers male (about 30 bits)
€ 0,50 1 x Headers female (about 30 bits)
€ 2,00 2 x Multiplexers (4051)
€ 0,50 1 x Hex inverting Schmitt trigger (40106)
€ 1,00 1 x 2aa battery holder
€ 3,00 1 x USB step up converter
€ 1,00 1 x Rubber band (X shape)
€ 4,00 1 x Assorted Wires
€ 2,00 4 x Rubber feet
€ 8,00 2 x AA batteries (rechargable)
€ 202,30 Total
[/box]
note: these prices are approximations, you might be able to get some parts cheaper or more expensive, but the ballpark cost will be about €200,-
Tools and consumables:
Glue
Solder
Electrical tape
Drill bits
Soldering iron
10mm wrench
File
Sanding paper
Clear stain
Step 3: Encasing
First step is to make the enclosure. My woodworking skills aren’t that great, but my computer modelling skills are ok, so I chose to laser-cut it. As I couldn’t find any laser-cutting facilities with a powerful machine, I didn’t have much choice in wood; it had have a thickness of under 2mm. Most types of wood are quite weak and flexible at that thickness, so I had quite a search finding the right wood. I finally settled to a beech plywood for model airplanes of ‘F1’ quality.
The cutting files can be found in “Meeblip lasercut 2mm hairlines part1 [Converted].pdf” and “Meeblip lasercut 2mm hairlines part2 [Converted].pdf”.
Before cutting the files, you should do some tests on the wood to determine the right intensity and speed. This is very important on the lettering, as a line too thin will be illegible from a distance, while too thick of a line will make the lines flow over. I used the same settings for the lines and letters, but for a next version I would increase the intensity on the lines, to make them a bit more pronounced. The pdf files show the cut lines in red, while the engraved lines are black
After everything is cut and engraved, it is time for assembly. Just put all the pieces, except for the front panel, together. Put some high strength (wood or instant) glue in the seams. (Be careful that you don’t smudge the wood or leave large blobs of glue hanging on the outside.) Tie this together with some rubber bands and leave it overnight.
With the encasing glued, its time for some finishing. First, be sure there is no grease on the wood, if there is, remove it with any degreaser. Now, use some fine grit (>P150) to sand the wooden panels with the grain. Clean it again after this is finished and let it dry. Now you can put any number of layers of light stain on, I did only one. This protects the enclosure from accumulating dirt later on.
For more detail: Designing and building an synthesizer with Meeblip and Arduino, added videos!