This is a follow up to an earlier Instructable for attaching the guts of a cheap clip MP3 player to an Arduino.
http://www.instructables.com/id/MP3-Interface-for-Arduino-Cheap-and-Easy/
The previous Instuctable showed how to use the Arduino to control all of the functions of the MP3 player: volume increase and decrease, next and previous MP3 file, play or pause. The previous Instructable also showed how to disassemble these little clip players and salvage the cool parts within.
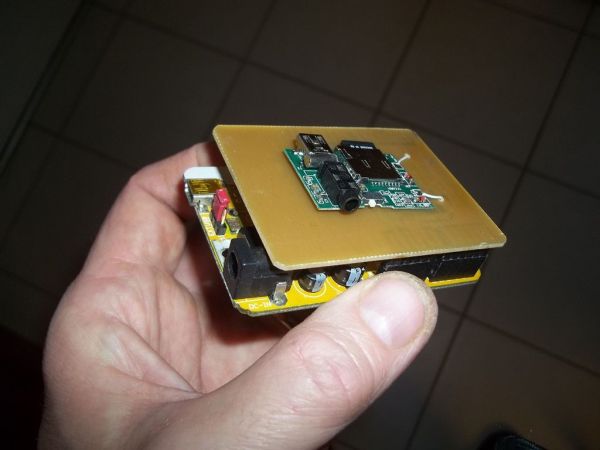
This Instructable makes the attaching the MP3 player to the Arduino more straight forward and a lot cleaner. In this installment, we will make a single sided Arduino shield. (You can use this same process for your other Arduino projects.) If you are into electronics and like prototyping, being able to fab your own PCB can be a great addition to the personal tool belt.
So why do this? Why attach an MP3 player to an Arduino? Think about responsive talking toys (how about a screaming/moaning version of Operation?), interactive dioramas, museum touch-and-explain displays…
PLEASE SEE THE LAST STEP FOR SOME FOLLOW-ON INFORMATION CONCERNING THE LC2093-B.
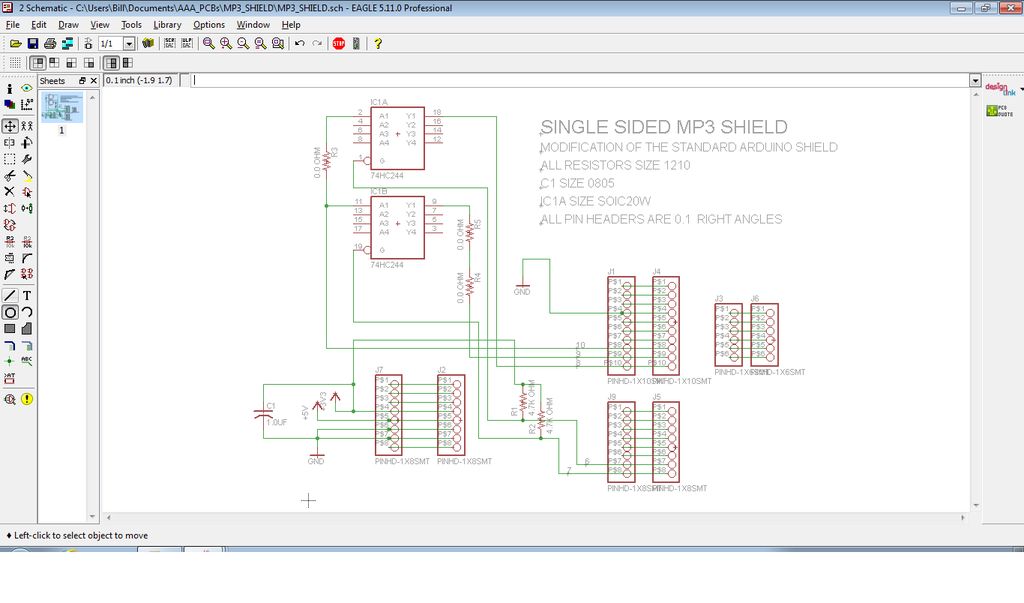
Step 1: Design the Board
1. 3.3V from the Arduino to power the MP3
2. Ground. So there is a common ground between the two devices.
3. Vol- on the MP3 attaches to pin 8 on the Arduino.
4. Vol+ on the MP3 attaches to pin 9 on the Arduino.
5. PLAY/PAUSE on the MP3 attaches to pin 10 on the Arduino.
6. Pins 6 and 7 of the Arduino are use to control a 74HC244 tristate driver to allow NEXT and PREV selection of MP3 files.
(Note, the comments on the previous Instructable suggested that the analog switches in that design be replaced with some more universally available part. I think the 74HC244 takes care of that: it is cheap, universally availble thru electronics distributors, handles both selections in one device and handles the 5V Arduino to 3.3V MP3 conversion.
See the previous Instructable for the explanation of how the design works…)
I use EagleCad. Because of the screwball spacing of the Arduino connector, I just start with the Arduino standard shield design and modify to suit my application. You can find a standard Eagle shield design at:
http://arduino.cc/en/Main/ArduinoProtoShield
Attached are my files.
 MP3_SHIELD.brd31 KBMP3_SHIELD.sch92 KB
Step 2: Make the Board (part 1)
I make my boards using a couple of simple steps:
1. Print out the image on shiny magazine/catalog paper at 1:1 using a laser printer. You may want to do a multi-up, so you can make a few copies at the same time.
2. Clean the PCB copper using a 3M scrubby and a small amount of low abrasive cleaner, like Bon-Ami or copper pot cleaner.
3. Transfer the image from the shiny paper to the copper on the PCB using a regular clothes iron.
4. Slough the paper off the board using water and my two big thumbs.
5. Correct any errors using a Sharpie marker and XACTO blade.
(The etching process is done in the next step.)
[box color=”#985D00″ bg=”#FFF8CB” font=”verdana” fontsize=”14 ” radius=”20 ” border=”#985D12″ float=”right” head=”Major Components in Project” headbg=”#FFEB70″ headcolor=”#985D00″]Arduino
MP3[/box]
For more detail: Cheap and Easy MP3 Shield for Arduino