Have you ever wanted a little plant to brighten up your desk or home, but you’re afraid that you’ll forget to water it? Fear no longer! Using an Arduino, a scavenged wall-wart, and a peristaltic pump, you can set up your plant to be watered as often as you like, from a jug or any other vessel. To be as accessible to as many people as possible, this tutorial can be done without soldering. That being said, the advantage of soldering is increased robustness and reliability.
Step 1: What you’ll need
What you’ll need:
(x1) Arduino UNO rev 3 (http://adafru.it/50)
(x1) USB cable (http://adafru.it/62)
(x1) 1N4001 diode (http://adafru.it/755)
(x1) PN2222A transistor (http://adafru.it/756)
(x1) 12v 1000mA DC power supply (http://adafru.it/798)
(x1) peristaltic pump (http://adafru.it/1150)
(x2) alligator clip test leads (http://adafru.it/1008)
(x1) jug, glass, vase, or any other vessel that can contain water (not pictured)
(x1) a piece of scotch or electric tape (not pictured)
Tools: wire snippers, soldering iron + solder (not pictured)
Step 2: Understand your transistor
First, figure out what the different pins are on your transistor. The diagram from the datasheet shows you which pins are the base, collector, and emitter. The second picture shows how the pins match up to the circuit diagram. This transistor is awesome because it will allow us to use 5v from the arduino to switch the much higher 12v required by the motor, which would destroy our Arduino if we connected it directly to the pins that we can control with our Arduino code. The PN2222A transistor is great for this purpose because it can handle 5v from the Arduino without any resistors.
Step 3: Protect From The Motor
Clip a small (1/2″) piece of wire from one end of your diode (if you have other similar wire, use that instead) and put it aside for the next step.
Attach your diode in reverse across your motor pins. Reverse means that the negative lead (indicated by the silver band on the diode) connects to the positive pin on the motor, and the positive diode lead connects to the negative pin on the motor. I’ve done it here by soldering, but if you don’t have a soldering iron, you can wrap the diode leads very firmly around/into the holes in the motor pins. This will prevent any potential damage from energy released when the motor is switched off.
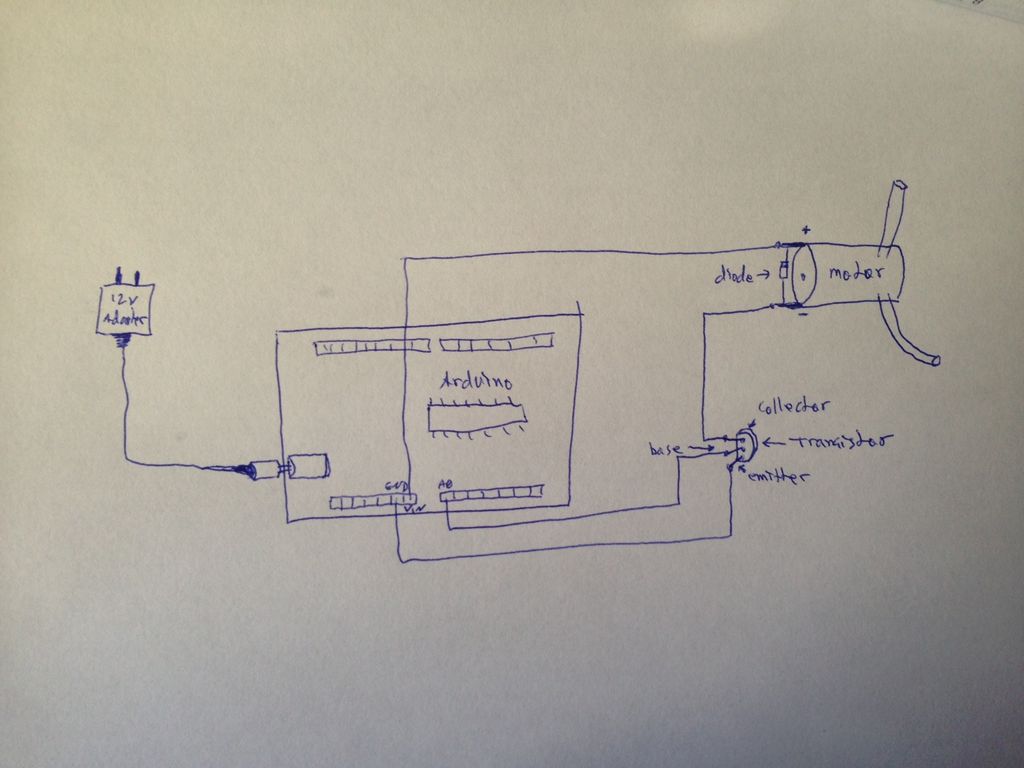
Step 4: Wire It Up!
Now wire everything up. Conveniently, we can just stick the transistor directly into the Arduino.
The emitter pin goes to GND, and the base pin (in the middle) goes to Analog Pin 0.
Bend the collector pin out so it won’t touch the Arduino, and attach an alligator clip to it. This pin will receive the electricity coming through the motor and allow it to keep flowing. Connect the clip on the other end to the negative pin on the motor.
Take the little piece of wire we cut and set aside in the previous step and stick it into the VIN pin hole. Bend it a little so it doesn’t touch the transistor.
Connect a clip to the positive pin on the motor, and connect the other end to the piece of wire in VIN. Tape this clip to the board or otherwise secure it so it doesn’t move around and touch the transistor pins.
A word of warning: it is possible to destroy the chip in your Arduino if you connect the circuit wrong. Luckily, you can order a new chip for $6 (or much less if you get them in bulk), rather than paying $30 for a whole new Arduino board. But you’re more likely to destroy the transistor, which isn’t too bad if you got the 10-pack.
Once you’re sure you’ve got it right (check the picture one more time!!), connect the power from your 12v adapter to your Arduino. If you’ve done it right, nothing will happen. If you’ve connected it backwards (reversed the collector and emitter) the motor will weakly spin. Sorry, but that’s probably the end of that transistor. You can try using it again, but it may not work properly. I would just get another one.
Step 5: Program your Arduino
Conveniently, the code is incredibly simple. Copy and paste the code into your Arduino code editor, choose how long you want to water, and how long you want to wait between watering. If you’re in an air-conditioned office, the air is usually very dry, which causes the soil to dry out quickly. In that case, you may want to water a little bit several times throughout the day. The only thing to remember is that you’re using milliseconds, so one hour is 3,600,000 milliseconds.
Unplug your 12v cable and connect the USB cable between your Arduino and your computer.
Upload your code, then disconnect the USB cable.
Connect the 12v cable to your Arduino, and the motor should immediately run for 5 seconds.
This code also turns on the built-in LED during watering. If your LED is on but the motor isn’t, you may have missed something.
int motorPin = A0;
int blinkPin = 13;
int watertime = 5000; // how long to water in miliseconds int waittime = 3600000; // how long to wait between watering
void setup() { pinMode(motorPin, OUTPUT); pinMode(blinkPin, OUTPUT); }
void loop() { digitalWrite(motorPin, HIGH); digitalWrite(blinkPin, HIGH); delay(watertime); digitalWrite(motorPin, LOW); digitalWrite(blinkPin, LOW); delay(waittime); }
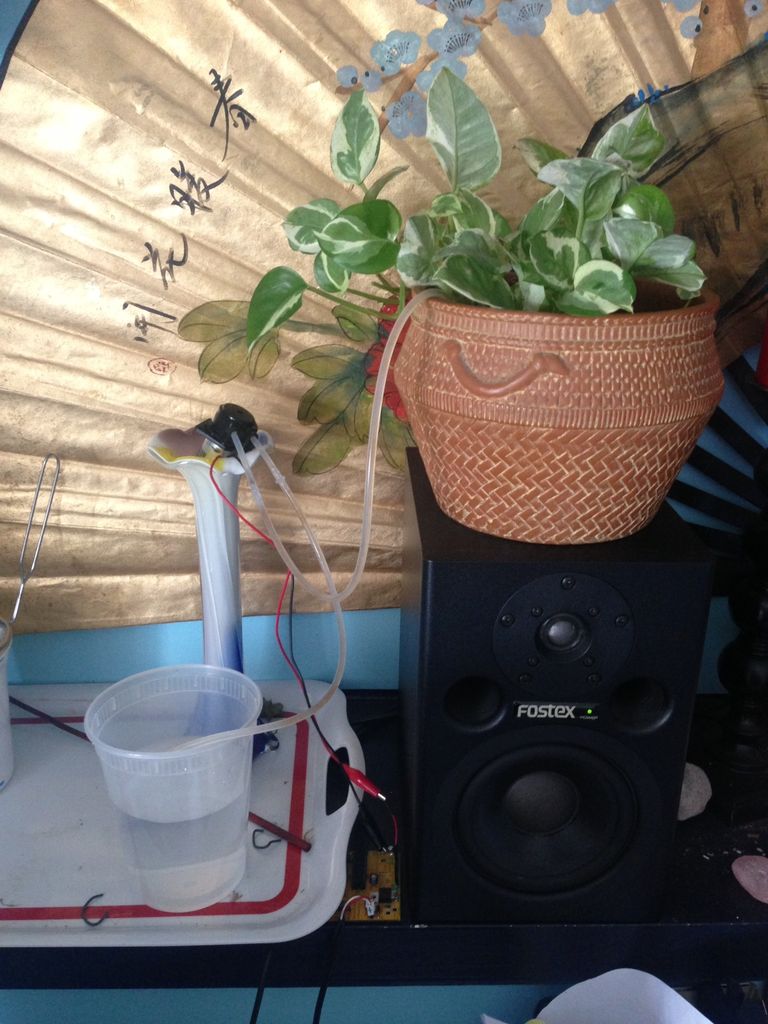
Step 6: Implement
So now that you’ve got a working setup, it’s time to put it in place so your plant can get its water.
Get a jug or glass or whatever you’d like, and put the input (the sucking end) of the pump hose in it.
Put the output of the hose in your plant.
Put the Arduino somewhere where it won’t get wet.
As far as aesthetics are concerned, I kind of like the wires because people come over and see them and say “What’s with the wires… wait, is that some kind of watering contraption?!” and then I get to tell them all about it and show them how it works. If you prefer something more discreet, you can put everything into a box and run the tubes through holes. You could even put the box under the plant as a stand. Your imagination is the limit.
For more detail: Automatically water your small indoor plant using Arduino + pump