My goal for this project is to make a watch with selectable dials, stopwatch and millidays.
This idea started with an Aprils fools prank about metric-time. (http://www.youtube.com/watch?v=K35xG1buyFA)
First I wanted to make a metric clock but soon this idea evolved from a metric watch into an open course watch.

I knew that it would be hard (or impossible) to make the watch small enough to really wear, but I wanted to try it anyway.
This would be mostly a programming project, but that is nice for long, cold and dark winter nights.
So my watch needs to be:
- small enough to wear
- easy to reprogram
- capable of showing metric time
- have selectable dails
- have an easy understandable menu structure
- controllable with just 2 buttons (digital watches with 4 buttons confuse me)
- cheap (I’m still Dutch you know)
Step 1: You will need
- Arduino Nano
- Nokia 3110 screen (Adafruit or something)
- 2 pushbuttons
- 2 10K resistors
- some wires
- (optional a thermometer-ic)
- 2 button-cell batteries
- 2 small magnets
- a small breadboard for prototyping if you want
Tools and stuff
- soldering iron
- solder
- desoldering pump (or wick)
- pliers
- usb-cable
- computer with Arduino software
Wristband
- silicon kit (black)
- buckle (from old watch)
- plank
- aluminum 15 mm x 15 mm L-profile
- aluminum strips and scraps
- screws
- polyester filler
- polyester topcoat
- wax
- superglue
tools and stuff
- screwdriver
- hacksaw
- old credit card
- spatula
- dremel
- grinding stones for the dremel
- sanding paper
- some clean cloth
- rubber gloves
- ruler
- sharpy
Step 2: Breadboarding the watch
To check if everything works like I want it to work, I first wire the components up on a breadboard.
I am going to use the library from Adafruit (thank you Lady Ada) to get the screen up and running, so I wire it up like it’s written in the test-sketch (program):
// pin 7 – Serial clock out (SCLK)
// pin 6 – Serial data out (DIN)
// pin 5 – Data/Command select (D/C)
// pin 4 – LCD chip select (CS)
// pin 3 – LCD reset (RST)
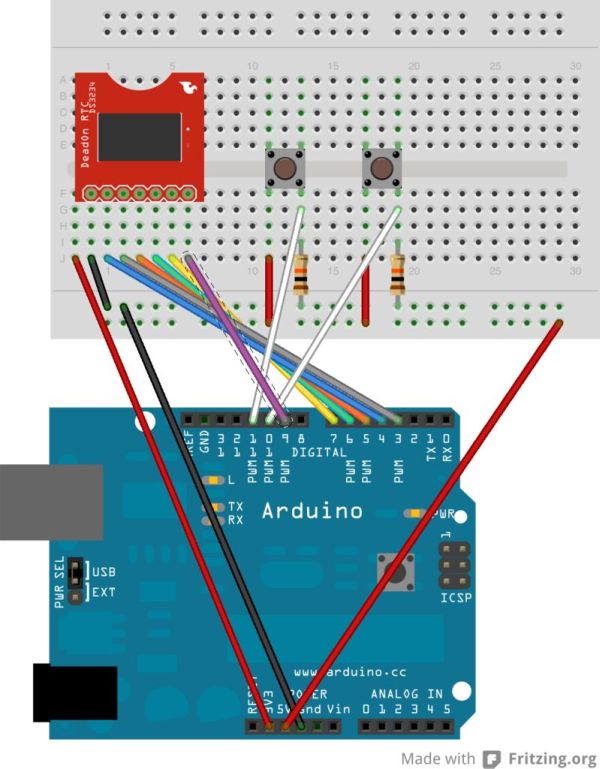
There is also a wire going from pin 9 to the backlight and a wire to ground. Because the display is actually 3.3V instead of the 5V coming from the Arduino, I wired the VCC to the 3.3V power of the Arduino. The power on the data pins is still 5V though, what can kill your screen, but mine is still working. (no guarantees though)
ATTENTION!!! >>> not all Nokia screen break out boards are wired the same way. Read what is written on the board and wire accordingly.
I also wired up two push buttons to pin 10 and 11, with a 10K pull down resistor to ground. (see the picture if you need more info)
In the picture it looks like the 3.3V wire is going nowhere, but that is just because I couldn’t find the right part in Fritzing (the program that made this picture for me)
[box color=”#985D00″ bg=”#FFF8CB” font=”verdana” fontsize=”14 ” radius=”20 ” border=”#985D12″ float=”right” head=”Major Components in Project” headbg=”#FFEB70″ headcolor=”#985D00″]
- Arduino Nano
- Nokia 3110 screen (Adafruit or something)
- 2 pushbuttons
[/box]
For more detail: Arduino Watch with Nokia 3110 screen