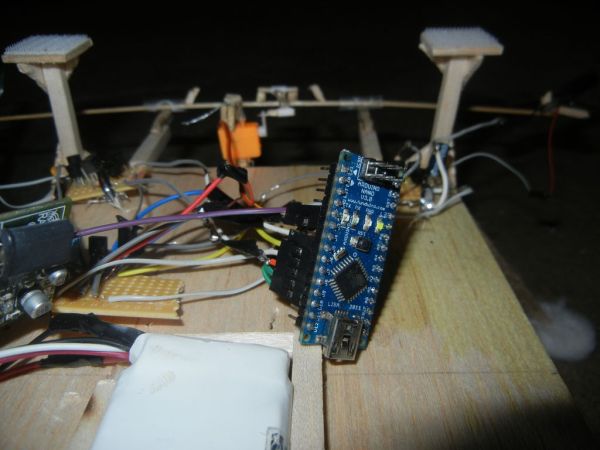
The blimp is controlled by a transmitter on the ground, operated by a human. There are three control levers– one for each motor, and one for the servo that rotates the axis they’re attached to. You push / pull to make the motors speed up or slow down; they’re controlled individually, it’s like driving a tank. You need two Arduinos – one for the transmitter and one on the blimp itself.
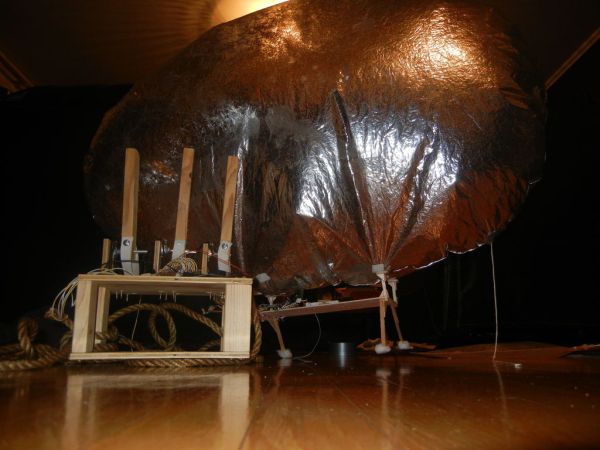
I generate the hydrogen through the reaction that occurs when aluminum, water, and lye (NaOH) are mixed.
I’ll go through the steps of building the transmitter first, then the blimp, and finally filling it up with gas.
If you persist, you too can rule the skies of your living room.
Ingredients:
Transmitter
– 1 Arduino Duemilanove but really any of them would work
-Ramsey TX433 Transmitter Module see next slide for details / alternatives
– 3 100k Ohm potentionmeters make sure they’re the kind that rotate, you’ll need to mount levers on them
– Assorted wires
– ~10 0.1″ pin headers— the standard kind that plug into Arduino sockets
– Elastic material (?) optional– I used strips of elastic that they put in pant waistbands to make them stretch
–Wood It comes from trees
–Screws
–Right-angle joints I’m not sure if that’s the right name–they’re the metal angles that let you screw together two pieces of wood at right angles
–9v battery clip
-project board( a small one)
-SPST switch for power i got mine from an ikea lamp
Blimp
– 1 Arduino Nano
-Ramsey RX433 Receiver Module see next slide for details / alternatives
– Blimp envelope i used this one from Plantraco– the same one the Blimpduino guys used
-Balsa Wood get it at Ace Hardware–I used a large flat piece plus assorted beams
–4 cotton balls for soft landings!
-1 7.4V 2 cell LiPo battery I got it here — you could absolutely use a smaller one
– 2 brushed motors w/ propellers I used these and their corresponding propellers ( stolen from the incredible Hummingblimp)
– 1 small servo I used a really tiny 2g digital servo, also from Hobbyking. I can’t find it on their website, but you could use anything with a similar low weight
-Project Board you’ll need three small pieces, each around an inch to 2 inches to a side
–4 3906 PNP transistors or similar
–10 3904 NPN transistors
–1 7805 voltage regulator
-1 100 uF capacitor
-power switch
-4x 100K ohm resistor
-2x 0.5 uF capacitor
-2 pin headers
-assorted wiring 12 of the wires will need 0.1″ socket endings to fit the Arduino’s pins; my Nano came with them. you may not be so lucky. Another note on wiring: it adds a lot of weight to the blimp and adds up quickly, so make it as short and light as possible. Wherever possible I used those really thin grey wires that run through data bus connectors inside computers.
-1 drinking straw , coffee straw
-4 pairs of velcro pads they’re about 1 sq. in, with adhesive on the back. I think they sell them at places like Staples
Hydrogen Production
-1 flask with a spout mine had a spout near that top that 1/4″ tubing fit over nicely
-1/4″ tubing If you’re not using some sort of buffer container, you’ll probably want at least three feet
-Lye I get mine in 500g containers at Ace. For exact amounts see H2 production step
-Aluminum Soda cans, heating ducts–use your imagination. You’ll need at least 120 grams for one fill
-Ice Lots and lots of ice
– Good gloves Lye can and will burn you, especially if you’re dumb like me. Use gloves that are intended for labs where dangerous chemicals are used.
-A rubber stopper or other means of completely sealing your flask
– A sealed catheter bag (optional) handy as a buffer and for controlling the flow of gas
Tools
–Soldering iron / solder Make sure it has a fine tip; grind it down if necessary.
–Drill press / hand drill for making the control levers
-Screwdriver
-Sandpaper
-A computer
– A saw
– x-acto hobby knife for cutting balsa
-Glue It mainly needs to join balsa to balsa; any wood glue you have will probably be fine.
– A good scale for measuring lye and aluminum–as well as your blimp.
–Wire cutters
-Multimeter
-oscilloscope optional but really really useful
Below I included a zip file which contains the schematics for the transmitter and receiver, as well as the Arduino sketches for each of them — those are the .ino’s. Please note that the schematics are, well, schematic, but they won’t actually map to the right parts if you try to create PCB’s from them. The eagle .lbr parts are not exact, they’re just diagrams that I used to help with the wiring, which I did by hand.
 blimp_files.zip32 KB
Step 1: A note about radios
I used a transmitter / receiver pair – the TX/RX 433 that my brother gave me that was languishing in our basement for several years. The modules are made by Ramsey electronics and are very poorly documented; I don’t know if Ramsey even makes them anymore. Fortunately, I do know that they’re very cheap — I think $5 — so buying a similar pair shouldn’t set you back to much. They operate on the 433 MHz band, which you don’t need a license for; be warned, though, that a lot of RC vehicles use this frequency which could lead to interference. It took me a really long time to get these radios to operate reliably without static, because there were some small pads on the underside that were soldered together when I found them, that weren’t supposed to be. An oscilloscope is invaluable for debugging radio problems.
This picture is of the transmitter module, soldered into a connector that I use to attach it to the controller. The radios, once you get them to work, are very simple to operate: you give them +5V and GND, and then whenever you pull the DATA pin on the transmitter high, the DATA pin on the receiver also goes to +5V. This is a very intuitive way of operating radios, and with some fine tuning of timing you can use these radios to send bytes reliably and quickly one-way. There are lots of cheap radio pairs you can buy that operate exactly like this, and with them you can use the exact same setup I did. If you feel like splurging, there are things like the Xbee which handle all of the messy timing issues for you–you give it data, and it spits it out on the other side. They are, however, very expensive.
[box color=”#985D00″ bg=”#FFF8CB” font=”verdana” fontsize=”14 ” radius=”20 ” border=”#985D12″ float=”right” head=”Major Components in Project” headbg=”#FFEB70″ headcolor=”#985D00″]Transmitter
– 1 Arduino Duemilanove but really any of them would work
-Ramsey TX433 Transmitter Module see next slide for details / alternatives
– 3 100k Ohm potentionmeters make sure they’re the kind that rotate, you’ll need to mount levers on them
– Assorted wires
– ~10 0.1″ pin headers— the standard kind that plug into Arduino sockets
– Elastic material (?) optional– I used strips of elastic that they put in pant waistbands to make them stretch
–Wood It comes from trees
–Screws
–Right-angle joints I’m not sure if that’s the right name–they’re the metal angles that let you screw together two pieces of wood at right angles
–9v battery clip
-project board( a small one)
-SPST switch for power i got mine from an ikea lamp
Blimp
– 1 Arduino Nano
-Ramsey RX433 Receiver Module see next slide for details / alternatives
– Blimp envelope i used this one from Plantraco– the same one the Blimpduino guys used
-Balsa Wood get it at Ace Hardware–I used a large flat piece plus assorted beams
–4 cotton balls for soft landings!
-1 7.4V 2 cell LiPo battery I got it here — you could absolutely use a smaller one
– 2 brushed motors w/ propellers I used these and their corresponding propellers ( stolen from the incredible Hummingblimp)
– 1 small servo I used a really tiny 2g digital servo, also from Hobbyking. I can’t find it on their website, but you could use anything with a similar low weight
-Project Board you’ll need three small pieces, each around an inch to 2 inches to a side
–4 3906 PNP transistors or similar
–10 3904 NPN transistors
–1 7805 voltage regulator
-1 100 uF capacitor
-power switch
-4x 100K ohm resistor
-2x 0.5 uF capacitor
-2 pin headers
-assorted wiring 12 of the wires will need 0.1″ socket endings to fit the Arduino’s pins; my Nano came with them. you may not be so lucky. Another note on wiring: it adds a lot of weight to the blimp and adds up quickly, so make it as short and light as possible. Wherever possible I used those really thin grey wires that run through data bus connectors inside computers.
-1 drinking straw , coffee straw
-4 pairs of velcro pads they’re about 1 sq. in, with adhesive on the back. I think they sell them at places like Staples
Hydrogen Production
-1 flask with a spout mine had a spout near that top that 1/4″ tubing fit over nicely
-1/4″ tubing If you’re not using some sort of buffer container, you’ll probably want at least three feet
-Lye I get mine in 500g containers at Ace. For exact amounts see H2 production step
-Aluminum Soda cans, heating ducts–use your imagination. You’ll need at least 120 grams for one fill
-Ice Lots and lots of ice
– Good gloves Lye can and will burn you, especially if you’re dumb like me. Use gloves that are intended for labs where dangerous chemicals are used.
-A rubber stopper or other means of completely sealing your flask
– A sealed catheter bag (optional) handy as a buffer and for controlling the flow of gas
Tools
–Soldering iron / solder Make sure it has a fine tip; grind it down if necessary.
–Drill press / hand drill for making the control levers
-Screwdriver
-Sandpaper
-A computer
– A saw
– x-acto hobby knife for cutting balsa
-Glue It mainly needs to join balsa to balsa; any wood glue you have will probably be fine.
– A good scale for measuring lye and aluminum–as well as your blimp.
–Wire cutters
-Multimeter
-oscilloscope optional but really really useful[/box]
For more detail: Arduino-Radio Controlled Hydrogen Blimp