Our NetPlay project is built on a standard breadboard.
In our previous Arduino masterclass we briefly introduced the Ethernet Shield an Arduino expansion board that adds Ethernet connectivity plus microSD card storage. We used that storage as the basis of a simple one-button digital audio player. It was functional but limited to 8-bit mono WAV files with a 19kHz sample rate. We also gave you the software to create those specific files. The audio quality was a bit better than AM radio level which is good enough for audiobook and basic music playback.
Several weeks on and we’re continually astounded by this little Arduino Uno board and just what software developers are able to scrape out of its 16MHz/8-bit ATMEG328P microcontroller.
Thanks to recent online work by Lutz Lisseck it’s now technically possible to push this little chip to pump out 16-bit stereo audio with a 31.25kHz sample rate – that’s basically FM radio – with little more than six resistors and a couple of capacitors. We’re going to combine the Ethernet Shield with Lisseck’s work to create a stereo 8-bit audio player that comes with its own web server we’re calling NetPlay.
Getting around limitations
The ‘SimpleSDAudio‘ library makes it possible to push the boundaries of the Arduino Uno and create a standalone project that leaves us gobsmacked.
Unfortunately it’s not possible to combine the Ethernet Shield’s Ethernet function with 16-bit stereo audio – basically there just aren’t enough pulse-width modulated (PWM) outputs to go around. However we’re taking one of Lisseck’s ‘SimpleSDAudio’ examples and creating a stereo 8-bit audio player with 15kHz bandwidth that you can control via a web browser on your PC tablet or smartphone.
The $10 Ethernet Shield you can grab from eBay contains a Wiznet W5100 Ethernet controller chip that comes with its own TCP/IP stack. Combined with its microSD card slot which supports up to 32GB of storage and it’s a seriously impressive little add-on board. It’s enough to create your own little web server that can dish up web pages to a browser on your PC laptop tablet or smartphone. More importantly it’s a web server you can use to control the outputs of the Arduino Uno and get it to do some seriously cool stuff.
WebLED
To give you a taste we’ll start this month with a simple example: turning an LED on and off over your home network. Using the Ethernet library bundled with the Arduino 1.0.3 IDE it’s reasonably simple to create a web server that waits for incoming traffic and spits out HTML code back to the client. Using an HTML form our little WebLED sketch accepts data back from the client to control the digital output D5 to switch an LED on and off.
Sure it’s pretty simple but use your imagination and some extra electronics and that LED could be a motor an emergency beacon a video recorder model railway coffee machine or a water pump. You’ve also got up to 21 digital outputs you can individually control via the web exponentially expanding the possibilities.
The circuit is about as simple as you can get: a 470ohm current-limiting resistor and an LED. Go through the ‘APC_06_WebLED.ino’ sketch (download it from apcmag.com/arduino.htm under Project 06) to see how it works. You need little more than half a dozen lines of code to create a web server. In fact most of the code (and there’s not much of it there) is setting up the web page and parsing the response from the client.
This will give you a taste not only for the possibilities but also for how our NetPlay stereo audio player works.
The $10 Arduino Ethernet Shield provides microSD storage Ethernet and built-in TCP/IP stack.
Building NetPlay
Building our NetPlay project isn’t much more complicated than building the WebLED. In fact it’s pretty similar to the last project’s audio player.
Again we’re using the Arduino’s PWM outputs to turn digitally sampled audio back into an analogue voltage approximation. These outputs appear at the D5 and D6 pins on the Ethernet shield. (The Shield doesn’t do anything at this point – these outputs are feed-throughs from the Arduino board underneath.)
These are fed through a resistor divider network which doubles as a basic first-order low-pass filter to knock off some of the PWM clock signal to just leave the audio signal we want. If you’ve built the audio player in the last project you can use the same 3.5mm stereo socket so there’s no more soldering required.
Once you’ve programmed the NetPlay sketch into the Arduino you can power the project by using a USB charger straight into the USB port of the Arduino board. Plug an Ethernet cable into the Ethernet Shield and the other end into a spare port on your ADSL modem/router. Plug the Ethernet cable in first and then apply the power as the project will be up and running within a second or two of that power being applied.
Creating NetPlay audio tracks
While NetPlay can’t handle standard 44.1kHz/16-bit stereo WAV files (well not yet at any rate) we’ve made decent progress from the previous audio project jumping from 19kHz sample rate/8-bit mono PCM audio playback to 31.25kHz/8-bit stereo PCM.
Thanks to Nyquist’s Theorem a 31.25kHz sample rate gives us a practical audio bandwidth of around 15kHz which as we said before is FM radio territory and much better than the 9kHz bandwidth we were talking about in the last project.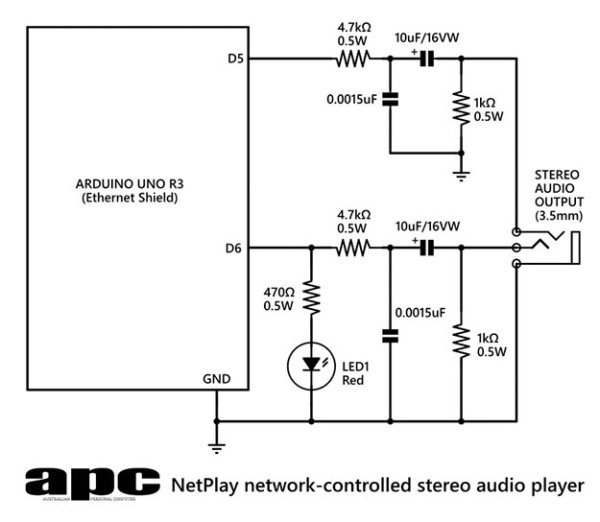 However we still need to create these files so we’ve modified the Auduino Windows audio converter app from the last project to create a NetPlay version – it’s a Windows registry key file that integrates the encoding commands straight into Windows Explorer’s right-click context menu. When activated it converts any audio file into NetPlay stereo format using a combination of FFmpeg and SoX open-source audio converters.
Like in the previous project we also need to keep the files in an 8.3 DOS file naming format and our NetPlay audio converter does this automatically.
Install the converter
To install the NetPlay audio converter simply launch the ‘installnetplay.reg’ registry key file. It adds a key for the menu text you’ll see on the right-click menu as well as the commands we want those menu options to carry out. The ‘uninstallnetplay.reg’ file removes those registry keys and the menu entries.
First grab the ‘netplay.zip’ file from dl.techlife.net/apps/netplay.zip. Unzip it to your C: drive where it will automatically create the C:netplay folder and dump the contents there.
We use a combination of FFmpeg to convert audio files into a standard 44.1kHz/16-bit stereo WAV format and feed that into SoX to create our 31.25kHz/8-bit stereo raw PCM files. FFmpeg can also create these files but unfortunately it has fixed steps in its audio bandwidth settings that are locked irrespective of the sample rate you choose. For example create a 19kHz audio file with FFmpeg and the audio bandwidth is no better than 7.5kHz – the same bandwidth you get when creating a 16kHz file. Do it with SoX and a 19kHz sampled file gets a bandwidth closer to 9kHz which sounds much better. The same thing happens creating a 31.25kHz sample rate audio file – you get 10kHz bandwidth with FFmpeg but 15kHz with SoX.
For more detail: Arduino Project 6: Web-controlled music player