Welcome to my solar charge controller tutorials series.I have posted two version of my PWM charge controller.If you are new to this please refer my earlier tutorial for understanding the basics of charge controller.
This is project is entered to ” 2015 Hackaday Prize “.If you want to support me and see the project in a new level,please follow and give skulls to my project @ hackaday.io.This will be very helpful for me.
1. Version-1
2. Version-2
This instructable will cover a project build for a Arduino based Solar MPPT charge controller.It has features like: LCD display,Led Indication,Wi Fi data logging and provision for charging different USB devices.It is equipped with various protections to protect the circuitry from abnormal condition.
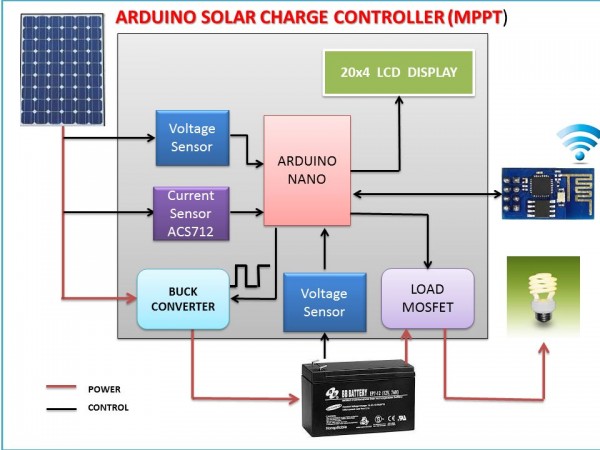
The microcontroller used is in this controller is Arduino Nano. This design is suitable for a 50W solar panel to charge a commonly used 12V lead acid battery. You can also use other Arduino board like Pro Mini,Micro and UNO.
Now a days the most advance solar charge controller available in the market is Maximum Power Point Tracking (MPPT).The MPPT controller is more sophisticated and more expensive.It has several advantages over the earlier charge controller.It is 30 to 40 % more efficient at low temperature.But making a MPPT charge controller is little bit complex in compare to PWM charge controller.It require some basic knowledge of power electronics.
I put a lot of effort to make it simple, so that any one can understand it easily.If you are aware about the basics of MPPT charge controller then skip the first few steps.
The Maximum Power Point Tracker (MPPT) circuit is based around a synchronous buck converter circuit..It steps the higher solar panel voltage down to the charging voltage of the battery. The Arduino tries to maximize the watts input from the solar panel by controlling the duty cycle to keep the solar panel operating at its Maximum Power Point.
For More Details: ARDUINO MPPT SOLAR CHARGE CONTROLLER (Version-3.0)