Story
This project was inspired by someone else who made an Arduino time-lapse dolly (suprise surprise). However that project was published some years back and I have lost the link to it. Of course time-lapse is not that exciting anymore but 5 years ago it was. The thing about this specific project that really got my attention was the fact that the camera not only could slide horizontally but could rotate as well, giving the time-lapse this other-worldly effect. I decided I had to make my own.
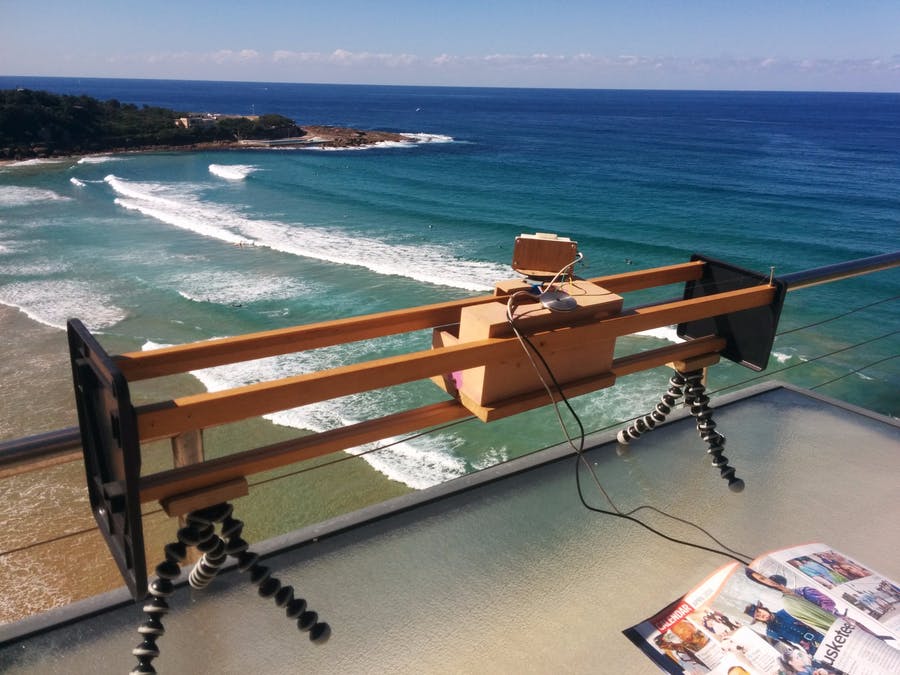
The problem was that this project I was trying to replicate used a custom-built rig, custom-made PCBs and an expensive DSL camera. Being a fan of cheap gear, that wasn’t gonna fly with me. And since the project’s creator was not very helpful (I don’t think he was much of an open-source kinda guy) I set out to build it from scratch… and cheaply!
I’d tinkered around with Arduino for some time, but this was a whole ‘nother level. I was going to have to really step up my game. But I don’t think I could have done it without a mentor who happened to live in my neighbourhood – he was a real electronics whiz. I would have been stuck in stage zero forever had he not pushed me to take that first step. And that first step was eBay!
Yes, that’s right… eBay. I didn’t need a genius to tell me that, but that’s what happened. See I’d been caught up trying to be a designer, spending hours thinking about how my invention ideally should look and function. I was stuck in the idea/dream phase. But really that’s pointless. Unless you’re James Cameron who can just invent the things he wants with his bazillion-dollar budget, start looking at what is actually available on the market and go from there.
So I started with the most expensive item – the camera! It needed to be Arduino-compatible and able to take a decent quality picture. I thought about using my iPhone camera and somehow triggering it using the audio jack, but that was too complicated. There were some Arduino cameras on the market but the image quality just wasn’t there. Eventually I came across the HackHD. A GoPro-quality camera with GPIO pins. Brilliant. Add to cart. Oh and don’t forget a class-10 SD card with plenty of storage for those high-def images. There goes a few hundred bucks. Then add to that a 3D-printed case which cost way more than it should have since all the measurements in the STL files had to be converted from imperial to metric (thanks America). Also 3D printers were still pretty new back in the early ’10s, and any service costs a fortune in Australia.
Next on the list – 2 stepper motors. One for translation (i.e. horizontal movement) and one for rotation. The 28BYJ-48 provides a surprising amount of grunt for only a couple bucks. And it was a lot of fun learning how steppers work. You have to activate the 4 pins in a sort of leap-frogging sequence – 1000 1100 0100 0110 etc – and iterating through to get it to turn. The Arduino I used had a built-in LED on each pin which was perfect for visualizing the stepping process. Now the rotation part was pretty straightforward, but what about translation? Again my mentor proved mighty helpful by sending me in search of a pulley, which you can see is that metallic disc thing in the photo.
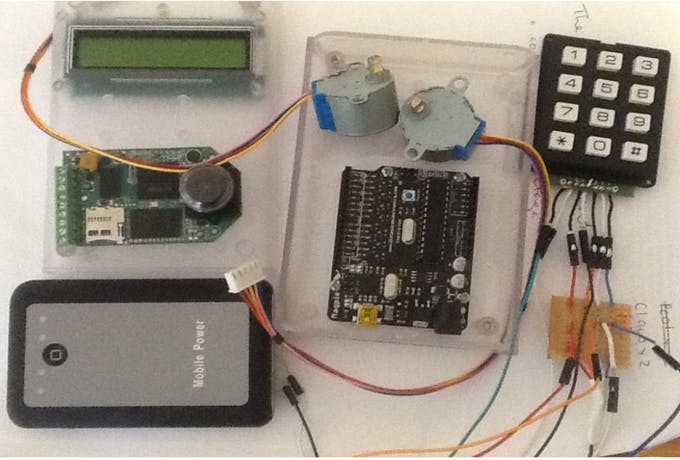
Then I needed a keypad and LCD so I could operate the device without a laptop. This was a pretty awesome crash course in basic UI; taking numerical inputs from the user, checking they are valid, storing them in memory, and if a mistake was made allow the user to start again. The 3 inputs I needed were:
- total duration in hours that the device would be in operation (I managed to get up to 12 hours max with the power bank I used)
- seconds between each image capture (the HackHD needed a minimum of 15 seconds to take a picture and save it to the SD card)
- total amount of rotation in degrees
- a final YES/NO confirmation before starting to take photos. If no, clear the inputs and start again.
And although not necessary it was a nice feature to also have the LCD display how far it had progressed as a percentage and how many hours were left once the photography had begun.
In some freakishly magical way, I used every single digital AND analog pin on the Arduino (except D0 which is reserved for serial RX). This wasn’t planned, it just conveniently turned out that way. Unfortunately I did not make a diagram as I was not really into documentation back then. But here’s the pinout:
- D1: Serial output to LCD display (Couldn’t receive data back from LCD as it only had 3 pins; VCC, RX, & GND)
- D2-D8: Keypad input (a hell of a lot of pins I know)
- D9-12: Translation stepper
- D13: LCD power supply (I needed to be able to reset the display hence couldn’t use the regular 5V pin)
- D14-17: Rotation stepper
- D18,19: Transmit/receive signals to/from camera
Keep in mind the analog pins can be used as digital pins, which are D14-19.
Read More: Arduino HackHD Time-Lapse Dolly