In my other 2 Arduino tutorials I have help new users to play tones and making 2 servos move with a mouse.
This time I will help you move the same 2 servos with a thumbstick.
And again I have surf the internet to see If there are tutorials that clear to understand specially for
the beginner Arduino user and, I have not found one.
To move 2 servos with the thumbstick is way easier and painless than using the mouse. And the reason for this is that some times the processing software does not work correct or there is a conflict between the arduino software and the processing software.
For all the connections I will use the bread board.
Dont forget to vote for me on the Arduino challenge!!!
Enjoy and have fun!!!! 😉
Step 1: Materials
Hardware: (bought @ Radioshack)
Arduino Board (I am using the UNO REV 3 version)
2 Parallax servos
Parallax Thumbstick (joystick)
Small Bread Board
Solderless Breadboard Jumper Wire
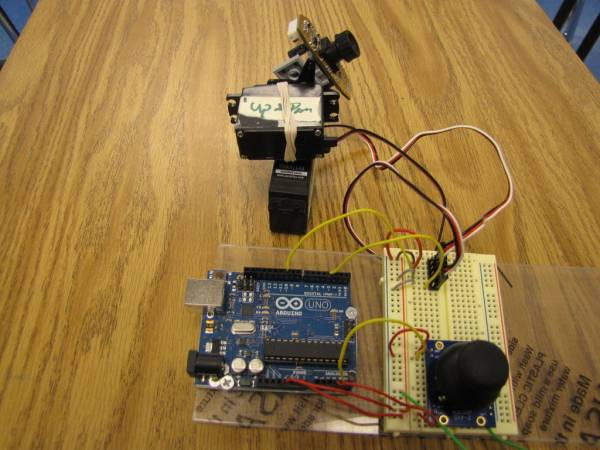
Something to see the 2 servos movement ( I am using a broken Web Cam and some legos not shown, for this tutorial)
Step 2: Connecting the servos
I will start with the 2 servos. (I am using the bread board to make all connections easy)
You can use the picture for more information.
Servo Up/Down Arduino Servo Right/Left Arduino
Red Cable———————— 5V Red Cable———————— 5V
Black Cable———————- GND Black Cable———————- GND
Yellow or White Cable——— PWM (4) Yellow or White Cable——— PWM (10)
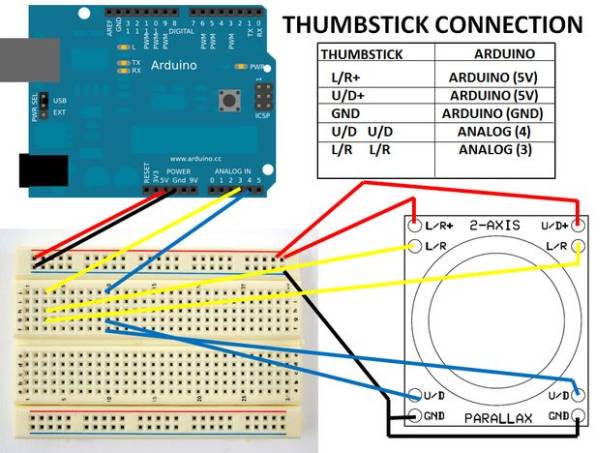
Step 3: Connecting the thumbstick (joystick)
The follwing connection will confuse you a little, just follow the picture.
Again using a bread board will make things easier.
1. The thumbstick has one U/R+ and one L/R+ this two connections will provide power to the joystick. Connect them to the Arduino 5V connection.
2. Also the joystick has two L/R connections and two U/D connections it is important that you connect both of them to the respective arduino pin.
3. Do the same to both GND connections on the joystick.
Thumbstick Arduino
L/R+ ———————- 5V
U/D+ ———————- 5V
GND GND ————— GND
U/D U/D —————— Analog 4
L/R L/R ——————- Analog 3
NOTE: Always double check the connections!!!
For more detail: Arduino + 2 Servos + Thumbstick (joystick)