This project is a part of experiments done while doing an artist in residence at Instructables. You can see the other projects here.
You can use bit-shifting as an alternative way of creating “music”. This principle enables you to squeeze as much processing power as possible out of the Arduino while creating novel and interesting effects. The challenge lies in composing through bitshifting. This is an example of how such composition could look like:
OCR0A = ((-t&4095)*(255&t*(t&t>>13))>>12)+(127&t*(234&t>>8&t>>3)>>(3&t>>14)); // by tejeez
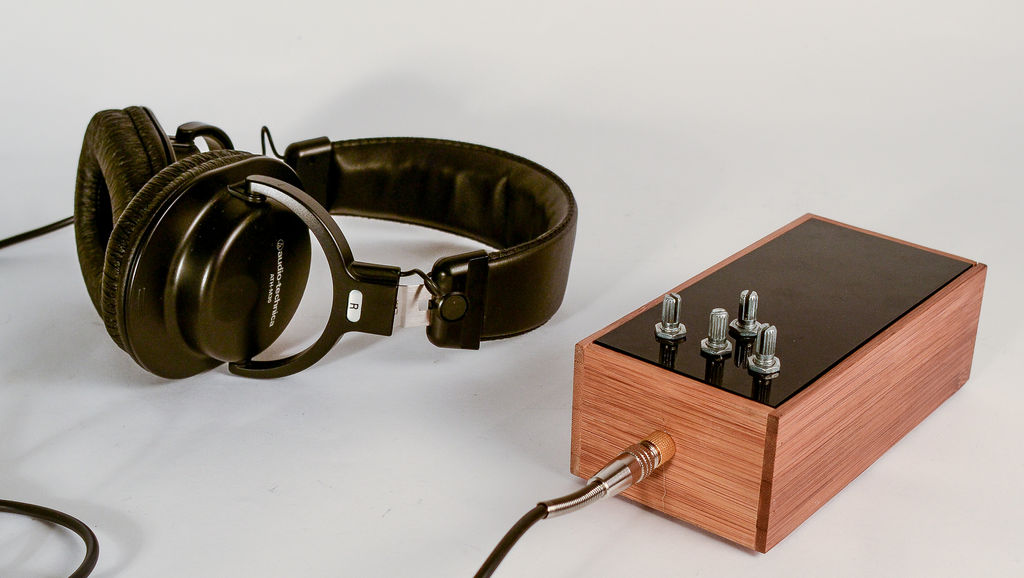
I have made this box to explore the consequences of changing the different parameters in the pieces. This enables me to see how they effect the overall sound qualities and enables me to prototype new compositions. The different parameters are changed through the 4 potentiometers. One potentiometer to choose the current algorithm and the other potentiometers to change the parameters of it. Although the sounds can be considered crude, it is quite engaging to experiment and play with.
Credits:
This project is based on Duane Banks code. He does a good job on crediting his sources, I want to embed them here for reference: The original tunes were produced by Viznut and by others in response to his original blog post here – The original Arduino port was completed by Arduino Forum user Stimmer. Duane Banks used the synth schematic found in this instructable plus a customized version of the timing functions found in the code. I adopted his code and modified the different algorithms so you can play around with their parameters and get a sense of how it affects the sounds.
Step 1: Components needed
You will need to following components:
- Arduino board
- Prototyping shield.
- Pin headers.
- 4 10kOhm potentiometers.
- 2.2k Resistor.
- 100n Capacitor.
- 100u Capacitor.
- Jack connector.
- A pair of computer speakers.
If you want to make the enclosure you would need:
- 3mm black acrylic.
- A wooden box (I got mine from the container store in SF).
I used a lasercutter to cut the acrylic, you could use a piece of plywood and cut the 4 holes manually.
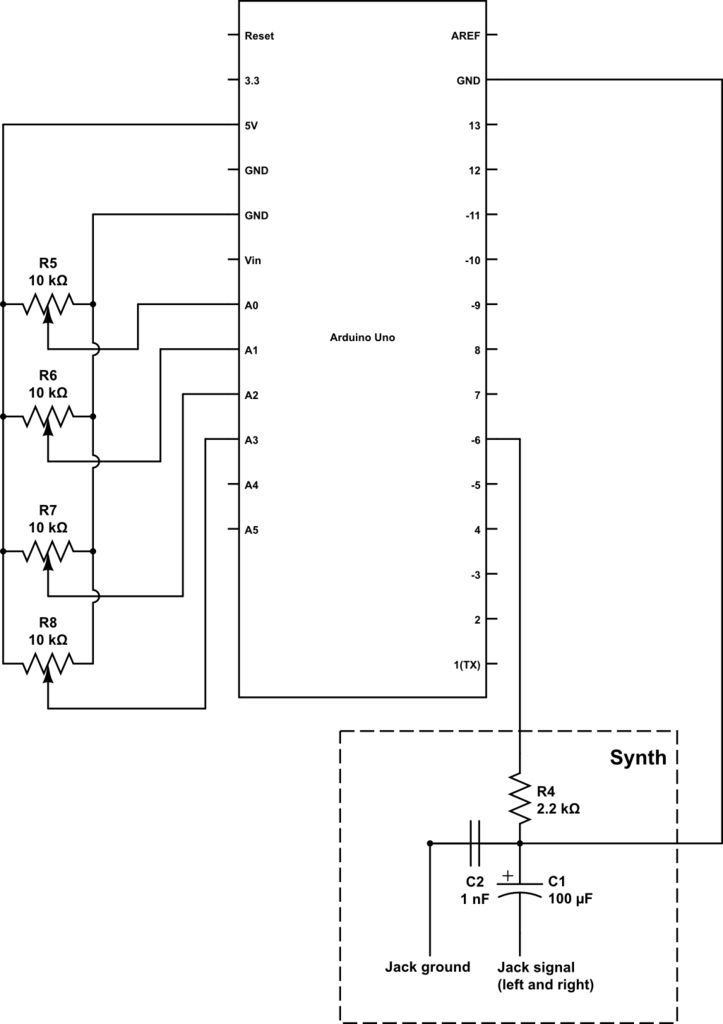
Step 2: Making the circuit
Wiring it up is pretty much according to the diagram. If you would like to experiment with wiring the sound circuit up on a breadboard you can find pretty detailed pictures and instructions in this instructable.
The potmeters should be connected with 5v on one side and Ground on the other. The middle pin should be connected individually to each analog in on the Arduino.
Step 3: Uploading the code
There are lots of tutorials which already explains how to program an Arduino and they do a much better job than I could. So I will just give you a couple of links:
- http://arduino.cc/en/Guide/HomePage
- http://www.youtube.com/watch?v=4HqXAmV_Ock
- http://www.ladyada.net/learn/arduino/lesson1.html
The 3 things that usually cause trouble:
- On windows you have to install the proper drivers (sometimes also on mac).
- Remember to select the right serial port in the gui.
- Remember to select the right board in the gui.
Below are the simplified steps to uploading the code to your Arduino board:
- Download Arduino: www.arduino.cc
- Connect the Arduino board to the computer via usb.
- Download the code from here.
- Move the libraries in the libraries folder into your Arduino libraries folder. If you do not know how to this please refer to this toturial.
- Upload the code to the Arduino board.
Step 4: Debug with Guino
I am using Guino to visualize the code. Guino is a new program to visualize data coming from the Arduino board and it enables you to manipulate it on the fly.
You can find the the Instructable here on how to use it. It is really simple to get up and running and it enables you to control some of the internal values. Download the program from here and run the program (you have already installed the libraries in the previous steps).
For more detail: Construct An Algorithmic noise machine Using Arduino