Overview:
I’ve often thought that a lighthouse would make a great project for an Arduino, and so I decided to give it a try using one of the local lighthouses here in Erie, Pennsylvania as inspiration. I chose the North Pierhead Lighthouse that guards the entrance to Presque Isle Bay. The model features a white LED beacon, a rotating parabolic reflector, a foghorn, and a flickering red LED representing the keeper’s fireplace. The video above shows the lighthouse in action. (You may have to turn up the volume to hear the foghorn.)

History:
Native American legend has it that the Great Spirit led the Erie tribe to the area now known as Erie, Pennsylvania because of its abundant game, plentiful fresh water and cool breezes. Legend also holds that members of the Erie tribe once ventured out into Lake Erie to discover where the sun set in the evening. Angered by this intrusion, the Spirit of the Lake raised a storm on the waters. To protect the Erie as they made their way back to shore, the Great Spirit stretched his left arm out into the lake to shelter them. The Great Spirit’s arm remained in the lake forming the peninsula now known as Presque Isle.
The peninsula encloses Presque Isle Bay with a narrow channel leading out into Lake Erie. This channel is guarded by the North Pierhead Lighthouse, first constructed in 1857. The current configuration of the structure stands about 10 meters (34 feet) high. The model here will be constructed at a scale of 5cm = 1m.
Step 1: List of Materials
The materials used in the project are:
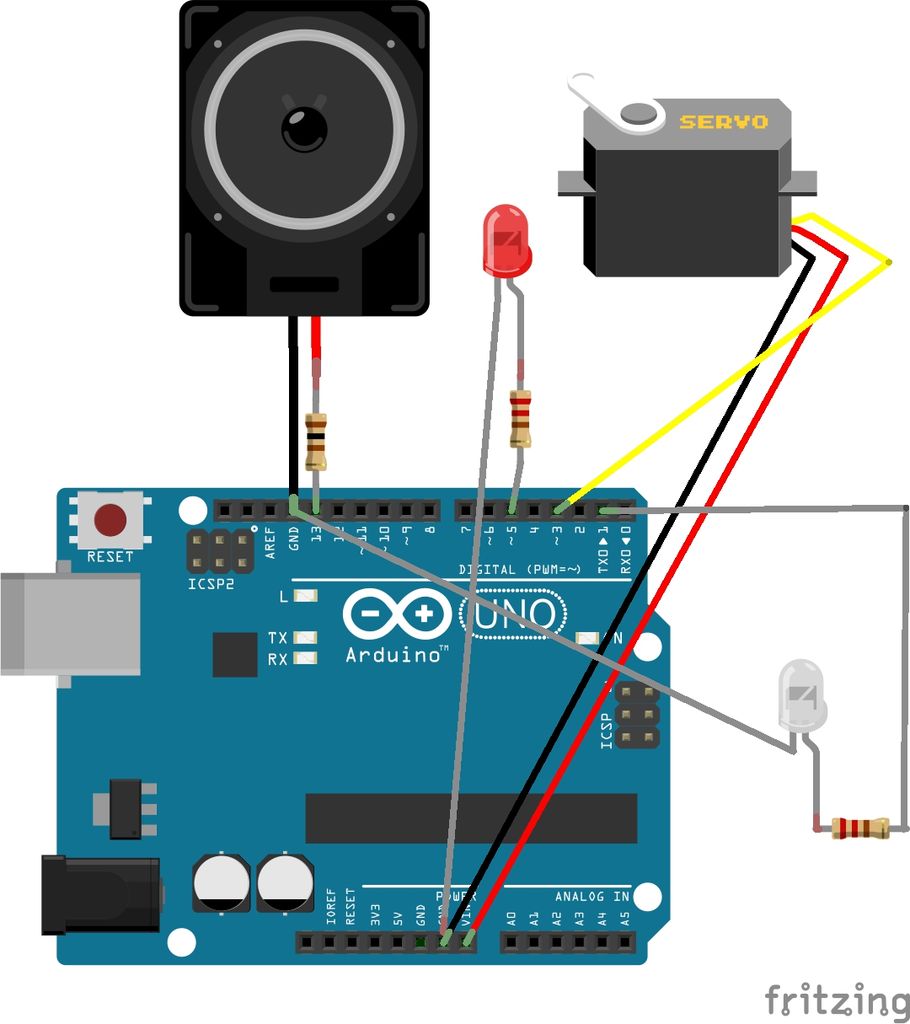
- Arduino board (I used a Duemilanove, but any board will work)
- Arduino proto shield or sensor shield (optional)
- Six 1.5 volt batties (I used AA)
- Six cell battery holder with barrel plug
- White LED
- Red LED
- 8 ohm speaker
- Continuous rotation servo
- Parabolic reflector (I used one from a $3 flashlight)
- Thin, three-ply wood (about four square feet)
- Saw
- Wood glue
- Hot glue/hot glue gun
- GEM-TAC clear drying glue
- Various screws, nuts and standoffs
Step 2: Cupola
The cupola was the most challenging part of the model. The hexagonal roof is made from six isosceles triangles, each with a base of 4cm. See Figure 2-2. I intended for the roof to have a height of 1cm at the center, which meant that the other two sides of each triangle should have a length of about 5.745cm. My cutting and piecing must have been off as the actual roof ended up with a height of about 2cm.
This worked out well, as this configuration looked more like the actual cupola roof. I cannot change the angle of the blade on my small band saw, so I had to miter the edges of the triangles with a Dremel rotary tool. Used hot glue instead of wood glue to piece the roof together since, when it is dry, there is more “give” in the hot glue. I needed this since I had to “massage” the roof a little bit to get it to sit properly. See Figure 2-3
The lower portion of the cupola is made from six rectangles each with a base of 4cm and a height of 5cm. Again, I mitered the sides and used hot glue to piece them together. The cupola has six posts that are 3mm wide and 5cm long. These are hot glued into the six corners of the hexagon with 4cm extending above the lower portion to hold the roof. The spire on top is made from a fake pearl with a toothpick stuck trough it. See Figure 2-4.
Step 3: Lower Sections
The middle and bottom sections of the structure are much less difficult. The middle section consists of four rectangular pieces of width 10.3cm and height 12.3cm fitted together. I used wood glue on these sections as the rectangular geometry was much more straightforward (and much more forgiving) than the hexagonal cupola. See Figure 3-2. The roof of the middle section/floor of the cupola is a 11.3cm by 11.3cm square. I cut a hole in this square to mount the servo and pass wiring from the cupola to the lower sections. The hole has to be offset so that the rotor of the servo is in the exact middle of the square. See Figure 3-3 and also Step 4. I used plastic mesh for the fence around the cupola and secured it with clear drying glue. See Figure 3-4.
The bottom section consists of four trapezoids with bottom width 15.7cm, top width 10.3cm and angled sides of 23.1cm. See Figure 3-5. There are several round porthole type windows on the structure, which I drilled with a 3/8 inch drill bit. There are also smaller holes on one side for the speaker. See Figure 3-6.
Step 4: Electronic Components
I disassembled a cheap LED flashlight to get both the white LED and the parabolic reflector (5cm in diameter). I drilled a small hole on the outer edge of the reflector so that it could be attached to the servo horn with some standoffs and screws. A little hot glue behind the anchor screw was necessary to get the reflector to sit vertically. See Figure 4-2. I used a 3.5cm standoff and another screw to attach the servo horn. See Figure 4-3. Three screws and nuts were used to secure the speaker to the bottom section. Wires and hot glue were used to set the LEDs in place.
Step 5: Circuit Diagram
For more detail: Arduino Controlled Lighthouse