Polydexter was the introductory project in the Creative Architecture Machines (CAM) advanced options architecture studio at the California College of the Arts (CCA), taught by Jason Kelly Johnson (co-founder of Future Cities Lab) and Michael Shiloh. Parts developed for this robot would go on to become integral in the second project of the studio, our walking 3D printer Geoweaver, which can also be found here on Instructables. Other projects from the studio, as well as their accompanying Instructables, can be found at our Youtube channel.
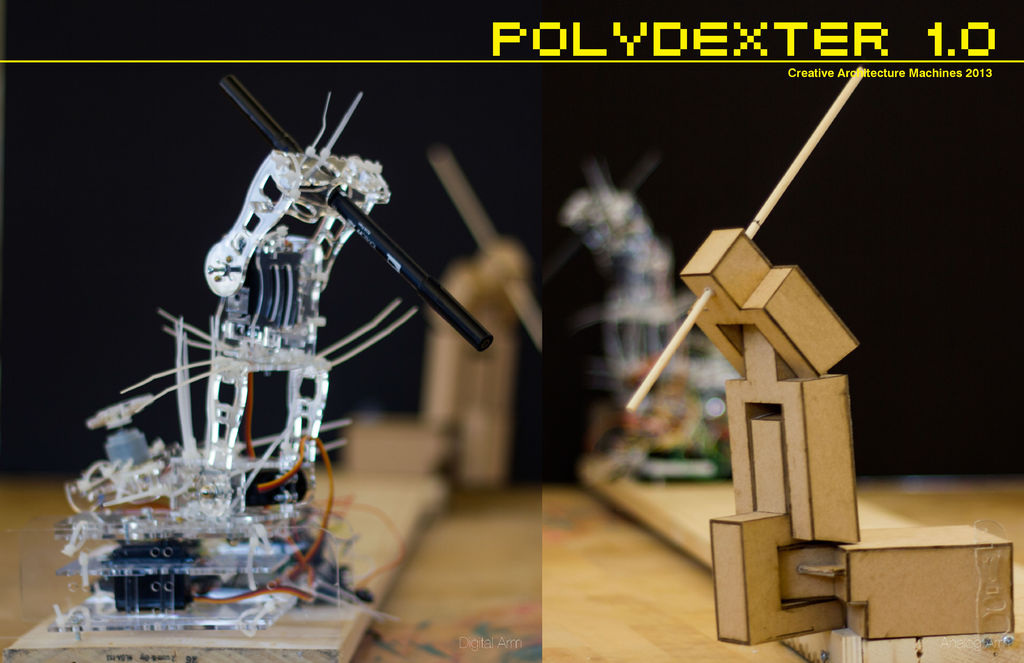
Polydexter, designed and fabricated by Jia Wu and I, is a remote human-sensing Arduino-controlled robotic translation arm. Utilizing three axes of control, movements recorded by the input (analog) arm are augmented by the output (digital) arm, and produce a drawing. We enhanced the sense of remote control by hiding all of the electronics of the input arm and wrapped it in hand-glued chipboard while running all of the wiring beneath a 2×6 piece of lumber. It’s hard to capture exactly how much fun Polydexter is to play with; appropriately, the robot required us humans to relearn how to write in order to get it’s translations right (though Jia got very good at it and could write Chinese characters after enough practice!).
When we began this project we had no knowledge of Arduino or robotics and this was a great introduction to simple coding, electronics wiring, and the art of mechanical design. This is a simple but addictive toy to play with and is a great introduction to robot making. We still have fun messing around with it and are looking forward to hooking it up to Firefly to see how bringing in different machine vision or data sets can affect drawings. We extrapolated a lot of possible future uses: teaching people to write in different languages, translating/editing/censoring written messages between countries, or scaled up, translating a stroke of your hand into built space using precision brick laying or material extrusion.
Edit for Epilog Challenge: If we had access to a personal laser cutter we would prototype the begeezus out of this robot. We have many plans for new updates and tweaks that would incorporate much more refined, laser engraved parts out of acrylic and possibly Yupo.
Anyway, let’s get Instructablesing.
Step 1: Materials and Equipment
Cut Materials:
- 1/8″ acrylic, ~110 square inches
- 1/16″ chipboard, ~300 square inches
- 2×6 lumber, ~3′-0″ long
- Zip ties, ~30
- Screws for connecting servos to acrylic
Electronics:
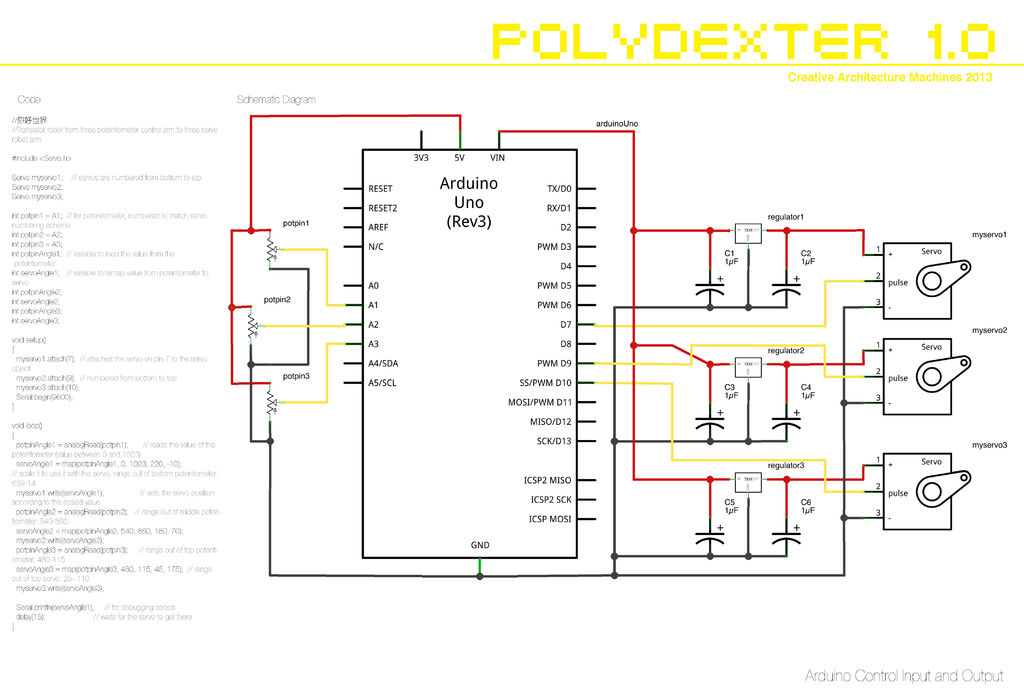
- 3 potentiometers
- 3 servo motors
- Arduino Uno
- breadboard (or prototyping board)
- jumper wire
Equipment:
- soldering iron
- screwdrivers
- wirestripper
For a list of used electronics, please refer to these custom made CAM kits from Oddwires.
Step 2: Laser Cut Parts
A laser cutter isn’t required for the chipboard parts but it makes things much easier. Please rearrange the line work to fit your machine, and though we didn’t want to mark the parts with numbering we color coded the parts to match to the assembly drawings.
 laser cut file for Digital Arm.dxf
Step 3: Build Analog (Chipboard) Arm
The analog arm basically glues together along the edges. We used simple tacky glue and the connections were strong. The colors in the cut DXF file correspond to the drawing above.
TIP: Piece it together from the inner layers out, adding the screws, washers and lock nuts next, and then gluing the outer layers on.
Step 4: Build Digital (Acrylic) Arm
The small holes in the acrylic are designed for use with zip ties. The major gear translates the 180 degree motion of the servo motor into 360 degrees. We used metal washers to smooth the friction between the acrylic pieces but you can also cut your own PETG washers. The colors in the cut DXF file correspond to the drawing above.
For more detail: Polydexter: Arduino Robotic Translation Arm