Have an old toy car? I hacked mine using Arduino and an H bridge circuit to control the motors, used my Sony Z1 Android phone to control it with the recent 1Sheeld I got from Kickstarter.
I thought to use the Gyroscope sensor in to drive it but after experimenting, I used the gravity sensor instead, will explain in details why later in step 5.

Step 1: Required stuff
Required components:
1- Android smartphone / tablet ( x1)
2- Arduino uno ( x1) $26
3- 1Sheeld ( x1) $60
4-Cheap RC car ( x1) (you can get it from a toy store)
5- Connectors male female (x4) $5.45 per 40 set
6- H bridge ( x1) $9.51
7– Mediabridge USB cable (x1) $7.99
8- Male Dc Plug (x1) $2
Required tools:
1- Screwdriver
2- Wire cutter
Step 2: Prepare RC car
Here, you can find the steps for dis-assembly of the RC car:
1- Remove the bottom base screw of the RC car.
2- Remove the upper part.
3- Cut the wires from the original car PCB.
4- Remove the motor casing.
5- Cut the motor wires (as they are too short in my case).
6- Solder new ones (cut the jumper from the female side to prepare the wire for soldering).
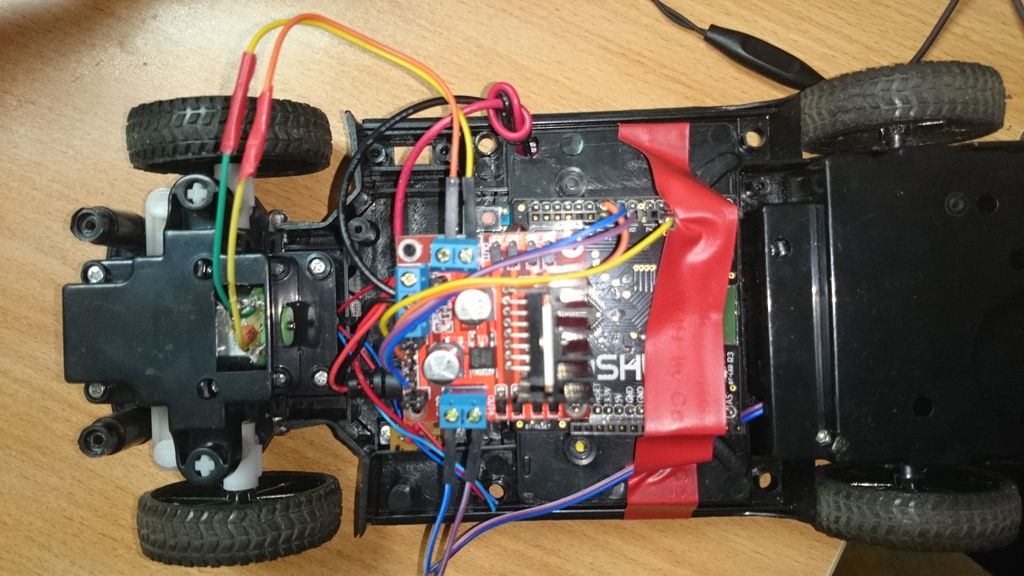
Step 3: Connect H bridge
1- Connect the H bridge board with the motors.
Connect the motors terminal in H bridge where every motor take two exit
Front motor
Ch 1 to yellow cable.
Ch 2 to orange cable.
Rear motor
Ch 3 to Purple cable.
Ch 4 to blue cable.
2- Connect the battery
Connect the positive pole of the car battery to the H bridge where indicated on board “red cable”.
Connect the negative pole of the car battery to H bridge where indicated on board “black cable”.
3- Connect the male power plugs
Red with red and black with black.
Step 4: Arduino,1Sheeld and H bridge
1-Connect 1Sheeld on top of your Arduino board.
2-Connect the H bridge with 1Sheeld
Connect IN 1 in h bridge “yellow cable in picture ” to pin 6 in 1Sheeld.
Connect IN 2 in h bridge “orange cable in picture” to pin 11 in 1Sheeld.
Connect IN 3 in h bridge “Purple cable in picture “to pin 9 in 1Sheeld.
Connect IN 4 in h bridge “blue cable in picture” to pin 10 in 1Sheeld.
For more detail: Hacking my RC Car using Arduino and Android Smart Phone