Ever wanted to visualize your brain activity in real-time? Move an object on a screen with your mind? EEG devices are fantastic fun and allow you to do such things!
This tutorial will show you how to make an illumino: a recreational EEG hat that turns your brainwaves into light. I always wanted my own simple EEG wearable to play with, especially one that was indiscernible to everyone else. I couldn´t find exactly what I was looking for, so I made one, using Neurosky’s ThinkGear™ ASIC Module and an Arduino. To make it artistically creative and interactive, I added RGB LEDs hidden inside a white pompom, allowing the wearer to visualize their brain activity in real-time as an array of colorful light.
Although there´s room for a lot of improvements, it´s a pretty decent start. All electronics are discretely hidden, so it looks and feels as though you’re just wearing a cool & comfy beanie. Colors and brightness of the LEDs are manually selectable/adjustable with the small button switch. The Arduino software is accessible via a USB slot. The hat also works fine simply as an EEG device, if you just want to connect it to a computer without a light show. You can use Processing to create beautiful real-time moving graphical visualizations of your brain activity (code included to get you started).
Enjoy building your illumino! Leave a comment at the end with suggestions+feedback 🙂 Oh and if you find a bug in the software, or you´d like further explanations/photos for something, let me know!
For those of you who want to stay updated on upcoming interactive art installations I am working on with illumino, I made a website with a mailing list: www.illumino.io.
Step 1: A bit of science (skip this to make illumino directly)
How can we measure brain activity using a wearable hat?
Electroencephalography (EEG) is the measurement of neural activity through sensors (electrodes) placed against the scalp. These electrodes can measure the tiny electrical changes that occur when neurons fire. By amplifying these signals through a computer, we can observe a person’s brain activity in real-time.
Great video that explains the fundamentals of EEG (University of Waterloo):
Cleaning up the signal
When a brain signal is recorded from a person’s head using EEG sensors, it picks up a bunch of things other than just brain signals: muscle and eye movements from the person, and especially interference noise from that old refrigerator in the corner of the lab. Before the brain signal can be interpreted, we need to clean it up or “pre-process” it: filter out the noise, remove all the muscle, eye movement and blinking from the signal.
We then apply mathematical transformations to categorize the brainwaves by frequency, because there’s not just one existing type of brainwave. Brainwave oscillations can be slower or faster, and can be classified into “frequency bands”: Delta (0-4Hz), Theta (~4-8Hz), Alpha (~8-12Hz), Beta (~12-30Hz) and Gamma (>30Hz).
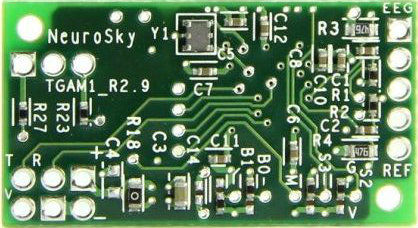
With most research experiments, this raw EEG signal is recorded, and the “cleaning up” is done manually after the experiments, using special software. Commercial EEG headsets contain chips that do some signal cleaning in real-time. This tutorial uses Neurosky’s ThinkGear™ PCB, which filters out HF noise and muscle movements from the brain signals in real-time, and applies custom algorithms for “relaxation” and “attention” detection. The output from the PCB is then sent to the Arduino to be transformed into light.
What does this mean?
Now that we have a cleaned up brain signal, we can start to interpret it. Changes over time in the amount of these frequency bands reveal important information about the mental states of a person, for instance if they are asleep, concentrating, relaxing, etc (rough explanation). Certain brain signals can also be indicative of clinical conditions (epileptic seizures or sleep disorders). In a typical research lab experiment, the EEG is recorded and then averaged for each participant (over many, many trials), for a large group of participants. Scientists study recurring patterns in neural responses to visual/auditory/multisensory stimuli to understand how the brain processes and encodes information. For example: can we predict, based on the EEG of someone, whether they are watching a comedy or a horror film?
Brain-computer interfaces
Recurring patterns in brain activity can also be used to write algorithms for developing brain-computer interfaces (BCI). A brain computer interface is a computer system that allows a person to control an object using only their brain. Perhaps the most widely used EEG signal in developing BCIs is the P300 event related potential (ERP): a positive change in voltage that roughly starts around 250ms after stimulus onset. There are a few spelling system that use the P300 to allow people to communicate with their brainwaves, however they require training and they don’t allow us to simply think of words see these appear on a computer screen. The easiest signals to use for BCI object maneuvering would have to be facial muscle activity detected by sensors placed in the frontal area of the head, as these signals that are easily recognizable (left/right eye movements, blinking, jaw movements). There’s a lot of exciting progress being done in BCI research.
Research EEG vs. portable consumer EEG headsets
EEG equipment used in research labs and hospitals provide robust, high quality EEG recordings. Unfortunately, the wires connecting the headset to amplifiers restrict the mobility of the wearer. Wireless EEG headsets are easy to put on and nowadays many use “dry” electrodes (electrodes that don’t require gooey gel or saline solution). So far, the main limitation of these portable devices is the spatial & temporal resolution (1-14 electrodes; average sampling rate 128 Hz), which is nowhere near as good as that of research EEG headsets (32-256 electrodes; sampling rates up to 20 kHz). What this means is that it is much more difficult to extract and accurately map the source of a brain signal with a portable device than it is with advanced equipment. Also, in a portable device the signal is more noisy as there’s a lot more muscle activity due to the person moving around (even though a lot of this noise is filtered out in the pre-processing of the signal). Nevertheless, portable EEG can be used in many useful ways, such as developing simple non-invasive brain computer interfaces, entertainment (gaming), some clinical practices (neurofeedback, epilepsy). Wireless EEG headsets have only just begun to emerge on the market in the last few years, and rapid advances in technology are constantly improving these systems.
Step 2: Materials
Together, all materials and electrical components should cost you around $140, which is relatively cheap for a decent quality (& super comfy/discreet) one-electrode EEG wearable.
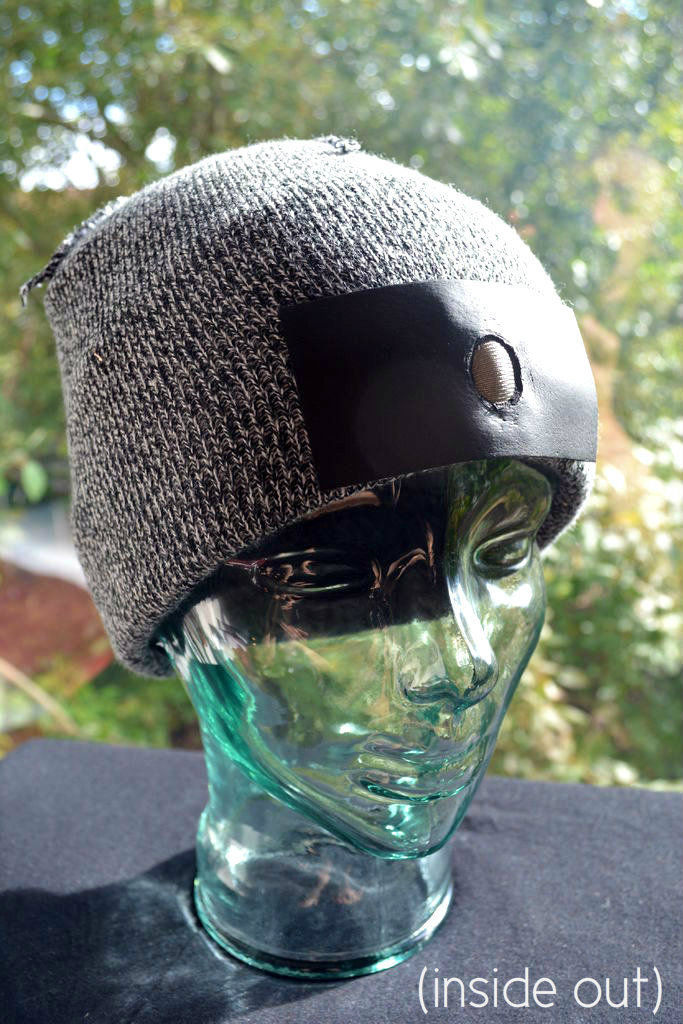
- A double-layer hat with a wide foldover flap. We simply hide all the electronics in the fold. The pompom wires will be run through the double layer of the hat.
- Weather stripping adhesive tape, wide (~1.5 inch)
- Thread, and a needle to sew with (or fabric glue)
- Kapton tape or normal isolating electrical tape
- Heatshrink for your wires
- A 3.7V lithium ion battery (500 mAh) (less than this will heat too much, more than this is bulky)
- JST 2-pin cable
- JST battery extension
- Thin and flexible but sturdy wires (~0.5mm).
- Two shielded wires for the electrodes (RG174 wires are fine)
- 4-pin connectors
- A tactile pushbutton switches with 2 leads, for the ¨Mode switch¨ (switch that allows you to select colors and brightness)
- Conductive fabric
- High density foam, to make the electrode bump
- Copper tape
- Solder
- A soldering iron
- White thick yarn for the pompom (preferable white for light visibility)
- Thin, flexible copper sheet
- an ECG snap lead (for the reference electrode).
- Small adhesive transparent one-time use gel electrodes with snap, for the reference electrode
- Also useful: a multimeter, a wire stripper
Step 3: Electrical components
Brain signals are detected by the EEG electrode attached on the forehead area, on the inside of the hat. Dissimulated in the fold of the outside of the hat are several small components: a lithium battery, a JST breakout board, and Neurosky’s Thinkgear™ASIC PCB. You can buy the TGAM out of discontinued products on the web. The Neurosky ASIC is a component present in Neurosky’s commercial EEG headsets. This PCB does several things such as amplifiy and pre-process the incoming neural data (filters, FFTs). The TGAM specs can be found in the attached pdf. Basically, it outputs real-time estimated amounts of attention, of relaxation, and power of different frequency bands, using custom algorithms (I don’t know the details of these calculations). If you wish to use your illumino device to develop your own simple brain-computer interface applications other than just generate light or make interactive graphical visualizations, I suggest you take the time to really understand how the Neurosky TGAM works.
The Neurosky TGAM is connected to an Arduino microcontroller, which contains the custom software for illumino (see step 11). Attached to the Arduino is a USB adapter, to allow access to the software easily from a computer. I use the Tinycircuits mini FTDI USB adapter and TinyLily Arduino. Alternatively, you can use an Arduino that has an onboard USB slot, however I like the TinyLily because its micro size is very handy. If you´re going to implement bluetooth, you´ll need an Arduino with more RAM.
Since illumino is programmed to turn the real-time brain signals into colorful light, 4 RGB LEDs are connected to the Arduino. I use Adafruit’s Flora Neopixel LEDs, but any small RGB LEDs will do the trick.
 TGAM Datasheet.pdf
Step 4: EEG electrode
An EEG device has two types of electrodes: the EEG electrode, which records brain signal from the scalp, and the reference electrode, which informs the EEG device what “no brain signal” resembles (baseline). This is the most important step of the tutorial: if you build the electrodes carelessly, your signal will be terrible, and you will be picking up a lot of noise and interference. Take the time to refine the design if necessary.
For more detail: Illumino: EEG hat with Arduino turns brain activity into light