This Arduino based project was designed to solve a recurring problem for my hearing impaired wife. Our laundry room is located remotely from our living area. If our laundry has finished washing and is not removed in time, it can sour or even get moldy. If our laundry has finished drying and is not removed promptly, then severe wrinkling occurs. My solution is to sense when the washer or dryer has turned off and then send a signal to a visual alarm inside our living space to alert my wife when the laundry is done. This project can be used with any 110 VAC washer or dryer or other appliance that needs to be monitored.
Step 1: The modules
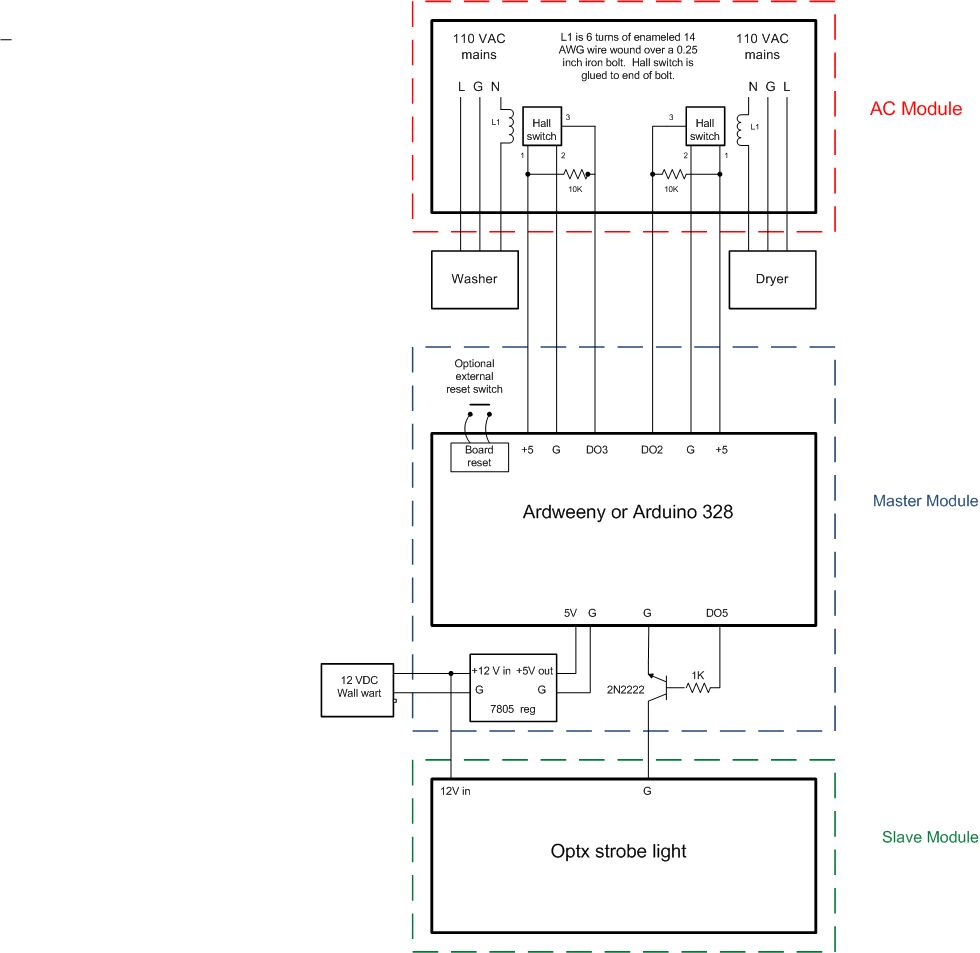
My solution consists of three physical modules:
1.The AC module provides 120 VAC to the washer and dryer and senses when either one is drawing current. When the current stops, a signal is sent to the master module. The AC module is a common 6 way receptacle that is modified for this project.
2.The Arduino based master module is located near the AC module in the laundry. It reads the current sensor inputs then decides when to turn the alarm in the slave module on or off. It also contains a voltage regulator and driver for the slave module.
3. The remotely located slave module is a flashing strobe light located in the living space. Our experience is that a strobe light was much more noticeable and less disturbing than an audible
Step 2: Building the AC module
CAUTION ! Never work on a live circuit. Carefully route and insulate all wiring.
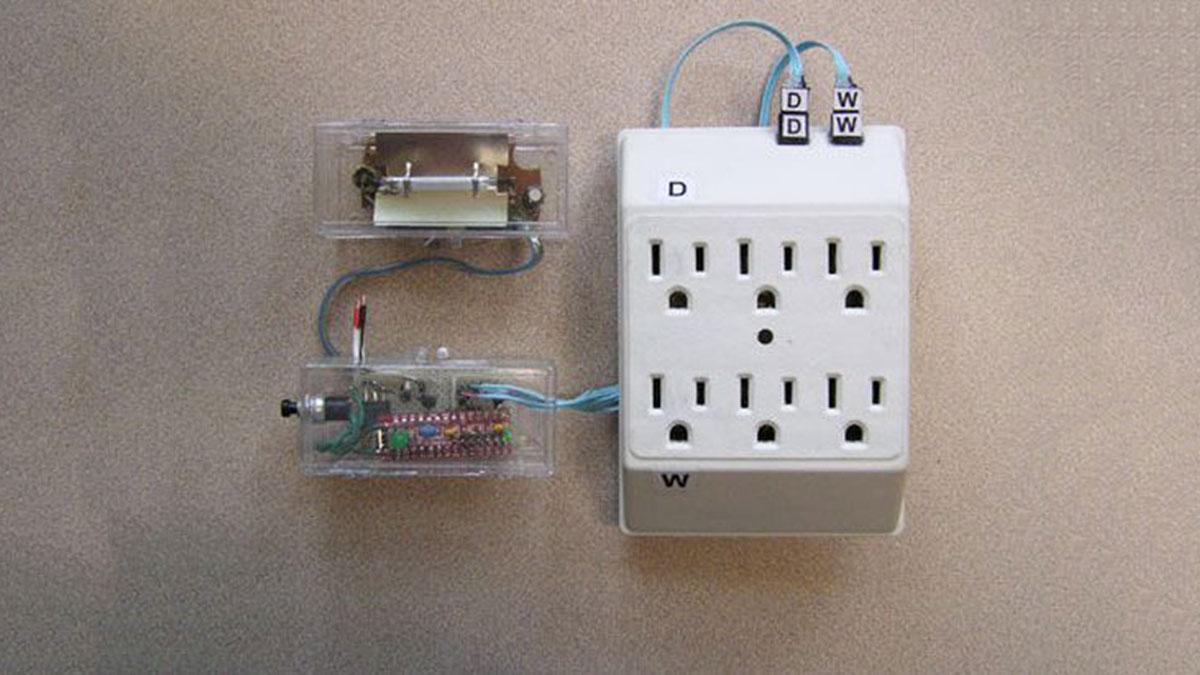
The AC module consists of a six way AC receptacle that has been modified with a Hall effect sensor mounted on two of the six available receptacles. Any current draw of more than 4 amps produces a 5VDC, 60 Hz square wave that can be read by the master module. Cut a small break in the neutral lead of the two receptacle neutral wires that you want to use for the washer and dryer. Cut a quarter inch iron bolt to about a half inch length. Wrap about 6 turns of #14 enameled copper wire around the bolt and solder the ends to each end of the break in the receptacle neutral. Glue the hall switch with to the end of the bolt with the beveled side toward the bolt. Solder the resistor between the outside leads of the hall switch. See schematic and photo for details. Make sure all wiring is separated and insulated properly.
The Hall switch also provides complete isolation from AC line voltages.
Step 3: Building the master module
Building this module will depend on what Arduino 328 based MCU you want to use. I chose the Ardweeny because it was cheap and small and I had two on hand. I mounted components on a perf board from my junk box. I used hobby servo interconnect cables between modules. The Ardweeny requires a 5VDC supply, other Arduinos may not. See schematic and photo for details.
Step 4: Building the slave module
Building the slave module:
I used a 12 VDC automotive strobe light mounted in the remote slave module as an alarm inside the house. You could use any combination of audio or visual alarms. I also used a wired link between the master and slave modules, but this could also be an RF wireless or even an internet like. I prefer to just keep it simple. The strobe requires a 12 VDC power supply. In my case, the master and slave are located on each side of a wall, so I used a common 12V wall wart supply for the slave and stepped down the 12 volts with a 5 volt regulator for the Ardweeny.
Caution: strobe lights use high voltages so be careful handling them.
Step 5: Start up and Operation
1. Plug in washer and dryer to the modified AC module. Verify that they work normally.
2. Plug in the power supply to the Arduino master module and load the code. The on board LED should blink at about one second intervals.
3. Attach the slave (alarm) module to the master module and power supply.
4. Connect the signal lines from the AC module hall switches to the master module.
5. Turn on either washer or dryer for a few seconds or longer, then turn off. The Arduino LED should now glow continuously and the alarm should operate.
6. Reset the switch on the master module. The alarm will turn off and the Arduino LED should blink again and you are ready for the next cycle.
7. Note that the alarm triggers when either the washer or the dryer turns off and the Arduino must be reset manually (and hopefully the laundry is unloaded 😉. This assures that the alarm is not ignored!