(Arduino Pro Mini Protoboard Version)
Latest Release: http://code.google.com/p/dinocalc/
Development: https://github.com/WeaselJones/DinoCalc
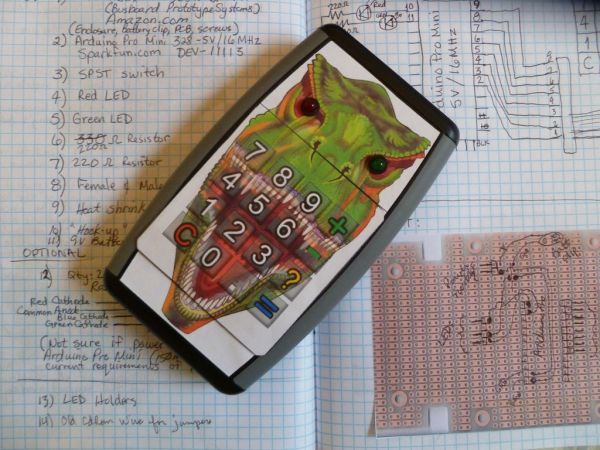
This is a calculator without a LCD that tells you if your math answer is right or wrong, without giving you the answer. This instructable will show you how to make this simple math checking calculator using “off-the-shelf” items.
[UPDATE: A TUTORIAL SHOWING HOW TO CREATE YOUR OWN CUSTOM INLAY GRAPHIC IS NOW INCLUDED! ALONG WITH A NEW GRAPHIC FOR GIRLS TO USE INSTEAD OF THE DINOSAUR. CHECK OUT APPENDIX A AND B AT THE END OF THIS INSTRUCABLE!]
When I was younger I had a calculator that did not have a LCD display but instead had two LED lights, one green and one red. You would enter a math problem with what you thought the correct answer was. If your math problem was for example, 12 + 12, you would enter on the keypad: 12+12 = 24, and then press the “?” key. If your answer was right then the green LED would light up, if your answer was wrong, the red LED would light up.
This is my salute to that toy from my childhood, as well as a great way for me to engineer and program a neat little project that my preschool son can actually use to check his simple math.
This first version will document the prototype that I have built. My first objective was to create a calculator capable of just adding and subtracting using off the shelf items. I plan on starting with an Arduino Pro Mini for the developmental and prototype stage and I will then move on to a final version that has a lower cost and device count (ATmega328P on a custom PCB).
The way the calculator will work is:
1) User enters:
a Number, (for example, 12)
then a math operator, (let’s pick addition, +)
then a Second Number, (let’s add 13 to our first number)
then press the equal sign, (=)
then the user enters what he (or she) believes the answer to be, (let’s guess 22)
then press “?” to see if you’re right or wrong!
2) Microprocessor then calculates the correct answer.
In our case, 12 + 13 = 25. So the Calculated correct answer is 25. This answer is just
stored in memory and not shared with the user.
3) Microprocessor compares the calculated answer to the user’s
guessed answer.
If they are not equal then the microprocessor turns on the red LED.
If they are equal then the microprocessor turns on green LED.
We guessed 22, so 22 is not equal to 25 so the RED LED LIGHTS UP!
Notes and Limitations:
1) Only one math operation is currently supported (ie, 12+12 or 12 – 12 will work, but 12+12+12 or 12+12-12 will not)
2) Negative numbers will work (ie, -12 + -12 or -12 – -12 will work)
3) Large numbers will work (ie, 123456789 + 8765 will work)
4) Decimal Numbers will work (ie, 12.1 +12.2 will work)
5) I made this for my preschool son, so right now the only math operators currently supported is addition and subtraction. Multiplication and Division will be easy to add in the near future.
6) The last limitation is your imagination. Just because I did something one way, don’t be afraid to change it to work for you!
TIP: TO COMPLETE THIS PROJECT THE BUILDER WILL NEED TO HAVE EXPERIENCE WITH SOLDERING AND USING THE ARDUINO IDE. THERE ARE MANY TUTORIALS ON USING THE ARDUINO IDE ON INSTRUCTABLES AND AT HTTP://ARDUINO.CC. IF YOUR EXPERIENCE IS LIMITED, I RECOMMEND BUILDING THIS PROJECT FIRST ON A BREADBOARD, AS SHOWN IN THE OPTIONAL STEP 5, SO THAT THE BUILDER CAN BECOME MORE FAMILIAR WITH THE DINOCALC SOFTWARE AND PROGRAMMING OF THE ARDUINO PRO MINI.
AND WHILE THIS PROJECT ISN’T COMPLICATED TO SOLDER YOU MIGHT NOT WANT THIS TO BE YOUR FIRST SOLDERING EXPERIENCE. IF YOU’VE NEVER SOLDERED BEFORE THERE ARE MANY “LEARN HOW TO SOLDER KITS” THAT YOU CAN PRACTICE AND LEARN ON FIRST. SUCH AS: Elenco AmeriKit Learn to Solder Kit.
Step 1: “How do you eat an Elephant?”
TIP: Even a small project can be overwhelming and risks not being finished if you try and do too much at once. Instead, establish some goals and guidelines and work to meet them one step at a time. You’ll feel better after each achievement and it helps to prevent your project from winding up in some storage box unfinished.
We’ve all heard the question about eating an elephant one time or another and we know the answer, “One bite at a time”.
I have often been guilty of starting a project and then placing the unfinished project into a box or on a shelf to collect dust because either I hit a “road block” or just overwhelmed myself with trying to do too much at once. I often try to eat the Elephant in one bite.
This time I decided to try a different approach (plus I promised my wife I’d actually finish something this time).
So first I set a series of goals for my project and I decided to stick to them. I then divided all my goals into two main groups: Software and Hardware. When I found time to work on my project I’d focus on one goal and try not to get distracted. If I came up with an idea that belonged with another goal, I’d write it down so I could revisit my idea when I was working on that particular goal. If it was an idea that would be nice to have but really belonged in a future version (ie, custom etched PCB board, low power mode, battery recharging, etc) I would write it down in my notebook under “Future Objectives”. This way I didn’t overwhelm myself by making my project so large that it would never stop growing and never get finished. My notebook held my project together.
I highly recommend you too keep a notebook to jot down your experiments, references, and even your failures. I’ve learned a lot, even from my failures. Success consists of going from failure to failure without loss of enthusiasm. –Winston Churchill
HARDWARE
1) Needs to be able to be set up on a breadboard for the software development phase
I started with a keypad, Arduino Uno, and some LED’s. I used this breadboard setup until my code was finished.
2) What is used during development needs to be easily translated into a prototype product
I needed something smaller then the Uno and the Arduino Pro Mini fit the bill. I could use my program I developed on the Uno and the Arduino Pro Mini would be small enough to fit in the “Sparkfun” enclosure I was looking at. I thought about custom etched PCB with just a low powered ATMega328P but decided to stick with my original goals of using “off the shelf” items and save the custom PCB for a future version.
3) Needs to be easy to hold and operate by 4 yr old fingers
I searched many different enclosures and was about to settle on using the “Sparkfun” enclosure when I can across the Hammond enclosure with battery holder. It was exactly what I envisioned.
4) Needs to be appealing in appearance so the 4 yr old wants to use it
My son loves hot wheels, lizards, and dinosaurs. So I searched around until I found a dinosaur face that would scale easily to the front of the hand held enclosure. Image was found at: http://www.arthursclipart.org/dinosaurs/dinosaurs/page_02.htm
SOFTWARE
1) Needs to be able to detect button presses from a keypad
First goal, I needed to be able to tell which button was being pressed.
2) Needs to be able to input the button presses into variables
I then needed to have my program store my button presses. I needed to be able to use numbers larger than just single digits.
3) Needs to be able to perform addition or subtraction (multiplication and division can come later, since my son is only 4 yrs old)
Having my program know when to add or subtract became a challenge. And this then became a major challenge when I decided to include negative numbers. If I hadn’t broke my software code development into “smaller” bites, this could have been the “road block” that would have killed this project. I did add decimal numbers to the programming so that when I do add division it will already be there.
4) Needs to be able to calculate the correct answer and then compare it to the guessed answer the User inputs
This goal led to my discovery about the limitation of floating number math which was solved by comparing the absolute value of the difference between the correct answer and the guessed answer.
5) Needs to be able to respond to the user with either a correct or incorrect response.
Light the Red LED for wrong; Green LED for right.
So now that you know the approach I took, lets get started on building your DinoCalc!
Step 2: Bill of Materials
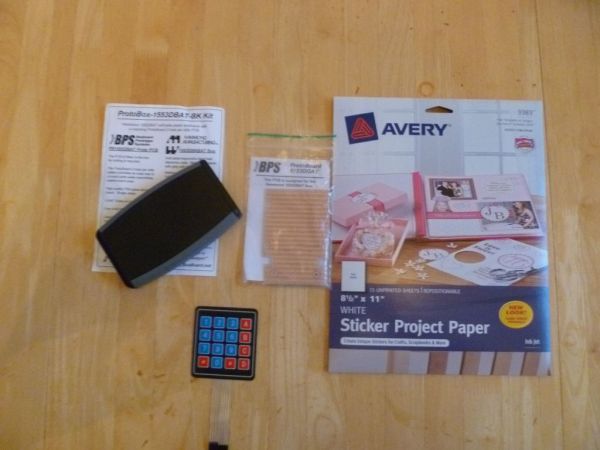
Here is a list of what is needed to put together your calculator with “off the shelf items”. No etching required (I’m saving that for a future version).
I looked up part numbers for this project on Mouser.com and Sparkfun.com. You’ll need parts on both lists. At least half of the components I used came from an electronic spare parts bin I’ve been building up ever since I started my hobby. If you also have a parts bin, then just adjust both lists to your situation.
TIP: Part of the fun of doing a project like this is making it yours!
If you can’t find everything or if you think, “Hey, what was this guy thinking? Part XYZ will work better!” Then please feel free to use different parts or even different suppliers. If you hate AVR then just modify the project and software code so you can use your favorite microprocessor, like a PICAXE. I’m releasing all my source files and it won’t hurt my feelings if you change things. But please do make sure to share what you came up with!
DinoCalc Hardware version 1.0 Bill of Material
(Arduino Pro Mini Protoboard Version)
——————————————————-
MOUSER.COM
——————————————————-
Item
No. Qty Description Part Number
— — ————————————- —————-
1) 1 9v Alkaline Battery 658-6LR61XWA
2) 1 CARBON FILM RESISTOR – 330 OHMS 291-330-RC
3) 1 CARBON FILM RESISTOR – 270 OHMS 291-270-RC
4) 1 SPST ON-OFF SLIDE SWITCH 112-R13-602A
5) 1 LED – THROUGH HOLE GREEN DIFFUSED 78-TLHG5400
6) 1 LED – THROUGH HOLE RED DIFFUSED 78-TLHR5400
7) 2 5MM LED PANEL MOUNTING 696-SSH-LX5091
8) 1 4X4 MATRIX MEMBRANE KEYPAD 619-27899
9) 1 PROTOTYPE BOARD FOR 1553DBKBAT ENC 854-PR1553DBAT
10) 1 HAND HELD ENC WITH BATT COMPARTMENT 546-1553DBKBAT
You can also find this Bill of Material on the mouser.com website under the DinoCalc version 1.0 project at the following link:
http://www.mouser.com/ProjectManager/ProjectDetail.aspx?AccessID=0904c64079
—————————————————-
SPARKFUN.COM
—————————————————-
The following is a list of parts needed for this project on sparkfun.com.
Item
No. Qty Description Part Number
— — ————————————- —————-
1) 1 Arduino Pro Mini 328 – 5V/16MHz DEV-11113
2) 1 FTDI Basic Breakout – 5V DEV-09716 (Optional)
3) 1 Female Headers PRT-00115 (Recommened)
4) 1 Break Away Headers – Straight PRT-00116
5) 1 Break Away Male Headers – Right Angle PRT-00553
6) 1 Solderless Headers – 10-pin Straight PRT-10527 (Optional)
7) 1 Jumper Wire – PTH Black White PRT-08672 (Optional)
8) 1 Jumper Wire – 0.1″, 3-pin, 6″ PRT-10368 (Optional)
9) 1 Hook-up Wire – Red PRT-08023 (Optional)
10) 1 Hook-up Wire – Black PRT-08022 (Optional)
Notes:
Item #2: This is needed only if you don’t already have a way to program the Arduino Pro Mini.
DEV-09718 5V FTDI Cable will also work and you won’t need to find a USB Cable.
Item #3: This is recommended so that you don’t make the Arduino Pro Mini a permanent installation
in your calculator. You want to reuse it for a later project.
Item #6: This can be used in place of soldering headers to the Arduino Pro Mini Programming Header.
Items #7 and #8: These are recommended only if you don’t already have some old jumper wires laying
around (such as from old CD-ROM kits or old computer boards).
Items #9 and #10: Hook-up Wire is needed only if you don’t already have a source of 22 AWG wire for
the wiring on the protoboard.
You can find this Bill of Material in a Wish List on Sparkfun.com at:
https://www.sparkfun.com/wish_lists/56143
—————————————————-
AMAZON.COM
—————————————————-
This was the adhesive paper purchased to place over
the keypad and on the enclosure face.
Item
No. Qty Description
— — ————————————-
1) 1 Avery Sticker Project Paper, White, 8.5 x 11 Inches, Pack of 15 (03383)
found at link: http://www.amazon.com/gp/product/B0000C0CJQ/ref=oh_details_o04_s00_i00
—————————————————-
MISCELLANEOUS
—————————————————-
These are standard items you probably have on hand already:
1) Soldering Iron
2) Solder
3) Heat Shrink or Electrical Tape
4) Color Printer for printing the enclosure overlay
Step 3: Preparing the Arduino Pro Mini
For the Prototype version I chose the Arduino Pro Mini 5V/16MHz. While I developed the code for the calculator with my Arduino Uno and a breadboard, I knew that the Arduino Uno would be too cumbersome to place inside a hand held enclosure. The Arduino Pro Mini is small and ideal for a small enclosure and compatible with the Arduino Uno, so I knew my code would need little or no modification to work with it.
The Arduino Pro Mini comes without any headers so you will need to add some yourself. First take your male pins and separate two 12 pin sections. These will be soldered on the sides as shown. I used my breadboard to keep the pins lined up during soldering. For the programming header you can either solder six right angle male pins, or follow the tip below and use solderless headers for programming.
TIP: INSTEAD OF SOLDERING A HEADER TO THE PROGRAMMING HEADER, USE “SOLDERLESS HEADERS”, SUCH AS THE SPARKFUN PART PRT-10527. THESE HEADERS ALLOW YOU TO PROGRAM YOUR ARDUINO PRO MINI AND ARE REMOVABLE AND REUSABLE WHEN YOUR PROGRAMMING IS DONE.
Step 4: Programming the Arduino Pro Mini
Now it’s time to program the Arduino Pro Mini.
FIRST:
Download the “keypad.h” library from the Arduino Playground:
http://arduino.cc/playground/uploads/Code/keypad.zip
Place the KEYPAD folder into your libraries folder of the Arduino IDE.
This library makes using a matrix type keypad easier to program.
TIP: TO LEARN MORE ABOUT THE KEYPAD LIBRARY, VISIT http://playground.arduino.cc/Code/Keypad
SECOND:
Download the DinoCalc-Release-1v0.zip Package either by clicking on the download below or at http://code.google.com/p/dinocalc/
Extract the zip file and inside you’ll find two folders: Hardware and Software. Right now we’re interested in the Software folder.
In the Software folder is another folder named DinoCalc. This folder can be copied to your Arduino “sketchbook” location.
This folder contains the source code (DinoCalc.ino) and a hex file. The hex file is for advanced users that might be using a different AVR programmer.
TIP: If you aren’t sure where your “sketchbook” location is, then open the Arduino IDE and look under File/Preferences. You’ll see where the sketchbook location is on your computer.
THIRD:
Read the Sparkfun Tutorial to become familiar with your Arduino Pro Mini, especially if you are new to “Arduino”. Even though the tutorial mentions the 3.3V version, it is still applicable to the 5V version. Just make sure you use the 5V FTDI programmer and select the 5V version of the Arduino Pro in the Arduino IDE when you are programming. Also, use the latest Arduino IDE. You don’t need to download the older version shown in the tutorial.
Make sure when attaching the FTDI that the GRN label on the FTDI programmer lines up with the GRN label on the Arduino Pro Mini and that the BLK label matches the BLK label.. As long at the FTDI programmer is attached, the Arduino Pro Mini can be powered from the FTDI programmer.
FOURTH:
Open the DinoCalc.ino file with the Arduino IDE.
Press the Upload button on the IDE and after a few flashing TX RX lights your Arduino Pro Mini will be programmed!
If you have any errors, make sure you placed the keypad library in the proper place and then go back and check the Sparkfun tutorial and make sure you have everything connected right. Also, make sure you’ve selected the Arduino Pro Mini 5V/16MHz under the IDE Tools/Boards Menu, and that you’ve selected the proper COMM port for your FTDI programmer under the Tools/Serial Port menu.
Step 5: Testing on Breadboard (optional)
This step shows the Arduino Pro Mini setup on a breadboard. It isn’t needed to complete the project but can be used if you wish to modify the program for your own application or if you wish to program and test the Arduino Pro Mini before installing it into the enclosure.
I used an eight pin male straight header to connect the ribbon cable from the keypad to the breadboard. The connections were as follows:
Arduino D 2 —> 4×4 keypad pin 1
Arduino D 3 —> 4×4 keypad pin 2
Arduino D 4 —> 4×4 keypad pin 3
Arduino D 5 —> 4×4 keypad pin 4
Arduino D 6 —> 4×4 keypad pin 5
Arduino D 7 —> 4×4 keypad pin 6
Arduino D 8 —> 4×4 keypad pin 7
Arduino D 9 —> 4×4 keypad pin 8
Arduino D10 —> (long leg)RED LED(short leg) —>
330 ohm resistor —> GND
Arduino D11 —> (long leg)GRN LED(short leg) —>
270 ohm resistor —> GND
The Arduino Pro Mini can be provided power from the FTDI programmer or after you’ve programmed the Arduino Pro Mini you can hook up a 9V battery for StandAlone Power
.
Standalone Power:
9V POSITIVE —> Arduino Pro Mini RAW
9V NEGATIVE—> Arduino Pro Mini GND
Using the breadboard setup shown, this is how I worked on the software until it performed the way I expected.
If you are using the 4×4 membrane keypad without the sticker overlay, you can change the keypad array in the program to match the numbers on the face of the keypad. Just remember A is plus, B is minus, C is ?, D is equals, # is decimal point, and * is C. Also don’t forget to change the code back before you apply your sticker overlay and place the Arduino Pro Mini into an enclosure.
In the program change lines 203-207 from:
char keys[ROWS][COLS] =
{{‘7′,’8′,’9′,’+’}, //Sticker will be applied over keypad to
{‘4′,’5′,’6′,’-‘}, //match the layout I want and to provide
{‘1′,’2′,’3′,’?’}, //a custom graphic (eg dinosaur, bird, etc)
{‘C’,’0′,’.’,’=’}};//
change this to:
char keys[ROWS][COLS] =
{{‘1′,’2′,’3′,’+’}, //Sticker will be applied over keypad to
{‘4′,’5′,’6′,’-‘}, //match the layout I want and to provide
{‘7′,’8′,’9′,’?’}, //a custom graphic (eg dinosaur, bird, etc)
{‘C’,’0′,’.’,’=’}};//
TIP: TO LEARN MORE ABOUT THE KEYPAD LIBRARY, VISIT http://playground.arduino.cc/Code/Keypad
Step 6: Protoboard Layout
It is now time to start placing your components onto the Protoboard that fits inside of the enclosure.
In the Hardware folder from the DinoCalc-Release-1v0.zip package that you have already downloaded, there is a folder called, EagleCad files. Inside is a schematic called, DinoCalc_1v0_Schematic.pdf. Also under Hardware is the folder Hardware Layouts. Inside is a pdf called Hardware Layout Version 1v0.pdf. You might want to print out a copy of these files and have them handy as you add components.
IMPORTANT!: I am showing part placement on my graphic with the copper bottom of the Protoboard shown facing up. This is to help show how everything is connected. The copper side will be on the bottom since you will be soldering on the copper side, and the parts will be placed on the fiberglass side, as shown in the photos.
TIP: Under the Hardware folder is another folder called Datasheets. If you wish to modify the layout that I have, there is an Actual Sized PCB layout on the BPS-MAR-PR1553DB-001.pdf datasheet. Just remember not to scale the pdf when you print it.
Step 7: Protoboard Layout (Keypad Connector)
Break away 8 pins from your right angle male headers. This will be used to connect the keypad to the Arduino Pro Mini. Notice how the header is placed on the “two-hole” pattern. This allows the Arduino Pro Mini to be soldered right next to the keypad connector.
Look close, you can see the pins for the right angle header right before soldering.
Step 8: Protoboard Layout (Female Headers)
If you want your Arduino Pro Mini to be removable (which I highly recommend) then break away two twelve holed female headers and install one next to the Keypad Connector you just soldered. Line it up so that pin 2 on the Arduino Pro Mini lines up to the first pin on the keypad. Then place the other female header parallel and six holes away from the first female header.
If your Arduino Pro Mini will be permanently soldered into place, then wait to do it at the very end since there will be several wires under the Arduino Pro Mini.
TIP: Seperating female headers almost always results in one pin being sacrificed. I would cut through the 13th pin and then carefully shave off the extra plastic to give me 12 perfect female pins. You can also use the Arduino Pro Mini to help line up the female headers while soldering. Test fit the headers onto the Arduino Pro Mini and then line up the Arduino’s digital pins 2 through 9 with the keypad connector. Once soldering is complete you can remove the Arduino Pro Mini from the female headers so that you can solder in the wiring for the next step.
Step 9: Protoboard Layout (Battery Connections)
TIP: If you haven’t already, you might want to print out the Hardware Layout Version 1v0 pdf and have it next to you when making these connections.
FIRST:
Take a scrap piece of bare wire, such as one snipped from a LED or capacitor, and solder across a row of the contacts, as shown.
SECOND:
Next, solder the 9V battery connector’s black wire to one of the holes next to the piece of wire you just soldered. These holes will form the Ground Bus and will be used to connect all of the grounds (LED, Arduino Pro Mini, Battery).
THIRD:
Solder a two pin right angle male header, and attach the positive wire of the 9V battery connector to one side as shown. This male header is where the SPST switch will enable or break the power from the 9V battery. Connect the other side of the male header with a wire to where the RAW pin on the Arduino Pro Mini will be. Optional: A diode can be place between the positive wire of the 9V battery connector and the SPST switch header. This would help protect your circuit from a battery being inserted backwards. I chose not to use a diode here since I’d be the only one changing out the 9V battery and the connector will only fit one way onto the 9V battery.
FOURTH:
Solder a wire from next to the female header where the GND on the Arduino Pro Mini will be (this wire will be underneath the Arduino Pro Mini) and solder it to the Ground Bus.
FIFTH:
Solder in place a three pin right angle male header as shown for the LED lights.
WAIT A MINUTE, you said THREE PIN and you show FOUR pin, WHAT’s UP??? You are 100% right, I am showing a four pin header with one pin snipped off. What I used for a cable was from an old CDROM kit. It has a four pin connector with only three wires. Only three wires will be needed to connector your LED lights. If you only use a three pin connector with three wires, then feel free to modify what I am showing to just a three pin right angle connector.
SIXTH:
Solder the LED connector’s ground to the Ground Bus.
For more detail: DinoCalc Version 1.0