Not even Zombies are exempt from a good pat-down. Scanner security wands are used at the most exclusive nightclubs and venues. Does not detect metal to indicate a presence of weapons but will indicate the lack of a soul which means a more rigorous body cavity search to remove any last shred of dignity you have left, wait… Can also be used in the office to make sure everyone is pulling their own weight. The zombies that walk in on Monday seem to be less productive as the week goes on.
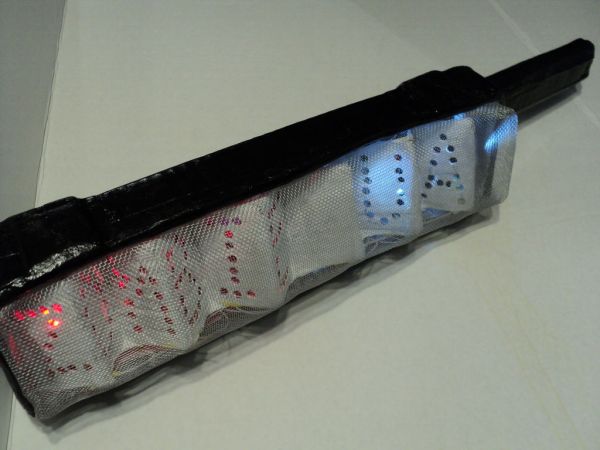
This small handheld device makes cool sounds as you pass the scanner wand over the area to be searched to determine if ZOMBIE or HUMAN. Remember, it’s not the size of the unit, it’s the skill of the operator using it.
DISCLAIMER: No hipsters were harmed in the making of this instructable. Although, many think they would have.
Step 1: Scavenging for parts…
This scanner is essentially an Arduino based theremin using an ultrasonic sensor as input. The Arduino blinks some LEDs in response.
It is all housed in a custom cardboard/papier mache housing with attached grip.
[box color=”#985D00″ bg=”#FFF8CB” font=”verdana” fontsize=”14 ” radius=”20 ” border=”#985D12″ float=”right” head=”Major Components in Project” headbg=”#FFEB70″ headcolor=”#985D00″]
You will need:
An Arduino, I used an Arduino UNO.
Ultrasonic range sensor – I used an HC-SR04, generic from ebay
Piezo speaker or buzzer for sound.
Bunch of LEDs in red and white.
Bunch of resistors to prevent your LEDs from burning out. Use any online LED calculator to figure out the value of the resistor needed based on the specs of your circuit.
A couple of tactile switches and a slide switch for the battery pack.
A battery pack to make it portable.
Wire for the electronics
Cardboard and glue
Paint
Something to cover the front, plexiglas, acrylic, or I used some scrap window screen metal mesh.
[/box]
CAUTION: Crafting is hazardous, pointy things and sharp things are pointy and sharp. Know how to solder and use electronics safely.
Step 2: Box it up…
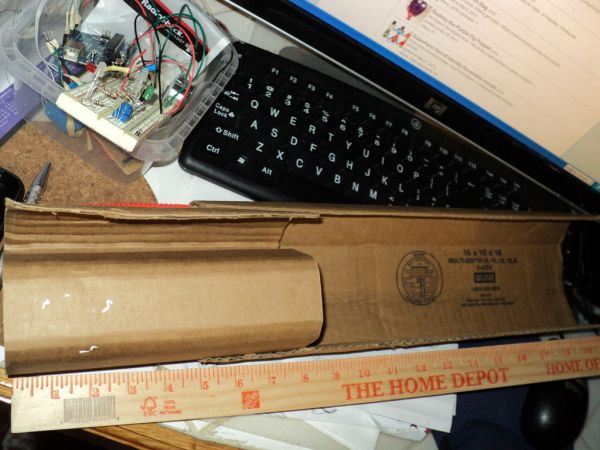
You could use some high-end 3D modeling software to create the housing for this security wand. You could then massage and convert the files into something that a 3D printer can use to 3D print on the 3D printer. You could then fire up your 3D printer and wait several hours for a print this large or outsource it to a 3D printing house leaving you with a hole in your pocket.
Luckily 3D printing and rapid prototyping is available for all with materials and tools right at home. Cardboard and papier mache. And for us poor souls, this will do the trick.
Use a yardstick to crease and fold your cardboard pieces.
I just eyeballed the whole thing.
Add pieces where needed.
Laminate several layers of cardboard for strength.
Glue pieces together. Burnish edges to smooth over.
Make openings where needed and reinforce the cut opening. I needed a wire routing hole for the control panel, an opening/mount for the ping sensor, and the bayonet mounts for the knife and laser pointer.
Dissect the cardboard to use the outer “skins” as paper for papier mache.
Prime cardboard and paint.
I painted the inside white to reflect more light from the LEDs.
Paint the outside black.
Step 3: Nixie display…
Yeah, wouldn’t that be special.
We are going to use the LEDs to give us a faux pixelated LED character display.
Create a cardboard accordian-like folded mask.
Cover it all over with tape to give it some strength
On each panel write out the character that will be displayed.
Use an ordinary paper punch to place the “pixels”..
Step 4: Heart of the thing…
This is not really a true classic antenna based theremin.
In this Arduino version, an ultrasonic range sensor is providing the variable input to change the pitch of the sound.
You could also replace the sensor with pressure switches, stroke sensors, photocells, capacitance sensors, etc.
Instead of a normal speaker, I am using a piezo buzzer I salvaged from a carbon monoxide alarm.
Note that my generic ultrasonic sensor is a 4-pin model, there are some with 3-pins so you need to be aware and adjust the code to drive it accordingly.
My code is a mishmash of all basic functions and sample sketches for an Arduino.
I won’t attach my code since it is not optimized and is easy enough for the beginner to try to duplicate based on the logic described below. Hey, the best way to learn is to troubleshoot your own code.
I got the ping sensor to work. Serial monitor was showing it measured distances.
I used that as input to the theremin sketch. The distance measures was mapped to the sound range.
When the tone sounds as it goes through the loop, I flash a bunch of LEDs.
I have external pushbutton switches set up with pull-up resistors so when I press one, it will indicate ZOMBIE.
The pressing of the second pushbutton switch will indicate HUMAN.
A third switch on the external control panel is just hooked up to the RESET and GND. Sometimes the Arduino needs to be kicked when it starts up weird.
Code always has to be tweaked when you are working with a whole bunch of LEDs since clear lens LEDs in different colors are never soldered to the right lead that you think they are supposed to be soldered to.
For more detail: TSA Zombie Scanner Security Wand