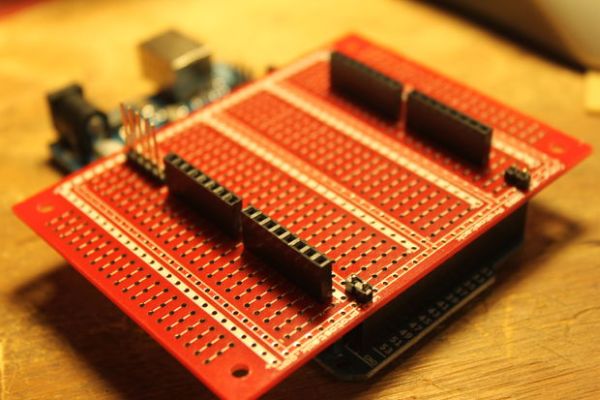
This is a down and dirty prototyping shield that will work for Arduino Mega’s and there pin compatible clones. This is the first time i have made this board, but i have other projects i think this would be handy for.
[box color=”#985D00″ bg=”#FFF8CB” font=”verdana” fontsize=”14 ” radius=”20 ” border=”#985D12″ float=”right” head=”Major Components in Project” headbg=”#FFEB70″ headcolor=”#985D00″]
Materials used:
Protostack Style 1 Half size (full size would also work)
I keep a few of these boards around. They make much more robust prototypes than bread boards do.
Arduino Stack-able headers SparkFun UltiMachine
Straight Breakaway headers
Long Breakaway headers
Really long breakaway headers. (i have some of these, but i cant remember where i bought them.[/box]
Limitations:
I tend to build projects for megs that require multiple serial ports and do not use all of the IO pins.
Also all Arduino’s have an “error” that goes back to there creation. Pins 8 to AREF are not on the same .1″ spacing as the rest.
The bottom line is that Pins: 8-13 , 22-53 and AREF are not broken out on this completed shield.
Alternatives:
*SparkFun has a.MegaShield Kit for Arduino . This board is “ok” but it does not break any of the pins out to the solider area except 5V and GND. This makes useing as a pass through board harder. (the easiest way to use the board is to plug wire into the top of the headers. I glued a small bread board onto mine and use it for less robust prototypes.
*Arduino has a Shield – MEGA Proto KIT Sold in the US at UltiMachine. This board does break out all of the mega pins to the solder area and allow for pass thorgh to other shilds.This is the board i use when i need all the IO pins.
ProtoStack board:
I use Protostack board because of there ease of use. The work alot like a bread board, but with everything soldered in they are more robust. The Protostack boards have 5 pin groups like a bread board. They also have common positive and negative rails.
Step 1: Layout
I wanted to capture all of the communication pins. Mostly for my current project i need all the serial ports.
I put some sections of breakaway headers into the pin ranges i wanted. I then moved the ProtoStack board around until it fit nicely. The best combination i found aligned:
The ground pins next to pins 52-53 with the negative rail
ONLY ONE of the Positive pins next to pin 22 to align with the positive rail
The analog pins are at one end of the 5 pin strip
The digital and serial pins are in the middle of the 5 pin strip
Step 2: Power Pins

I am using pins for the power and headers for the rest.
The stackable headers are taller than standard breakaway headers. I used longer headers and slid the spacers where i needed them.
Step 3: Layout 2
I started dry fitting headers and pins.
The stackable headers do force you to raise the board away from the Arduino.
This is a short description, but i spent a lot of time here making sure i had everything where i wanted it before soldiering things in place.
Step 4: Start soldering – Stackable headers
Getting everything to line up correctly is tricky. heads tend to fall over and get misaligned during soldering.
With the stackable headers properly inserted through the board into the Arduino,I put some spare break away headers into the to stackable headers. This keeps the stackable headers in one straight line, but will not prevent that line from falling over.
I then stacked a second board on top of that assembly. This will better maintain the alignment without the Mega in place. I flipped the assembly up-side-down and removed the Mega.
To check alignment, i look down the length of the pins.
Solder one pin from each stackable header and re check alignment by looking and by setting the mega onto the stack again. I recommend doing a second pin on each section then checking again. One pin is easy to re-melt and re-align. Two is much much harder. Any more pins than that and you will be in a “bend to fit” situation.
For more detail: Prototyping shield for Arduino Mega