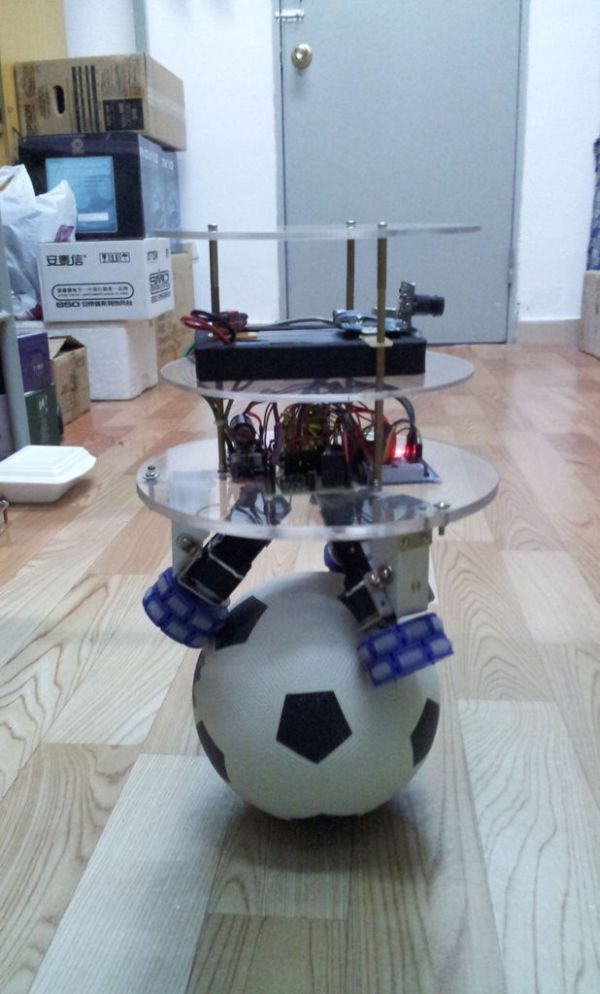
Last year, I have made this ball balancing robot.It can stand on a ball stable by the balance system of itself.
There is only one connect point between the robot and the ground, so it is more flexible than the traditional wheeled robot. It can move to any directions without turn. For the traditional wheeled robot when its center of gravity is too high it may fall down, but by using this robot the problem will not exist. So the application on this robot can be applied to narrow, crowded and interference environment.
And this robot can be used in many areas, such as security robot, explorer robot and entertainment robot.
This is just a platform and don’t have any practical application on it. We can add all kinds of different function on it according to the situation. For instance, you can add the applications of obstacle avoidance, localization and control by network to realize the function of the document delivery with this robot in your office.
What’s more, there are two ways to control: with the handheld wireless remote control and with the Kinect. By using the Kinect, you can control the car with your body, that’s may have a lot of fun.
The software may include: WPF programing, Kinect SDK, AForge.NET, PID algorithm, Kalman filter algorithm, AVR MCU programing and STM32 MCU programing.
The hardware may include: Gyro sensor, Accelerometer, Geomagnetic sensor, Wireless module, WIFI module, Camera, Kinect, STM32 MCU, Atmega16 MCU, Brushed DC motor (with gear box), encoder, DC motor driver, Controller power supply and motor power supply.
You can see more project here in my website.
So now let’s begin to build this robot.
Step 1: Add Omni-Directional Wheel to Brushed DC motor
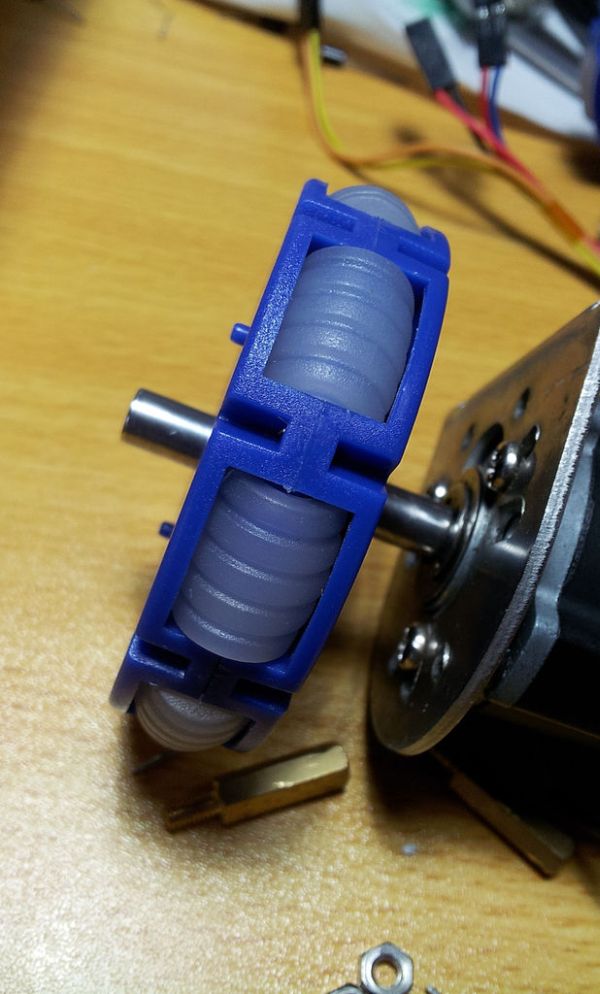
In the balancing system of this robot, there are 3 Brushed DC motors. Each motor may have a bracket for connecting and a Omni-Diretional Wheel for driving the ball.
Procedure:
1. Install the motor brackets to the Brushed DC motors.
2. Add one Omni-Directional Wheel to each of the Brushed DC motors.
Step 2: Make the motor bracket
To connect the DC motors to the body of the robot, I used the Aluminum profile to make 3 brackets. And then drilling several holes on them for connecting.
Procedure:
1. Cut the bracket from the Aluminum profile.
2. Cut another two as the same shape.
3. Drilling holes on the brackets for connecting.
Step 3: Add the motors to the Acrylic board
After making the brackets, I used the laser cutting machine to cut three pieces of acrylic discs to make the body of the robot. And then, connected them together to make the mechanical part of the robot.
Procedure:
1. Cut three pieces of acrylic discs by using the laser cutting machine.
2. Drilling holes on one of the disc and install the motor bracket on it.
3. Install another two brackets on the disc.
4. Install the Brushed DC motors on the brackets.
5. Add the ball.
6. Install another two discs.
Step 4: Add the electronic modules
Add the electronic modules to the robot.
For more detail: How to make a Ball Balancing Robot