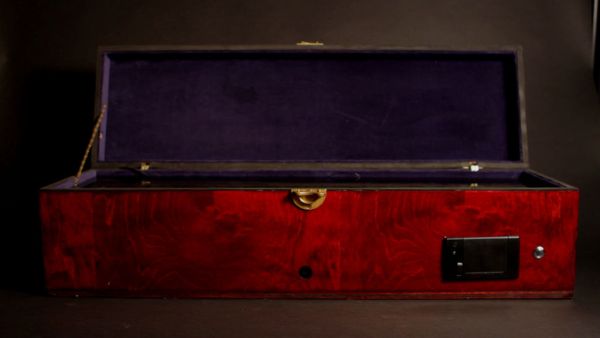
We all need to dream more so I’ve created this Arduino Powered “dream generator” to help plant the seeds for some big thinking craziness. When you approach the generator a Maxbotix ultrasonic sensor triggers lights and music that draw you in so you can stare into the blue LED enshrouded infiniteness of the box. Press the pulsing blue button and a thermal receipt printer generates your dream which is mashed up from Allan Ginsberg’s poem Howl Part 1, and the twitter feeds of the NY Times and pop star Taylor Swift. The juxtaposition of these three elements is designed to stimulate your own free-associating amygdala powered dream machine so you can make papa Descartes proud in your quest for absolute dream supremacy!
Step 1: The Basic Components
My dream generator includes a lot of separate components and getting them to work together is a challenge. Here’s a laundry list of what it entails.
There’s a Maxbotix LV-EZ1 Ultrasonic Proximity sensor.http://www.adafruit.com/products/172 They weren’t kidding. It is pretty easy. It’s got 7 hook up holes but you only really need three of them if you want to use PWM which seems to be a little more accurate than Analog. It takes a PWM pin on your Arduino though so that could be a factor in your project.
It’s got a string of awesome blue LEDs from SuperBright LEDs. They run on 12 Volts which created some powering complications that I’ll explain later.
There’s a music box that plays my own custom song. The LEDs and the music box are activated by an approaching person (or pet, they can dream too can’t they?) when the sensor gets to a predetermined proximity reading.
There’s a cool blue pulsing button that activates dream generation. (And happens to be waterproof.) http://www.adafruit.com/products/481 (Be careful when ordering this because there’s one with an identical picture that’s an on/off switch.) For our purposes we wanted one that acts as a pushbutton.
There’s a thermal receipt printer that prints out the dreams.http://www.adafruit.com/products/600
And finally there’s an Ethernet Enabled Arduino. (You could also use a regular Arduino and an Ethernet Shield.)
So it all goes together like this. You are attracted to the box because of the blue pulsing button. As you approach the entire thing lights up and mysterious music begins to play. You press the button to activate the dream generator and it goes out to the internet and mashes up relevant (or irrelevant) internet fodder such as twitter feeds, headlines, facebook statuses, etc. and then mashes them up through the filter of iconic Beat poet Allan Ginsberg’s signature work Howl and voila! You’ve turned the internet into your friend instead of a mind numbing cavalcade of non-sequiters.
Step 2: First Things First
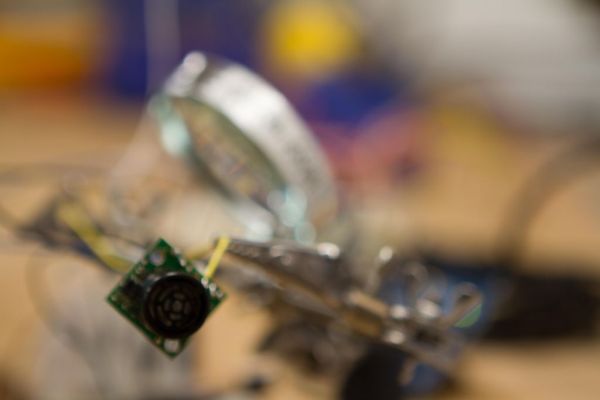
There were a lot of components to this project so I built them up one at a time starting with the Maxbotix Sensor.
Despite the 7 pin holes there are really only 4 pins that you’re interested in. Power Ground Analog and PWM. Connect Power to 5v on the arduino, ground to gnd, and (ignoring Analog for now) connect PWM to pin 9 on your internet enabled Arduino. (That’s one of the PWM pins.)
I started out with the code from this tutorialhttp://playground.arduino.cc/Main/MaxSonar .
There you’ll find code for Analog, Digital, and a version that averages several readings to smooth out the results. There’s also a Maxbotix Library available from Github but as far as I can tell none of these sketches activated that library so I don’t think it’s necessary.
I loaded the PWM sketch and changed the pin number from 7 to 9.
Uploaded to the arduino and after opening the serial monitor could see that I was reading proximity!
Step 3: Now let’s turn on the lights!
With the Maxbotix generating measurements in inches I set up a Transistor to activate the power to the lights and music. I used a Tip 120 NPN transistor connected to Pin 7. The transistor acts just like a switch and when Pin 7 goes high it opens the circuit by allowing power to flow to ground from the motor and lights. I declared pin 8 to be an output named music and created a short piece of code to check the sensor values and to send pin 8 high when the sensor reading was less than 5 inches. (I eventually changed this to a larger number but for testing this kept my activation area compact.)
A motor generates a backflow of electricity when the magnetic field of the rotors collapses and this surge could damage your transistor and potentially your Arduino so it’s VERY important to include that diode in parallel across your circuit. I got this diagram of how it’s hooked up off of Bildr and I triggered both the lights and the motor off of the same Tip 120 circuit.
Eventually I decided I wanted the motor to run at 5v and lights are supposed to run at 12 so I set it all up at 12v and put a 5v Voltage regulator into the circuit for the motor but it got way too hot so I divided the rails on my breadboard and included two separate power supplies, one at 12v for the lights and one at 5v for everything else and then everything seemed happy.
For more detail: Nocturnal Emissions: My Arduino Powered Internet Enabled Dream Generator