I know LEGO has the Mindstorms-set that probably is great, but wouldn’t it be even better (and cheaper) to hack your regular bricks into your own micro controller controlled LEGO? Well I think so!
I had this idea for a long time, but to many other projects stood in the way until Tristram posted this instructable: DIY-LEGO
We tried to work together on this project, but it seemed impossible to synchronize our agenda’s and get together so we both run our own projects. First I took the same route Tristran took and even build myself a MYDIYCNC to cut the bricks, but finally I decided to take an other approach.
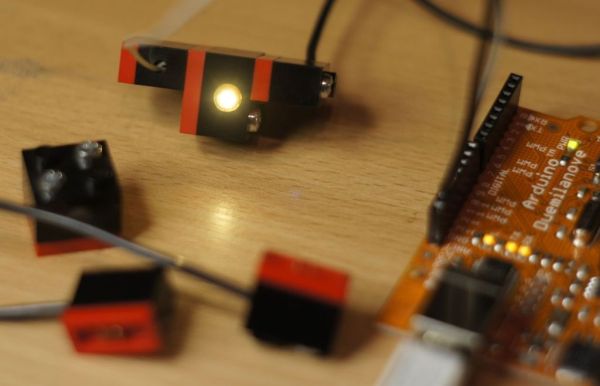
A nice first step in this project will be a simple LED in a brick.
(Tristram also did a LEGO-LED but with his own approach)
My goals for the LEGO-LED:
- It must be 5V so is can be easily controlled by an Arduino micro controller
- It must fit in a 2×2 brick and be flush within the brick
- There must be come logic in the positive and negative poles
- There must be a easy (LEGO-like) system to connect cables
- The design must be useful for different modules in the future, like sensors and switches. (so there must be a possibility for three poles: 5V, GND and signal)
- It must be repeatable
- It must be cheap (not counting the CNC I build for it)
- It definitely must look cool
Step 1: You will need:
[box color=”#985D00″ bg=”#FFF8CB” font=”verdana” fontsize=”14 ” radius=”20 ” border=”#985D12″ float=”right” head=”Major Components in Project” headbg=”#FFEB70″ headcolor=”#985D00″]
For starters you will need a bunch of LEGO-bricks to destroy. I couldn’t destroy my LEGO, so I bought it specially for it in “Pick a Brick” on the LEGO site.
LEGO:
- 2×1 black bricks
- 2×2 black bricks
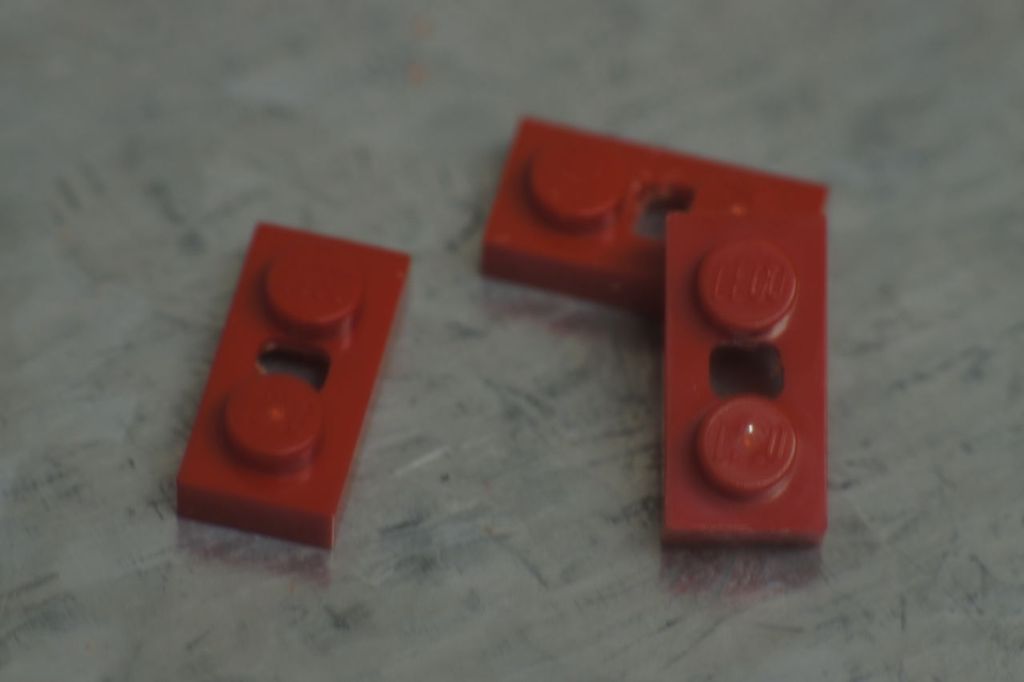
- 2×1 red plates
- 2×2 red plates
Other stuff:
- M2.5 x 5 mm bolts
- M2.5 nuts
- 0.5 mm copper plate
- small electrical wires
- 5mm LED
- The fitting resistor to light the LED on 5V
- (if you want) 6 mm plastic, aluminum of wood and 4 mm aluminum to make rigs
Tools and stuff:
- Needle nose pliers
- Wire cutter
- Small screwdriver
- Phillips head screwdriver
- Drillpress (it might also be doable with a hand drill)
- Drills: 2.5 mm, 4,5 mm, 5 mm, 5.5 mm an old 8 mm wooddrill
- A CNC is helpful, but small files might also work
- Soldering tools
- Razor blade
- Super glue
- Grinding wheel or power sander[/box]
Step 2: 1) The cables
Normally I wouldn’t start with the cables, but my bricks for the LED-module aren’t delivered yet, so the cables it will be.
The cable will be a 1×2 black brick with one of the studs made into a connector and a 1×2 red plate on the bottom with the little round stud in the middle replaced by a connector.
The hole in the Bottom plate
To make the connector, we need a 3mm x 4 mm hole though the 1×2 plate. I use my CNC for that. (you can also use a drill and file). To make it easier to repeat, I first made a jig to hold the brick out off 6 mm thick HDPE plastic. The G-Code to make the jig is included in this instructable. I used a 1.4 mm bit in the CNC.
As you can see on the pictures, the LEGO fits snugly in the jig. When I zero-out the CNC on the little hole I made in the jig, the bricks will be cut perfectly every time. (G-code included. You might need to change the .txt extension in .ngc)
 slotIn2x1brick.txt162 bytes
Step 3: The connector on the bottom plate
I tried manny different ways to make the connector. I tried 3mm nails, machined parts and bolds, but I think that I found a good solution now.
The best solution that I found until now for the bottom connector is a folded strip of copper. I was lucky to find a nice 0.5 mm thick, 3.5 mm wide strip of copper at the place where I buy my metals.
See the drawing on how to fold the strip.
To make this also easily repeatable, I also made a jig for this.
You can also use needle-nose-pliers.
- Cut the strip to a length of 30 mm
- Fold up the last 1.5 mm on both sides
- Fold up again 4.5 mm from both folds
- Fold down 3.5 mm from the last folds
- Fold down 2.5 mm from the last folds
If everything went well, you ended up with something that looks like the pictures.
For more detail: LEGO + Arduino = Brickduino (1. the LED)