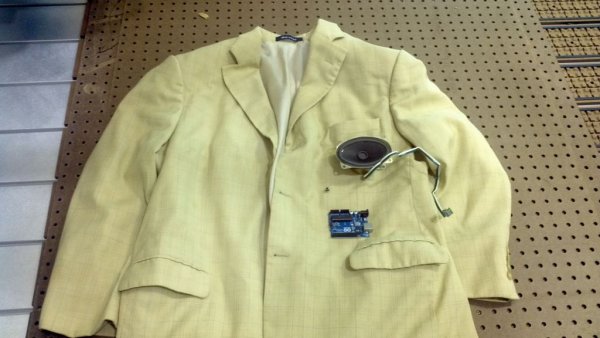
As a project for one of my college classes, we were asked to create something using the Arduino. After a few different ideas, I settled on putting an Arduino noise machine into a suit jacket. It uses parts of the jacket to make function, so that it appears that the jacket is making sounds for no reason.
The code that I used was from blinkyblinky, and can be found here. Using his project as the basis, its a simple matter of fitting everything into the jacket that you decide to use.
So lets begin.
Step 2: Preparing the Arduino
After you have breadboarded your synth to your liking (don’t worry, you can easily change the sounds on it), we will next prepare the Arduino to be put into the jacket. My instructor gave me an Arduino shield to place on the bottom, so I would recommend having something to protect it (shield or otherwise). For the I/O jacks, we need to make a perfboard. Its only necessary to have one that runs across the two sets of I/Os closest to the power jack and USB port. Cut one to the proper size by cutting along an edge you wish to break, then breaking it against a table. Then break out some headers that fit into the perfboard and fit into the Arduino. Although we are only using five I/Os, I recommend for the sake of stability to make them long enough to run through all of the I/Os.
[box color=”#985D00″ bg=”#FFF8CB” font=”verdana” fontsize=”14 ” radius=”20 ” border=”#985D12″ float=”right” head=”Major Components in Project” headbg=”#FFEB70″ headcolor=”#985D00″]
Parts
You will need:
1 Arduino Uno
1 suit jacket (check out local thrift stores)
2 speakers (also check otut
2 momentary tactile switches, preferable with four “legs” on them
1 soldering iron
Solder
Wire
Wire cutters
1 9v battery
1 9V battery adapter for the Arduino
1 battery switch
Perfboard
Small safety pins OR a sewing kit
Rather than reinvent the wheel, I recommend you check out blinkyblinky’s Instructable on how to put together and test out the noise machine. He also provides different codes, depending on the kind of sounds you want. Once you have it breadboarded and functioning the way you want it to, we can move on to applying it to the jacket.
[/box]
For more detail: Arduino Noise Machine Jacket