So about a year ago I decided that I wanted to get into AVR microcontrollers. After ordering an AVR pocket programmer from Sparkfun , I soon realized that it was too delicate to be sitting on a workbench full of wire clippings. I knew I needed a small enclosure to put it in, but couldn’t find anything I really liked. My final decision was to make my own.
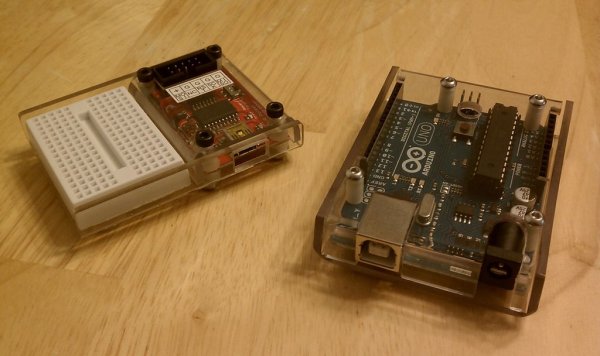
This instructable will explain the steps necessary to construct a “Lexan” shell for an arduino UNO (or other arduino). Of course these steps can be adapted to almost anything.
I don’t remember where I learned this method, but it was definitely from another Instructable. Here are some with similar methods:
– http://www.instructables.com/id/LCD-Cover/
– http://www.instructables.com/id/CULTRIVOR-Custom-30-Knife-Block/
– http://www.instructables.com/id/Motorcycle-Hand-Wind-Deflectors-version-21/
Step 2: Make a bending jig
This step is OPTIONAL but highly RECOMMENDED
This is where the table saw and chunk of 2X4 come in. I have tried to bend polycarbonate over the edge of a table and in a vise, its easier in the long run to make a jig.
If you don’t have a scrap piece of wood laying around, go to your local home improvement store near the end of business hours and ask if they have any scrap they’re throwing away. Home depot gladly gave me a few small pieces.
If you’ve never used a table saw before, this is not the time to start; have someone else cut it for you. The goal is to cut slots of varying depths into your scrap wood, be careful. To get an idea of the depth required for your project, take the distance from the edge of the Lexan to the target bend line and subtract 1/8″. Why? Because when you eventually use a torch to heat the Lexan it almost always bends 1/8″ above the wood. Also keep in mind that if you want a “U” shape, two bends need to be made. The slot will need to be close enough to the edge so that the first bend will clear the wood when making the second bend.
In my case I wanted the walls to be 5/8″ high, subtract 1/8″ and I need a 1/2″ deep slot. (Close to the end of the wood)
Step 3: Measure and cut
According to my measurements, my arduino is about 2-11/16″ long by 2-1/8″ wide. In the design I chose to go with, the bottom shell covers the sides with the 4 headers and the top shell covers the ends with power/USB and ICSP header.
Bottom- 3-1/2″ X 2-15/16″
2-1/8″ (width of arduino) + 5/8″ (side 1) + 5/8″ (side 2) + 1/8 (for luck) = 3-1/2″
2-11/16″ (length of arduino) + 1/8″ (the luck that is added to the top) + 1/8″ (for sanding) = 2-15/16″
Top- 4-1/16″ X 2-3/8″
2-11/16 (length of arduino) + 5/8 (end 1) + 5/8 (end 2) + 1/8 (for luck) = 4-1/16″
2-1/8″ (width of arduino) + 1/8″ (the luck that is added to the top) + 1/8″ (for sanding) = 2-3/8″
You’ve probably heard the saying measure twice, cut once. Before picking up the jigsaw, cut out paper pieces the same size as your Lexan should be and bend them accordingly. Do the paper pieces fit together the way you expected them, will your Arduino fit inside? (excluding the USB and power connectors) If not, step back and decide what measurements need to be modified.
Be careful not to bend the wrong edges of the Lexan you cut, so labeling the bending edges is recommended.
You will inevitably end up with some scrap pieces, use them for test bends.
[box color=”#985D00″ bg=”#FFF8CB” font=”verdana” fontsize=”14 ” radius=”20 ” border=”#985D12″ float=”right” head=”Major Components in Project” headbg=”#FFEB70″ headcolor=”#985D00″]
Tools/Materials
Use whatever tools you like, these are what I used:
– Ruler/Square combo
– Table Saw
– Jig Saw
– Pencil torch
– Lathe
– Drill press
– Fine sandpaper
– Small file set
– Dremel
Materials:
– Lexan polycarbonate (1/10″ thickness is usually carried by home improvement stores)
– Chunk of 2X4 wood
– Masking tape
– 4 nice screws with matching nuts (~18mm length)
– 2 – 1″ Nylon spacers (must fit over screws)
[/box]
For more detail: Clear polycarbonate enclosures using Arduino