RC cars can be WiFi Cars…?
RC cars are cool, but cheap RC cars have limited range and can only be controlled with the particular controller that was included with the car.

I purchased a RC jeep, complete with 4 wheel drive, flexible suspension, and off-road tires for about 30 bucks. Not long after playing with the car I determined that I could improve it by using WiFi and Android. So I wasted little time, and completely remove the circuit board that make up the cars electronic system. Using the existing electronics I determined the voltages and devised a motor control system that could be operated by the Arduino using a custom shield that I developed. The motor control system does not implement any PWM to control the speed. The car is design to crawl over obstacles, with very low gearing as a result it is very slow. This meant that just having the motors turn on and off would work just fine. The circuit I designed will however support PWM by using the enable pins.
I have been using the Arduino microcontroller in projects for a few months. I also purchased the asynclabs (http://asynclabs.com/) WiFi Sheild for the Arduino Duemilanoe to experiment with WiFI and microcontrollers . It comes with a package installs into the Arduino IDE. Building off of the “SocketServer” example I was able to build sketch that lets me control the motors and steering over WiFi.
I then used Visual Studio to put together a quick windows form application that connects to the car server and issues commands to control the motors, steering and lights. Then got bit with the android bug, after building a couple test apps I finally managed to get a working version that uses the orientation sensor to determine the desired car function.
Here is the step by step,
Step 1: Tools and Parts
This is a general list of the tools and parts that were used to complete this project.
Look at the Eagle Documents for exact specs of the components used.
Multimeter
Soldering Iron
Solder Wick
Screwdrivers
PCB etching supplies
Copper Clad Boards
Pliers
Arduino
AsyncLabs WiFi Sheild
RJ45 ends
Motor control H-Bridge
Caps.
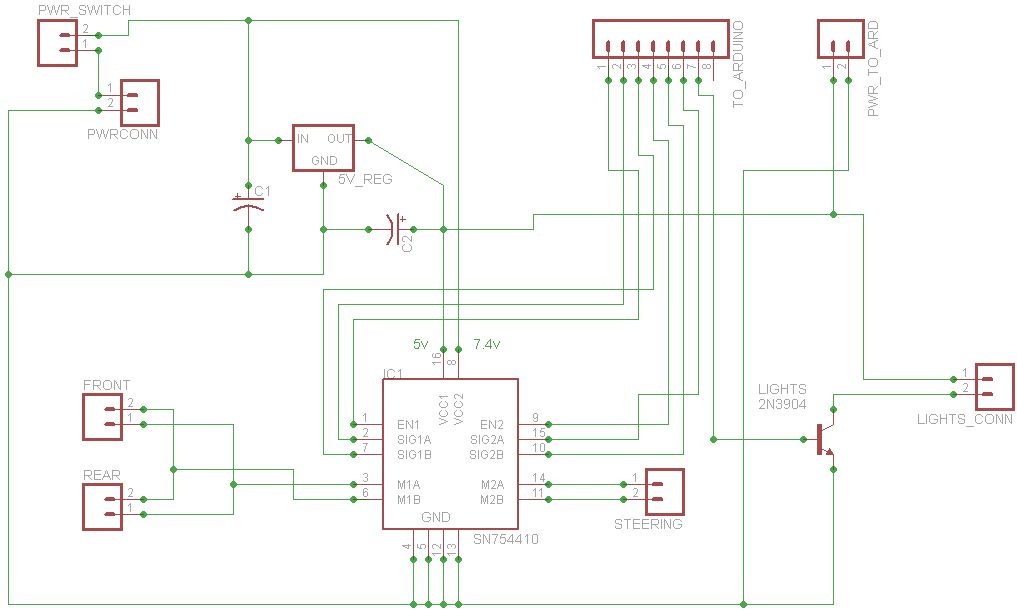
Step 2: Design Motor Control Circuit…
I put together this circuit to function as a motor controller and power regulator for the arduino board.
It allows use of the standard 7.2V battery pack to power the drive motors, steering motors and the arduino.
This circuit uses the sn754410 dual h-bridge chip to switch the drive motors and steering motors. The control lines for the motor controller are pinned out for direct soldering to the end of a RJ45 cable that plugs into the shield. This allows for easy removal of the Arduino and WiFi Sheild.
Eagle Files are included here.
 WiFi RC Car Motor Controller Eagle Files.zip
Soldering Iron
Solder Wick
Screwdrivers
PCB etching supplies
Copper Clad Boards
Pliers
Arduino
AsyncLabs WiFi Sheild
RJ45 ends
Motor control H-Bridge
Caps.[/box]
For more detail: How to build an Arduino WiFi 4×4 with Android Controller