Persistence of vision is an optical illusion, it works on a simple phenomenon how our day to day television works. MY first pov was six months before with arduino uno and with motor. However it is best to have a small and portable device that can be carried anywhere and image can be seen without any external motors or fan.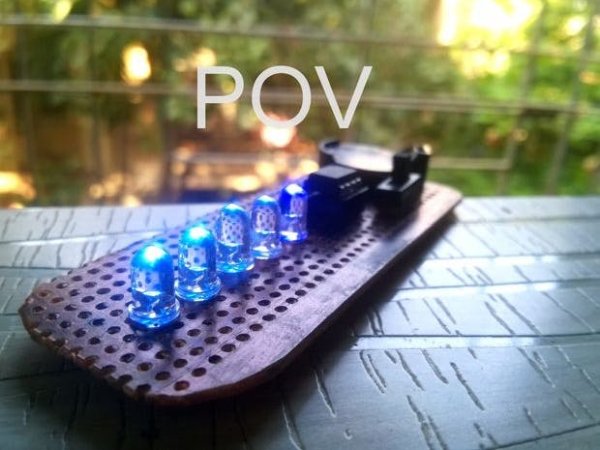
This small portable pov version uses attiny 85 ic, smaller variant of arduino uno that uses atmega 328 ic. This time, I made pov to give my sister as a gift .There are many tutorials on how to make pov but lot of them have tons of wires and motors and many a time uses the arduino uno board itself .so I thought, to come with no wire small pov with built in power source and a switch. By switching the internal crystal speed to 1 MHZ of attiny85, the image was seen more clearly without any motor. With proper camera shutter speed control the image can be seen nice and clear.
Step 1: Materials and Tools
- Arduino UNO
- Attiny 85
- 5 leds of any colour
- Breadboard
- soldering ion and solder wire
- Cutter
- Dotted pcb
- Hacksaw
- Slider switch
- 8 pin ic socket
- 3v cr2032 coin cell battery and holder
- jumper wires
Step 2: MAKING THE BOARD
- Cut the Dotted pcb into 9 cm by 3.5 cm using Hacksaw
- Solder the led’s on to the board and using cutter cut the extra led foot .
- solder the 8 pin ic socket on the board as shown in the picture
- Connect the ground of all leds to attiny 85 pin 4
- connect the rest of circuit as given in the circuit diagram picture.make sure you use solder bridge technique,as the whole board should have no wires.
- check all the connections using multimeter to check if two traces are not shorted.
- clean the pcb and now we will solder the switch and battery holder
- put the coin cell into holder and check with multimeter which pin is positive and negative
- solder the pin of battery holder and slider switch as shown in the picture
- connect the 8pin of ic socket to middle pin of slider switch and first pin of slider will to positive terminal of battery holder
- Now trace the gnd to connect
- check every single connection if shorted use de soldering pump and redo the traces.
Thank you Hemal Chevli for sharing the pcb version of pov
https://github.com/hemalchevli/POV
Step 3: PROGRAM an Attiny
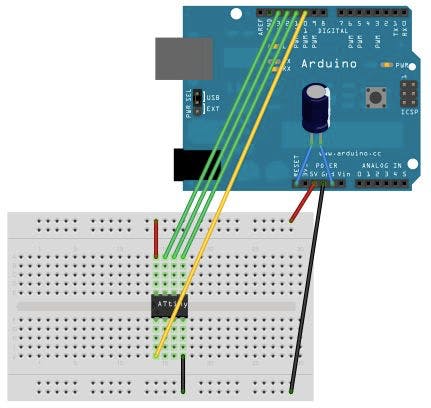
Step1. Install the ATtiny support in arduino ide
- Open the preferences dialog in the Arduino software.
- Find the “Additional Boards Manager URLs” field near the bottom of the dialog
- Paste the following URL into the field (use a comma to separate it from any URLs you’ve already added) https://raw.githubusercontent.com/damellis/attiny/ide-1.6.x-boards-manager/package_damellis_attiny_index.json
- Click the OK button to save your updated preferences.
- Open the boards manager in the “Tools > Board” menu.
- Scroll to the bottom of the list; you should see an entry for “ATtiny”.
- Click on the ATtiny entry. An install button should appear. Click the install button.
- The word “installed” should now appear next to the title of the ATtiny entry.
- Close the boards manager. You should now see an entry for ATtiny in the “Tools > Board” menu.
For more detail: Persistence Of Vision