This was inspired by Raj’s personal soundtrack shirt in Big Bang Theory S3, E16, “The Excelsior Acquisition”. You can now buy them online but it’s much more fun to make your own and it’s possible now that buttons designed for use in electronic clothing are available from Connectedwear.
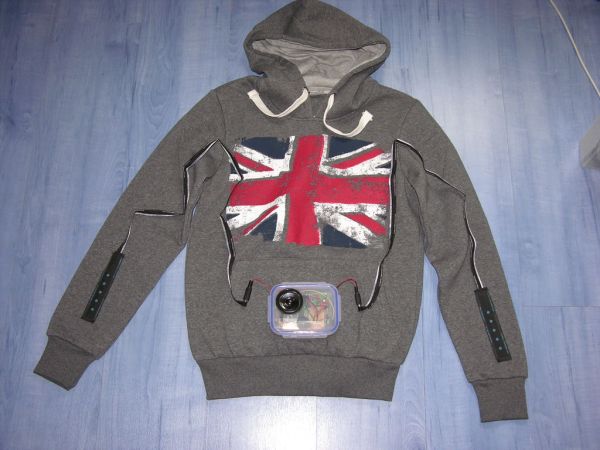
Nine of the buttons on the Connectedwear keypad sewn into the hoodie’s arms each play a given sound or tune and the tenth accesses a randomized library of small-boy friendly sound effects including farts, belches, screams, cheering, crashes, explosions, sirens etc.
The Connectedwear keypads are designed to operate an iPod but in a short email exchange they explained that the buttons work by each having a separate resistance built in. I used the Arduino Analog Read sketch from the Arduino website to read the resistance thru a 10K pull-up resistor when each button is pressed. I then used one of the several “multiple buttons on one analog pin” tutorials available on the web to build that code into the Waveshield code from the AdaFruit website tutorials.
Step 1: Parts
Arduino (make sure it’s compatible with a Waveshield – some aren’t)
Waveshield
2x Connectedwear Lite keypad part# KP2-4G from http://www.fibretronic.com
2x 2.5mm audio mono line sockets
2x 10K resistors
5cm, 8ohm speaker (Visaton K50WP)
9v battery connector with switch
Stripboard
Jumper wires
Step 2:
Circuit:
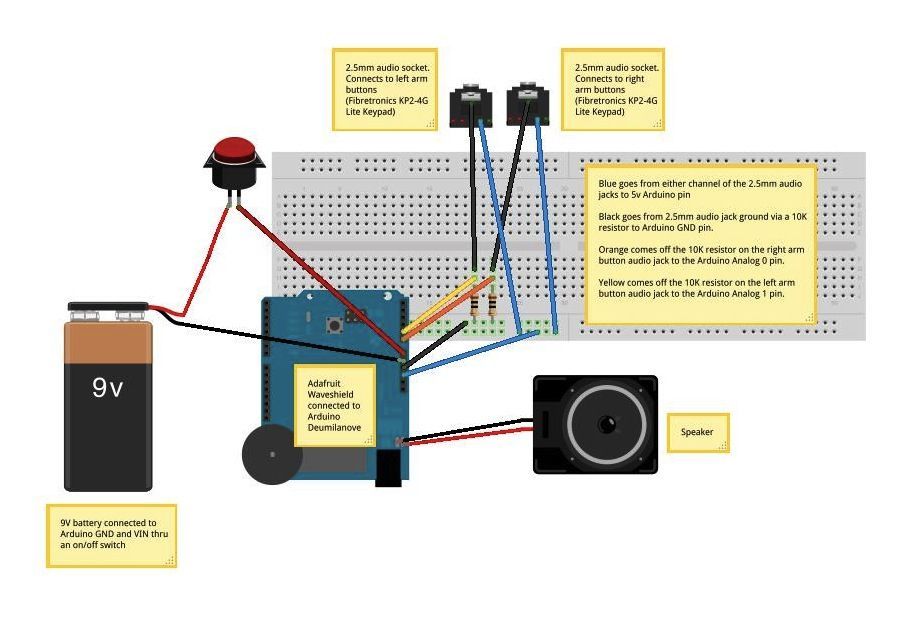
Breadboard everything first to read the resistance when each button is pressed. From the 2.5mm jack sockets put the center connection into ground via 10K resistor , with a pull up jumper into analog 0 pin on the Arduino. Connect either of the side pins on the 2.5mm socket to 5v pin. Repeat for the other 2.5mm socket with ascend resistor onto analog 1 pin. Connect a 9v battery to GND and the Vin pin thru any type of on/off switch you have available. Circuit diagrams are not my strong point but withe the help of Fritzing, here goes. Hope it makes sense.
Read the input each time a button is pressed on pin 0 then reload the sketch, having changed int analogPin to 1. It’s important read both sets of buttons separately as they all seem to be slightly different to each other.
Make sure all your jumpers are firm as a wobbly lead will have your readings bouncing all over the place. You know the circuit is solid when the serial monitor gives you a nice long line of zeros between button presses. Do this with your 9v power supply connected and switched on to replicate the system current in the final setup.
Step 4: Audio Files
Load your audio files onto the SD card on the Waveshield. Because I wanted as small a speakers possible to reduce weight and size but as loud a volume as possible I used Final Cut to boost the sound output by dragging the Volume Output Overlay to 11db for each sound file then saved using the Quicktime Conversion option. Sound files will only play if they fit the parameters laid out on http://www.ladyada.net/make/waveshield/. I used .wav, Linear PMC, Mono, 22Khz, Best Output, 8 Bits as my settings. The files distort a little coming out of the 5cm 8ohm speaker, but not too much.
Step 5: Code
The bulk of the code is for the WaveShield, based on http://www.ladyada.net/make/waveshield/
There are several multi-button examples around- I used a mash-up based on Rayshobby blog http://rayshobby.net/?p=16 with a bit of this one, http://www.instructables.com/id/Arduino-iPod/step4/Download-the-program/ thrown in.
Random selection code for the last button is adapted from www.arduino.cc/en/Tutorial/Blink & www.arduino.cc/en/Reference/Random.
Step 6: Build it
Once you are happy, solder the circuit onto a piece of stripboard and fit it into a suitable enclosure. Find a suitable garment – a hood works great because of the large pocket in the front. Find somebody with a sewing machine to fit it into the hoodie and away you go.
[box color=”#985D00″ bg=”#FFF8CB” font=”verdana” fontsize=”14 ” radius=”20 ” border=”#985D12″ float=”right” head=”Major Components in Project” headbg=”#FFEB70″ headcolor=”#985D00″]
resistors
speaker
battery connector with switch
Stripboard
[/box]
For more detail: Arduino Personal Soundtrack Hoodie