In this Arduino based automatic water level indicator and controller project we are going to measure the water level by using ultrasonic sensors. Basic principal of ultrasonic distance measurement is based on ECHO. When sound waves are transmitted in environment then they return back to the origin as ECHO after striking on any obstacle. So we have to only calculate its traveling time of both sounds means outgoing time and returning time to origin after striking on any obstacle. And after some calculation we can get a result that is the distance. This concept is used in our water controller project where the water motor pump is automatically turned on when water level in the tank becomes low. You can also check this simple water level indicator circuit for a simpler version of this project.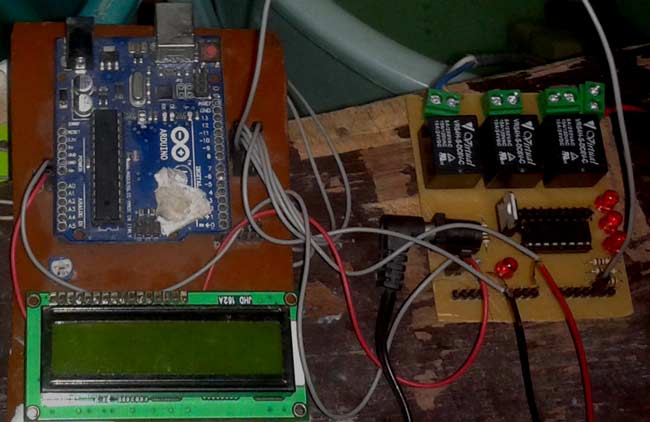
Components
- Arduino Uno
- Ultrasonic sensor Module
- 16×2 LCD
- Relay 6 Volt
- ULN2003
- 7806
- PVT
- Copper wire
- 9 volt battery or 12 Voltadaptor
- Connecting wires
Ultrasonic Sensor Module
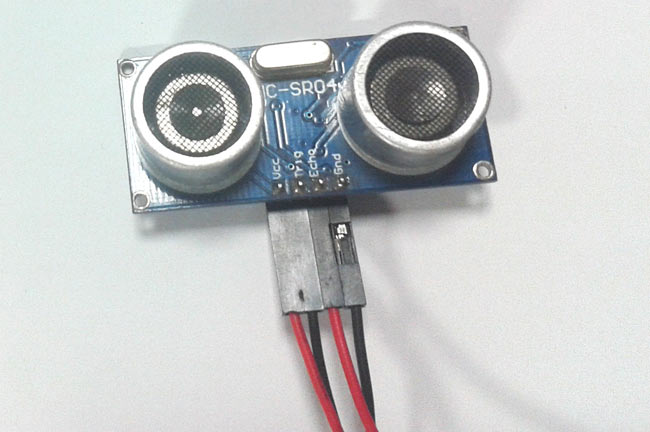
Ultrasonic sensor HC-SR04 is used to measure distance in range of 2cm-400cm with accuracy of 3mm. The sensor module consists of ultrasonic transmitter, receiver and the control circuit.
The ultrasonic sensor module works on the natural phenomenon of ECHO of sound. A pulse is sent for about 10us to trigger the module. After which the module automatically sends 8 cycles of 40 KHz ultrasound signal and checks its echo. The signal after striking with an obstacle returns back and is captured by the receiver. Thus the distance of the obstacle from the sensor is simply calculated by the formula given as
Distance= (time x speed)/2.
Here we have divided the product of speed and time by 2 because the time is the total time it took to reach the obstacle and return back. Thus the time to reach obstacle is just half the total time taken.
Working of Automatic Water Level Controller
Working of this project is very simple we have used Ultrasonic sensor module which sends the sound waves in the water tank and detects reflection of sound waves that is ECHO. First of all we needs to trigger the ultrasonic sensor module to transmit signal by using Arduino and then wait to receive ECHO. Arduino reads the time between triggering and received ECHO. We know that speed of sound is around 340 m/s. so we can calculate distance by using given formula:
Distance= (travel time/2) * speed of sound
Where speed of sound is approximately 340m per second.
By using this methods we gets distance from sensor to water surface. After it we need to calculate water level.
Now we need to calculate the total length of water tank. As we know the length of water tank then we can calculate the water level by subtracting resulting distance coming from ultrasonic from total length of tank. And we will get the water level distance. Now we can convert this water level in to the percent of water, and can display it on LCD. The working of the complete water level indicator project is shown in below block diagram.
Circuit Diagram and Explanation
As shown in the water level controller circuit given below, Ultrasonic sensor module’s “trigger” and “echo” pins are directly connected to pin 10 and 11 of arduino. A 16×2 LCD is connected with arduino in 4-bit mode. Control pin RS, RW and En are directly connected to arduino pin 7, GND and 6. And data pin D4-D7 is connected to 5, 4, 3 and 2 of arduino, and buzzer is connected at pin 12. 6 Volt relay is also connected at pin 8 of arduino through ULN2003 for turning on or turning off the water motor pump. A voltage regulator 7805 is also used for providing 5 volt to relay and to remaining circuit.
In this circuit Ultrasonic sensor module is placed at the top of bucket (water tank) for demonstration. This sensor module will read the distance between sensor module and water surface, and it will show the distance on LCD screen with message “Water Space in Tank is:”. It means we are here showing empty place of distance or volume for water instead of water level. Because of this functionality we can use this system in any water tank. When empty water level reaches at distance about 30 cm then Arduino turns ON the water pump by driving relay. And now LCD will show “LOW Water Level” “Motor turned ON”, and Relay status LED will start glowing
Now if the empty space reaches at distance about 12 cm arduino turns OFF the relay and LCD will show “Tank is full” “Motor Turned OFF”. Buzzer also beep for some time and relay status LED will turned OFF.
Programming
To program Arduino for water level controller, first we define all the pin that we are going to use in the project for interfacing external devices like relay, LCD, buzzer etc.
#define trigger 10
#define echo 11
#define motor 8
#define buzzer 12
Then we initialize all the devices used in project.
 lcd.begin(16,2);
 pinMode(trigger,OUTPUT);
 pinMode(echo,INPUT);
 pinMode(motor, OUTPUT);
 pinMode(buzzer, OUTPUT);
 lcd.print("  Water Level ");
 lcd.setCursor(0,1);
 lcd.print("   Indicator  ");
 delay(2000);
Now initialize the ultrasonic sensor module and read time of sending and receiving time of ultrasonic waves or sound by using pulseIn(pin). Then perform calculations and display the result on 16×2 LCD by using appropriate functions.
 digitalWrite(trigger,HIGH);
 delayMicroseconds(10);
 digitalWrite(trigger,LOW);
 delayMicroseconds(2);
 time=pulseIn(echo,HIGH);
 distance=time*340/20000;
 lcd.clear();
 lcd.print("Water Space In  ");
 lcd.setCursor(0,1);
 lcd.print("Tank is: ");
 lcd.print(distance);
 lcd.print("Cm");
After it we check conditions if water tank is full or water level is LOW, and take actions accordingly.
 if(distance<12 && temp==0)
 {
     digitalWrite(motor, LOW);
     digitalWrite(buzzer, HIGH);
     lcd.clear();
     lcd.print("Water Tank Full ");
     lcd.setCursor(0,1);
     lcd.print("Motor Turned OFF");
     delay(2000);
     digitalWrite(buzzer, LOW);
     delay(3000);
     temp=1;
 }

  else if(distance<12 && temp==1)
 {
     digitalWrite(motor, LOW);
     lcd.clear();
     lcd.print("Water Tank Full ");
     lcd.setCursor(0,1);
     lcd.print("Motor Turned OFF");
     delay(5000);
 }
Code
#include <LiquidCrystal.h>
#define trigger 10
#define echo 11
#define motor 8
#define buzzer 12
LiquidCrystal lcd(7,6,5,4,3,2);
float time=0,distance=0;
int temp=0;
void setup()
{
lcd.begin(16,2);
pinMode(trigger,OUTPUT);
pinMode(echo,INPUT);
pinMode(motor, OUTPUT);
pinMode(buzzer, OUTPUT);
lcd.print(” Water Level “);
lcd.setCursor(0,1);
lcd.print(” Indicator “);
delay(2000);
}
void loop()
{
lcd.clear();
digitalWrite(trigger,LOW);
delayMicroseconds(2);
digitalWrite(trigger,HIGH);
delayMicroseconds(10);
digitalWrite(trigger,LOW);
delayMicroseconds(2);
time=pulseIn(echo,HIGH);
distance=time*340/20000;
lcd.clear();
lcd.print(“Water Space In “);
lcd.setCursor(0,1);
lcd.print(“Tank is: “);
lcd.print(distance);
lcd.print(“Cm”);
delay(2000);
if(distance<12 && temp==0)
{
digitalWrite(motor, LOW);
digitalWrite(buzzer, HIGH);
lcd.clear();
lcd.print(“Water Tank Full “);
lcd.setCursor(0,1);
lcd.print(“Motor Turned OFF”);
delay(2000);
digitalWrite(buzzer, LOW);
delay(3000);
temp=1;
}
else if(distance<12 && temp==1)
{
digitalWrite(motor, LOW);
lcd.clear();
lcd.print(“Water Tank Full “);
lcd.setCursor(0,1);
lcd.print(“Motor Turned OFF”);
delay(5000);
}
else if(distance>30)
{
digitalWrite(motor, HIGH);
lcd.clear();
lcd.print(“LOW Water Level”);
lcd.setCursor(0,1);
lcd.print(“Motor Turned ON”);
delay(5000);
temp=0;
}
}
Source: Automatic Water Level Indicator and Controller using Arduino