We are going to make an Arduino control LED Piranha Plant :]
Step 1: What you’ll need
Arduino Uno
9 Resisters
9 LEDs – Red, Yellow, Orange is best since they need less amperage
PIR sensor
9v battery
arduino wall plug (you’ll be cutting the connection so that you can connect it to the battery. 12v plug in will over heat the arduino)
LOTS of wire
Plant plot of your choice – plastic is easiest
8in styrofom ball
Large white pipe cleaner
Paint – green, red, white
paint brushes
PVC pipe
saw – to cut pvc pipe
hot glue gun
45 degree elbow pipes – 3
model magic – doesn’t matter which color
foam core – for teeth
foam sheets

Step 2: Painting
You’ll want to paint everything first since it takes while to dry.
Plant pot, elbows, pvc pipe, and leaves will be green
Ball is red with white spots.
teeth – if you buy white foam core you wont have to worry about painting the teeth
You cut the leaf shape out of the foam sheet
you’ll also want to cut a circle to fit the pot
After the ball is painted you need to cut out a mouth. Once the mouth is cut you’ll nee to hallow out the inside. I used a knife to help cut mouth of it out. Then I used a spoon to refine it. Make sure you take about enough for the LED legs to come through.
Don’t worry about painting the inside. You’ll be cutting some foam core to fit inside. The mouth insert should be red
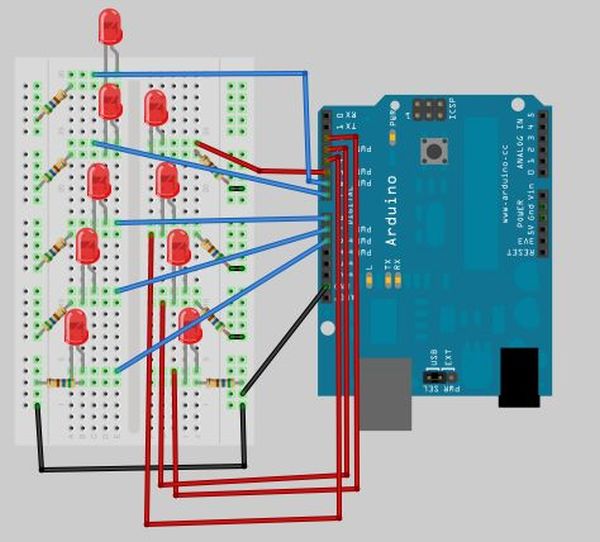
Step 3: Setting up
Testing makes things perfect :]
PIR
GND -arduino GND
VCC – Arduino 5V
OUT – A0 / OnOff switch (refer to yellow gator clip)
ONOff switch
Green gator clip – 11
Yellow gator clip – arduino GND
Black gator clip – any capasitor
red gator clip – PIR ground
Step 4: Coding
int sensorValue = 0;
int leds[] = {2,3,4,5,6,7,8,9,10}; // 9 total
int relay = 11;
void setup() {
pinMode(sensorPin, INPUT);
pinMode(relay,OUTPUT);
for(int i = 0;i<90;i++){
pinMode(leds[i],OUTPUT);
}
Serial.begin(9600);
}
void loop() {
randomSequence();
// read the value from the sensor:
sensorValue = analogRead(sensorPin);
Serial.println(sensorValue);
if (sensorValue>950){ //The ‘silence’ sensor value is 509-511
digitalWrite(relay,HIGH);
delay(100);
} else {
digitalWrite(relay,LOW);
}
}
// utterly random , a a kind of twinkling effect is acheived?
void randomSequence(){
int randomLed = random(0,9);
digitalWrite(leds[randomLed],HIGH);
delay(50);
randomLed = random(0,9);
digitalWrite(leds[randomLed],LOW);
}
9 Resisters
9 LEDs
PIR sensor[/box]
For more detail: LED Super Mario Piranha Plant using an Arduino