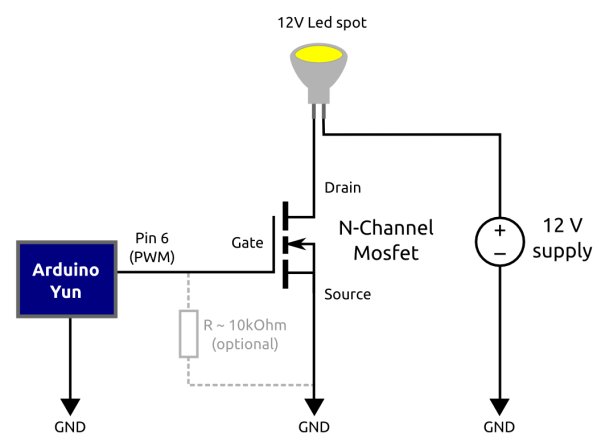
The Arduino Yún is a WLAN capable development board featuring an ATMega microcontroller, as well as a separate chip running a small Linux distribution, making it a perfect candidate for home automation projects like in the picture below! This basic tutorial will show you how to communicate wirelessly between your Arduino Yún and an Android device. Schematics and components for dimming a high power led are also available at the end of this post.
Arduino part
To keep things simple, we will begin by using the official Bridge library example sketch from here. After this sketch is installed, you can control the Arduino’s pins by entering specific URLs in a web browser. You need to set REST API access to open in the Arduino Yún configuration webinterface in order for this to work.
For instance (assuming your Arduino’s IP address is 192.168.1.33)
- http://192.168.1.33/arduino/digital/13/1 will issue a digitalWrite(13,1). And since pin 13 is connected to the on-board LED, the LED is lit up.
- http://192.168.1.33/arduino/digital/13/0 will call digitalWrite(13,0), and thus disable the LED.
- http://192.168.1.33/arduino/analog/13/128 results in analogWrite(13,128), which will dim the on-board LED to about 50% intensity. In the following Android application, we will use this URL to dim the LED accordingly.
On the other hand, you can read the state of the Arduino’s pins.
- http://192.168.1.33/data/get/D13 will return a JSON string, which can be parsed to get the appropriate value.
Actually, entering the above URL will not directly read pin 13. It will simply try to return a key/value pair in the datastore with key = D13. By studying the Arduino sketch, you can see that there are various occurences of Bridge.put(key, String(value)). This is used to update the datastore on the Linux environment.
Using formatted URLs in this way is also known as Representational state transfer (REST).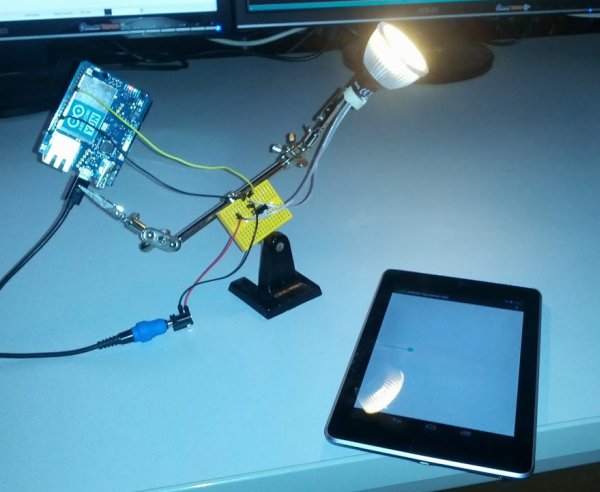
Android code
The Android part is rather straight forward. We will use the above URLs to write and read values on the Arduino. Some care must be taken since this involves networking. Therefore we must use separate threads, but we’ll get to that later. Let’s start a new Android project by adding a SeekBar and a TextView to our main layout.
android:layout_width="match_parent" android:layout_height="match_parent" android:paddingBottom="@dimen/activity_vertical_margin" android:paddingLeft="@dimen/activity_horizontal_margin" android:paddingRight="@dimen/activity_horizontal_margin" android:paddingTop="@dimen/activity_vertical_margin" tools:context=".MainActivity" > <SeekBar android:id="@+id/seekBar" android:layout_width="match_parent" android:layout_height="wrap_content" android:max="255" /> <TextView android:id="@+id/value" android:layout_width="wrap_content" android:layout_height="wrap_content" android:layout_centerHorizontal="true" android:layout_centerVertical="true" android:text="0" /></RelativeLayout> |
The SeekBar slider will be used to set the brightness of the on-board LED. The current value is read back from the Arduino and displayed in our TextView. Since calling the URLs will be done in a different thread, we need some form of inter thread communication. Synchronized, wait and notify come to mind, but there are – at least in my opinion – easier to grasp mechanisms. For instance an ArrayBlockingQueue which is basically a FIFO queue that can safely be filled and emptied from multiple threads. So let’s create an ArrayBlockingQueue and fill it with values whenever the SeekBar slider is moved.
private ArrayBlockingQueue<Integer> mQueue = new ArrayBlockingQueue<Integer>(100);@Overrideprotected void onCreate(Bundle savedInstanceState) { super.onCreate(savedInstanceState); setContentView(R.layout.activity_main); mSeekBar = (SeekBar) findViewById(R.id.seekBar); mSeekBar.setOnSeekBarChangeListener(new OnSeekBarChangeListener() { @Override public void onStopTrackingTouch(SeekBar seekBar) {} @Override public void onStartTrackingTouch(SeekBar seekBar) {} @Override public void onProgressChanged(SeekBar seekBar, int progress, boolean fromUser) { mQueue.offer(progress); } });} |
For networking, we will use two separate threads, one for sending values to the Arduino and one for reading values from the Arduino. Here is the code for the sending thread. Full source code including both threads is available at the bottom of this post.
private static Thread sNetworkThreadSend = null;private final Runnable mNetworkRunnableSend = new Runnable() { @Override public void run() { String url; try { while(!mStop.get()){ int val = mQueue.take(); if(val >= 0){ HttpClient httpClient = new DefaultHttpClient(); url = urlBase.concat(String.valueOf(val)); HttpResponse response = httpClient.execute(new HttpGet(url)); } } } catch (ClientProtocolException e) { e.printStackTrace(); } catch (IOException e) { e.printStackTrace(); } catch (InterruptedException e) { e.printStackTrace(); } sNetworkThreadSend = null; }}; |
Now we only need to start the threads and we’re golden. A good practice is to start network threads in the Activity’s onStart handler and stop them in the – you guessed right onStop handler. After all, one usually doesn’t want to waste resources when the Activity is hidden anyways.
private AtomicBoolean mStop = new AtomicBoolean(false);@Overrideprotected void onStart() { mStop.set(false); if(sNetworkThreadSend == null){ sNetworkThreadSend = new Thread(mNetworkRunnableSend); sNetworkThreadSend.start(); } if(sNetworkThreadReceive == null){ sNetworkThreadReceive = new Thread(mNetworkRunnableReceive); sNetworkThreadReceive.start(); } super.onStart();}@Overrideprotected void onStop() { mStop.set(true); mQueue.clear(); if(sNetworkThreadSend != null) sNetworkThreadSend.interrupt(); if(sNetworkThreadReceive != null) sNetworkThreadReceive.interrupt(); super.onStop();} |
The full Android and Arduino Yún REST example can be downloaded from here.
It gets better…
The above example should be OK for many applications already, however, you will notice that it takes quite a while until the LED finally reaches its desired value. The reason for this is that the SeekBar’s onProgressChanged method is called many times when swiping the slider, and therefore our queue is filled much faster than the thread can handle. One quick fix is to clear the queue before adding a new element, like this:
@Overridepublic void onProgressChanged(SeekBar seekBar, int progress, boolean fromUser) { mQueue.clear(); mQueue.offer(progress);} |
However, it’s still not very responsive. Instead of issuing a new http request for every value to be transmitted, it would be way better if we had some kind of a continuous connection between the Arduino and the Android device. As you can see in the example Bridge sketch, there is a YunServer class. Normally this server listens on port 5555 where URLs in the type of http://arduino.ip/arduino/some/command are forwarded for easy REST access. But we can also use the YunServer to listen on another port! We may then connect to this port using a socket on the Android side, and we will be able to continuously send new values without the need to initiate a new http request. The key is to initiate the YunServer with a different constructor, and also configure it so that it will listen on connections other than localhost, like so:
#include <Bridge.h>#include <YunServer.h>#include <YunClient.h>#define PORT 6666YunServer server(PORT);void setup() { Serial.begin(115200); Bridge.begin(); server.noListenOnLocalhost(); server.begin();} |
You can then accept clients in the main loop
void loop() { YunClient client = server.accept(); if(client.connected()){ String question = "What is your name?\n"; client.write((uint8_t*)&question[0], question.length()); String response; while(client.connected()){ if(client.available()){ char cmd = client.read(); if(cmd == '\n'){ break; } else { response += String(cmd); } } } response = "Bye "+response+"\n"; client.write((uint8_t*)&response[0], response.length()); client.stop(); } delay(1000);} |
Try the above code and then test it from the command line by entering (obviously adjust the IP address)
user@host:~$ netcat 192.168.1.47 6666
 For communicating with the Android device we will use a slightly different sketch, which you can download from here. The basic idea is, that we send the desired brightness value 0..255 in ASCII format from the Android device to the Arduino. Also, the new line symbol ‘\n’ is used to detect the end of a brightness value. To send those values, we need to adjust our network thread as follows:
private OutputStream mOutputStream = null;private Socket mSocket = null;private static Thread sNetworkThread = null;private final Runnable mNetworkRunnable = new Runnable() { @Override public void run() { try { mSocket = new Socket(ARDUINO_IP_ADDRESS, PORT); mOutputStream = mSocket.getOutputStream(); } catch (UnknownHostException e1) { e1.printStackTrace(); mStop.set(true); } catch (IOException e1) { e1.printStackTrace(); mStop.set(true); } mQueue.clear(); // we only want new values try { while(!mStop.get()){ int val = mQueue.take(); if(val >= 0){ mOutputStream.write((val+"\n").getBytes()); } } } catch (IOException e) { e.printStackTrace(); } catch (InterruptedException e) { e.printStackTrace(); } finally{ try { mStop.set(true); if(mOutputStream != null) mOutputStream.close(); if(mSocket != null) mSocket.close(); } catch (IOException e) { e.printStackTrace(); } } sNetworkThread = null; }}; |
The LED brightness should now adjust as smooth as butter. I have also tried to summarize the most important communication aspects of the whole application in the following diagram:
For more detail: Home Automation with Android and Arduino Yún