This project consists of two temperatures that are measured by the Arduino using two MCP9700 temperature sensors An Arduino Uno and Ethernet shield are set up as a web server that hosts a web page to display the two temperatures on two gauges. The web page is stored on a SD card that is plugged into the micro SD card socket on the Ethernet shield. A web browser is used to display the two temperature gauges on any computer connected to the same network as the Arduino. The video below shows the project working with the two MCP9700 temperature sensors connected to the Arduino using a breadboard.
Circuit Diagram
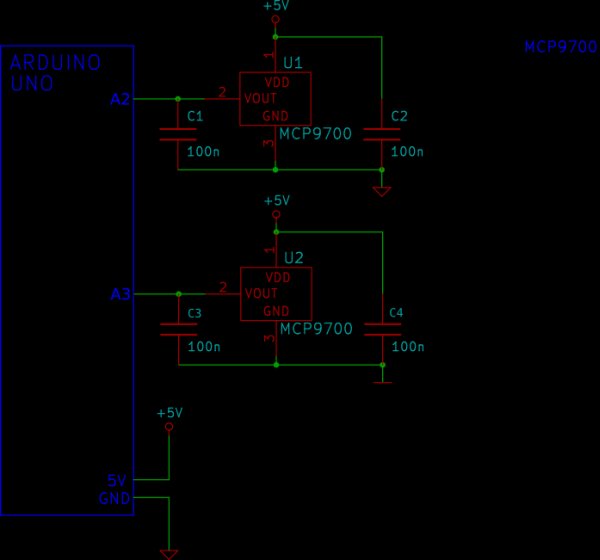
Two MCP9700 temperature sensors are interfaced to the Arduino and Ethernet shield as shown in the schematic diagram below. Two temperature sensors can be used to measure two individual temperatures, such as an inside temperature and outside temperature for example.
Capacitors C2 and C4 are optional power supply decoupling capacitors. Capacitors C1 and C3 are optional capacitors for filtering the output voltage from the MCP9700’s. Both sets of capacitors can be included in the circuit to make the analog output of the MCP9700 more stable.
 Arduino Sketch

The sketch below must be loaded to the Arduino. The sketch is a modified version of the two gauge Arduino web server tutorial which in turn is a modified version of part 15 of the Arduino Ethernet shield web server tutorial.
SD Card Hosted Web Page
The HTML markup below that contains JavaScript code must be copied to a file called index.htm, the file must then be copied to a micro SD card.
The micro SD card must be plugged into an Arduino Ethernet shield board that is plugged into an Arduino board such as the Arduino Uno. The Arduino must have the above sketch loaded to it.
Like the sketch above, the HTML page below is a modified version of the web page from the two gauge Arduino web server tutorial which in turn is a modified version of part 15 of the Arduino Ethernet shield web server tutorial.
How the Project Works
- When you browse to the IP address that the Arduino web server is located at (set to 192.168.0.20 in the above Arduino sketch) using a web browser, the Arduino web server will serve up the web page from the SD card in the Arduino Ethernet shield.
- The JavaScript code in the web page, now running in the web browser, will request an XML file from the Arduino web server every 200ms.
- When the Arduino receives the request for the XML file, it will read the analog values from the two analog inputs that the MCP9700 ICs are connected to, insert them into an XML file which it will then send back to the browser.
 The Arduino gets ten analog samples from each of the analog inputs and sends the average of the ten samples to the browser. This adds some filtering to the analog values to try to prevent the needles on the gauges from twitching or flicking back and forth.
- After the browser has received the XML file, the JavaScript code in the web page will extract the analog values from the XML file and feed them to the gauges for display.
The JavaScript code converts the raw analog values to temperatures, e.g. using the following code for the first analog value:
data_val = ((data_val * 5.0 / 1024.0) - 0.5) / 0.01;
Gauge Component
The gauge component is written by Mykhailo Stadnyk and can be downloaded from Mikhus at github. Also see a blog article on the gauge.
For more detail: Web Server with Two Temperature Gauges