This instructable is for two purposes 1) to understand and learn the fundamentals of sequential logic 2) use that knowledge to create a digital clock.
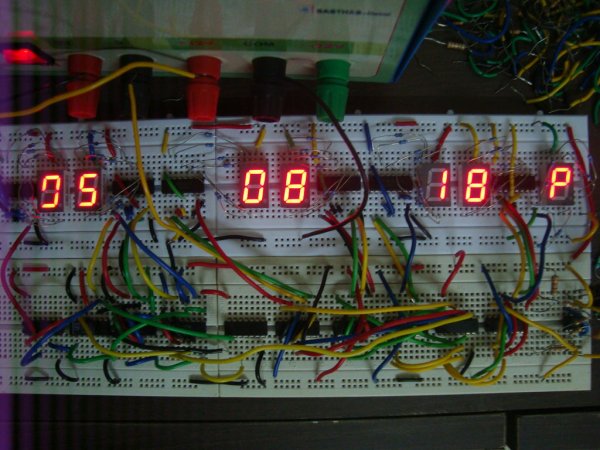
Digital clocks have been built by countless electronics hobbyists over the world. So why have I chosen to implement that? Well usually clock circuits available on the internet (all circuits I have seen) use the 7490 counter (I have used 7493 but I will show why), microprocessors or Arduino boards. But not all of us have the means to buy microprocessors or Arduino boards (as far as I am concerned they are expensive). I wanted to try a different circuit for the same clock and I also chose it because it requires a lot of counters, and counters are based on sequential logic. When I say digital clock, you should expect something like the one in the picture!
It’s my stand that just looking at the circuit diagram and replicating it on a bread-board is not what electronics is about. Almost all digital circuits from traffic lights etc. to even computers are all based on sequential logic (its importance). Therefore, I have included the theory of flip-flops and sequential logic design in hope that it would help the reader to design circuits of their own.
I have done my best to explain sequential logic design between Step 3 to 8. However, if all you want is the clock, then please skip everything from step 3 to step 8. But if you go through those steps you will understand how to work with flip-flops etc. and though it takes a lot of time I can assure that you will be left with a wealth of knowledge.
Since this is a circuit ‘of my own’, I know that I have to show a novelty factor. Usual clocks based on decade counters have a hour counter from 0 -23. I have only used IC’s but still got a 12 hour clock, which I have not seen elsewhere. I have also added a small alarm module. The alarm is again achieved using IC’s not by programming boards (which quite frankly is comparatively easy). It is not much but I did whatever extra nicks I could do. The main emphasis however, is learning sequential logic and developing a breadboard based clock using that knowledge.
For your kind attention: I am assuming that you know basic high school level digital logic – the fundamental logic gates and binary numbers.
Step 1: The Logic of the Clock
As said earlier, our clock is a 12 hour clock. So, the clock we want is something like this HH : MM : SS A/P. Now, SS can also be referred as S1 S0 and the same goes for MM.
S0 counts from 0 to 9 and then S1 becomes 1 and S0 counts again. Our seconds count is from 0 – 59. So our S1 counter has to count only from 0-5. S0 counts 0-9. Thus 0 – 59 will be obtained. Now when seconds becomes 60, it is one minute. So everytime SS reaches 60, M0 (minutes) should increase by 1.
M1 and M0 essentially count the same way as seconds. So, a 1 second pulse given to S0 makes it count from 0 – 9. Whenever S0 reaches 10, a pulse (digital parlance – clock signal) has to be generated to make S0 zero again (digital parlance – reset) and S1 one and the process repeats to make S1 two and so on. Thus S1 S0 will count from 0 – 59. Everytime SS reaches 60 a pulse has to be generated to make M0 one and SS 00. For every 60 seconds, SS will go to 59 and back to 0, while MM is incremented. The MM counting is similar to SS but MM receives its clock (triggering pulse) from SS.
 Remember MM is also 0 – 59. So similar to how when, SS incremented MM when it turned 0 after 59 (it doesnt become 60), MM also should become 00 incrementing HH by 1. HH is a 1 – 12 counter. So when HH becomes 12, A (AM) is changed to P (PM) and vice-versa. So let’s say the time is initially 11:59:59 A. The next second it will become, 12:00:00 P. The day passes and now the time is 11:59:59 P. The next second it will become 12:00:00 A. This repeats for as long as the clock runs.
This is the logic of the circuit. So, we need to design a 0-9 counter for S0 & M0, 0-5 counter for S1 & M1 and 1 – 12 counter for HH. A/P doesn’t need a counter, it just needs to alternate between these two states.
The alarm is done using a magnitude comparator. A 8 pin dip switch is used to enter 8 bits of data. Note HH (1 – 12) is 4 bits and M1 (0 – 5) is 3 bits. A/P is 1 bit. So if ABCDEFGH are the 8 pins from left to right, ABCD is entered for hours, EFG is for minutes and H is for A/P (M).
To set an alarm for 06: 30 AM, one needs to enter the binary value of 6 in ABCD (0110), 3 in EFG (011) and 1 (for A) in H. Note our alarm can be set only for 6: 30 or 6: 40 not any value in between. I think I can assume anybody who has enough technical knowledge to construct the clock will be able to enter the binary equivalent of decimals as shown above.
When the clock data is equal to 8 pin dip switch data, the comparator’s A=B truth value becomes logic high, which is used to trigger an alarm with another flip-flop. The reset of the flip-flop will enable us to silence the alarm. I guess that’s as far as the logic in the circuit goes to. From now it’s design and implementation.
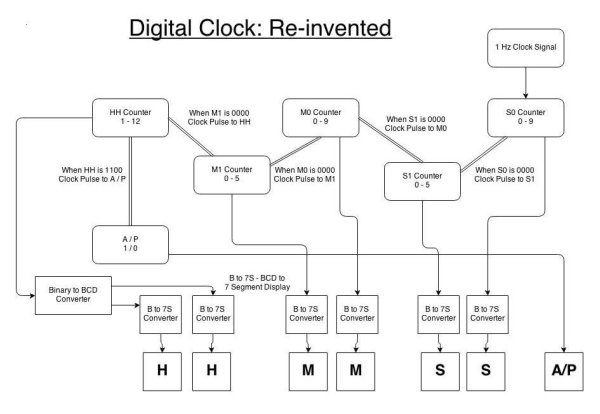
Step 2: Block Diagram
To avoid cramping up space, the alarm module is given a separate block diagram. The working of the block diagram is explained in detail here. Parts of this section might seem like the repetition of he logic of the circuit discussed before, but bear with me.
A 1 Hz (signal at every 1 second interval) square wave from an astable multivibrator is applied as clock signal to the S0 counter which counts from 0 to 9 after every second. After 9, the values reset back to 0. Whenever S0 (4 bits) becomes 0000, a clock signal has to be generated. This clock signal is applied to S1 counter which counts from 0 to 5. After it reaches 5 and S0 becomes 9, the next pulse will make both S1 & S0 zero.
When S1 (3 bits) becomes 000, a clock is generated and applied onto M0. This is extended to M1 just like S1. And similar to S1 when M1 (also 3 bits) becomes 000, a clock pulse is applied to HH. HH is a 4 bit counter counting from 1 – 12. Here everytime HH becomes 12, a clock pulse if used to toggle A to P or P to A.
Each S0, S1, M0 & M1 counter’s data is converted to 7 segment display format and applied to a 7 segment display. HH requires a Binary to BCD (Binary Coded Decimals) converter. So, the 7 segment displays show the time as it is stored in the flip-flops.
The alarm module uses an 8 bit comparator to accept the use defined time. As explained earlier, the first 4 bits are dedicated to HH, the next 3 bits are M1 and the last bit is to accept A/P. This 8 bit data is denoted A. The input from the dip switch is given to the comparator. The corresponding bits of data are also applied from the flip-flops. The loic is that whn the time as counted b te flip-lops is the same as that of the dip switch, the comparator’s A=B will become 1. This is used to toggle another lip-flop (its dedicated to this function alone) which is connected to the alarm. So, when A = B, the alarm sounds and it keeps sounding until the flip-flop is manually reset to 0.
Some of you might think, we can set the alarm only for times like 4: 30, 4:40 and during these times the A = B will be ‘1’ for 10 minutes. For example, if we set te alarm for 4: 30 PM, then the comparator output A = B will be 1 for 4:30 PM to 4: 39 PM because only M1 values are compared and M1 values are same.
So A = B is 1 for 10 minutes. Is that a problem? It isn’t because most flip-fops currently employed are edge triggered. What is edge triggering? To understand that, we have to understand flip-flops.
Step 3: Basics of D & T Filp-Flops
At a point of time in digital electronics, it was realized that you needed to remember past values to calculate new ones. For example, take our very own counters. You need to know what the previous number was, so that you can count to the next one. Only if you knew the previous number is 2 you can say the next number is 3 right?
By definition, a circuit whose present output depends on present input and past output is called a sequential circuit. Counters are sequential circuits. So a way had to be found to remember the previous state. This led to the development of a latch. A latch is a simple circuit that “latches on” or stores 1 or 0.
I have uploaded the .pdf file of the basics of flip flops, what they are and what do they do? I had to upload it for formatting issues. After reading through the document, continue with the next step. Remember, you can’t design circuits using flip flops, if you don’t know and understand their basics.
Step 4: Designing Sequential Logic
Simple Boolean expressions like A+B or A . B’ are all called combinational logic. Combinational logic when combined with memory is called sequential logic. Because it allows combinations to be made in sequences or recurring patterns.
Sequential logic design is quite simple if combination logic design is known – Karnaugh or K- Map reduction (generally Quine-Mculskey method is not used since that level of complexity is hardly used by hobbyists).
So we will look into how K map simplification is done. For sake of explanation, let us consider 3 bits A, B, C. The output Q is high for few arbitrary values of A, B, C. Now from this, we have to form the Boolean expression (fancy term for digital expression) for C in terms of A,B, C. That’s the purpose of a Karnaugh map or simply K-Maps.
Fair warning: It is almost impossible to understand K- Maps at first, but the more and more you see it again and again it becomes very easy. When I saw it for the first time it was ghastly, now it’s a pass time like bingo!
It is really tough to just talk about K maps and sequential logic design, so I have uploaded three hand written pages. Do read through it. I have done my best to compress the content into 3 pages, of what an entire book can be written about!
I have also uploaded the .pdf file of the Pin configurations of the IC’s we will use to implement our design and also our timer circuit. Use that as a reference or you can always search for pin configurations on the internet. I found this site useful: http://www.physics.mcmaster.ca/PHYS4DB3/Lab/Devic…
Step 5: 0 – 9 counter using D- FF
NOTE: The next four steps (including this one) are to gain knowledge of working and designing logic with flip-flops. These steps are not required for the clock’s final implementation. But these steps will show you why we use IC 7493.
For the sequential logic refer to the scanned file. Our objective is to now construct the counter.
Components Required:
IC 7474: 2 Nos.
IC 7411: 1 No.
IC 7408: 1 No.
IC 7432: 1 No.
IC 7447: 1 No.
IC 555: 1 No.
Capacitors: 1000 uF and 0.01 uF (1 each)
Resistors: 470 ohms (1), 500 ohms (1) and 330 ohms (7)
Common Anode 7 segment Display: 1 No.
Breadboard and Power supply
Obviously we need 4 D flip – flops (for the 4 bits). The best choice is to use IC 7474. Each IC has 2 flip flops. So we will need a total of 2 IC 7474 chips.
If you notice the pin diagram (the pdf in Step 4), you will see 1D, 2D etc. It simply means is 1D is the D terminal of the first flip-flop in the IC and 2D is the second. And the same applies for clock, clear etc.
From the design we also can know that we need three – 3 input AND gates. IC 7411 is a 3 input AND gate and each IC has three AND gates. So we will need 1 IC 7411.
We need four – 2 input AND gates. For this we will use IC 7408. Each IC has four AND gates, so we will need only 1 IC 7408.
We also need three 2 input OR gates. For this we will use IC 7432. Again this IC has four OR gates, we need only three but anyway we will use 1 IC 7432.
And yes, we want to see the output so a 7 segment display (I used common anode 7 segment display with IC 7447).
Construction:
There is not much of instructions I can give for the connections. Just use a breadboard and connect the Vcc and ground to all the IC’s first. It is better to keep the IC 7447 and the display on a separate adjoining board.
I have uploaded the pin configurations of all the IC’s and the display that are used in the counter. Use that as reference and just follow the designed logic.
First connect the clock signal from a 555 Astable multivibrator (a clock with a slow enough frequency to observe changes, we will worry about accuracy later). This is really a common circuit so I am not gonna discuss that but use the uploaded schematic. Connect the clock to the 4 flip flops (this is a synchronous circuit). Then start with D0 and do the combinational logic for D1, D2 and D3 one by one.
We are not using PRESET and CLEAR for this circuit, so you can either leave them open (without connections) or connect it to Vcc. I prefer the former option – just leave it.
In the 7447 pin configuration, you will find DCBA as the inputs. Q3 is D, Q2 is C, Q1 is B and Q0 is A. Connect a, b, c, d, e, f, g of the IC 7447 to the corresponding pins of the 7 segment display as in the pin diagram through a current limiting resistor of 330 ohms. Since we use a common anode display, connect the common terminal (COM in pin diagram) to Vcc.
Remember, the Q of the flip flop you designate D0 is Q0. And in the same way, Q of D1 is Q1, Q of D2 is Q2 and Q of D3 is Q3. You interchange any, the circuit will not work. Strictly adhere to the pin configurations.
You must now achieve the counter, if it does not work look for short circuits, loose contacts or wrong connections. I am sorry I can’t be of anymore use now.
Step 6: 0 – 5 counter using D – FF
This is quite similar to the 0-9 circuit except that the design changes and the circuit as such is comparatively smaller and requires less wires. Check the design in the scanned file.
Components:
IC 7474: 2 Nos.
IC 7411: 1 No.
IC 7408: 1 No.
IC 7432: 1 No.
IC 7447: 1 No.
IC 555: 1 No.
Capacitors: 1000 uF and 0.01 uF (1 each)
Resistors: 470 ohms (1), 500 ohms (1) and 330 ohms (7)
Common anode 7 segment display: 1 No.
Breadboard and Power supply
Here we need only 3 D flip Flops for the 3 bits, but we will have to use two IC 7474 anyway.
We also need 1 IC 7411 (for the one 3 input AND operation), 1 IC 7408 (for the three 2 input AND operations) and 1 IC 7432 (for the two 2 input OR operation). In practical terms gates and operations can be used interchangeably, as in 2 input AND gate is almost same as saying 2 input AND operation in practical terms.
The IC 7447 and the 7 segment display usage is the same as the previous case. In this case while connecting IC 7447, we use only 3 bits so only C for Q2, B for Q1 and A for Q0. Connect D terminal to the ground (don’t leave it open).
Construction:
Pretty much the rest of the circuit is the same and off the 4 Flip flops in the 2 IC 7474’s, we will only use three of them so don’t bother about the fourth 4th. Just leave that unconnected. And for the other terminals like PRESET and CLEAR – I suggest leave them too.
We need a clock again for the circuit and pretty much do the connections just like said before. First the Vcc and Ground and then the clock to the flip flops. Then the combinational logic for D0, D1 and D2.
As said before, Q of the flip flop you designate D0 is Q0. And in the same way, Q of D1 is Q1 and Q of D2 is Q2. Don’t mix it up!
Step 7: 0 – 9 Counter using T – FF
I have done this circuit in an asynchronous way. The two counters we saw till now work in an synchronous way. Read through the first scanned file where I have explained the difference.
Hoping that you have read it, now you will remember that I said connect the 555 timer output to all the clock terminals of the flip flops used in the 0-9 and 0-5 D flip counter. That is what makes them synchronous counters or in general synchronous circuits.
The same 0 – 9 and 0 – 5 counter can also be done in an asynchronous way which is what the next two counters will be about.
It is again an instance where it is not possible for me to explain the circuit by typing, so look into the second scanned file.
Components:
IC 7476: 2 Nos.
IC 7420: 1 No.
IC 7447: 1 No.
IC 555: 1 No.
Capacitors: 1000 uF and 0.01 uF (1 each)
Resistors: 470 ohms (1), 500 ohms (1) and 330 ohms (7)
Common Anode 7 segment Display: 1 No.
Breadboard & Power supply
As seen from the circuit diagram, we will need 4 T flip flops. As such there is no commercial T flip flop IC. So use a JK flip flop – IC 7476 and short circuit or connect J and K terminals. That connected J and K terminals will be our T terminal.
We will need one 4 input NAND gate for which we will use a IC 7420. This NAND gate’s output is connected to the CLEAR of all the 4 T flip flops.
Construction:
Again you will see terminals like 1K, 2K etc. Connect 1K to 1J and that will be 1T or the T terminal of the first flip flop in the IC. 2J and 2K for 2T.
The display part of the circuit remains the same with Q3 being D, Q2 being C, Q1 being B and Q0 being A for the inputs of IC 7447. The 7 segment connections from IC 7447 also don’t change.
Be careful while connecting the clock. We still need a 555 timer, but the timer’s output is connected to only the first flip flop (or the flip flop whose output is Q0). Then just follow the connections as in the second scanned file.
As you can see this counter uses very less wires. The working of such asynchronous counters is discussed in the 0 – 5 counter (for issues of space).
Step 8: 0 – 5 counter using T – FF
This circuit as well doesn’t change much from the 0-9 counter. For the circuit refer the scanned file.
Components:
IC 7476: 2 Nos.
IC 7410: 1 No.
IC 7447: 1 No.
IC 555: 1 No.
Common Anode 7 segment display: 1 No.
Capacitors: 1000 uF and 0.01 uF (1 each)
Resistors: 470 ohms (1), 500 ohms (1) and 330 ohms (7)
Breadboard & Power supply
As before, we need three bits or only 3 T flip flops but anyways we have to use 2 IC 7476. And the J and K have to be connected and they are together the T terminal.
Since this circuit requires only 3 bits, we need only a 3 input NAND gate. So we use IC 7410.
Construction:
Connect ‘T’ to Vcc and connect Q to the next stage clock as seen in the schematic.
The output of the 3 input NAND gate is connected to the CLEAR terminals of the three connected flip flops.
We use a 555 timer again connected only to the first flip flop. Then it’s asynchronous connections.
Towards the display side, Q2 is C, Q1 is B and Q0 is A and D is grounded since we require only 3 bits. The rest of the display connections are the same.
The working of such asynchronous counters is also explained in the scanned file. It is important to note that no matter how many T flip flops you connect in such an asynchronous way. The working does not vary.
So, it’s simpler to use Asynchronous circuits for counters because they use less connections and very little combinational logic. So, why are synchronous circuits important and why were excitation tables discussed? Well asynchronous are simple but they lack variety, meaning you could use them only as up or down counters that count ‘consecutive’ numbers. Up counters are ascending; Down counters are descending. All clocks use only up-counters otherwise time would run backwards!
The word consecutive there is very important. An asynchronous circuit, counts 6 then 7 and so on (up counter) or it counts 6 then 5 and so on (down counter). But what if I wanted to count only even number or odd numbers? There, you have no choice but to use synchronous circuits and excitation tables. Using synchronous circuits any random sequence can be done like from 1 to 5 then to 2 and then to 9 or whatever single loop sequence. So the choice between asynchronous or synchronous circuits depends solely on your purpose.
 Step 9: Why 7493?
For non- consecutive sequences, you have to go with synchronous circuits but for purposes like clocks where the counting sequence is consecutive, it is better to go with asynchronous circuits because they are simpler to construct.
So, it’s decided that we will use asynchronous logic for our clock. But even asynchronous logic requires 3 or 4 IC’s for each counter. Since we require multiple counters, what do we do for not cramping space? We use IC 7493.
Take a look at the IC 7493 architecture. If you connect Qa to input B, we get our 4 bit T flip-flop (all J & K are internally connected to Vcc) asynchronous counter.
For a 0 – 9 counter, 1010 (10) should be used as the reset trigger. So Qd and Qb are connected to R0(1) and R0(2) respectively and we have our 0 – 9 counter.
R0(1) and R0(2) are internally connected to a NAND gate which is connected to the CLEAR of all the 4 flip flops. It has the 4 T flip flops and the NAND gate built-in. Input A is given the external clock connection from a 555 astable multivibrator. Qa is connected to Input B to complete the asynchronous connection.
If you use IC 7493, there are only few connections necessary. External clock input from a 555 timer etc. to Input A (Terminal 14). Qa (terminal 12) connected to Input B (terminal 1). Qd, Qc, Qb, Qa of IC 7493 are given as inputs DCBA of the IC 7447 and the rest of the display connections are the same with the current limiting resistors. The required resetting connections (which differ for 0-5 counter and 0 -9 counter) have to be made.
For a 0 – 5 counter, we use 0110 (6) as the reset trigger. So again Qa is connected to input B to get our 4 bit asynchronous counter. Now Qb and Qc are connected to R0(1) and R0(2) respectively and we have our 0 – 5 counter. These circuits are pretty straight forward if you just refer the pin diagram.
Its for simplicity and restricted space that we use these 7493 counters for M1, M0, S1 and S0. Generally a problem can have different solutions. For example, the same 0 – 9 counter can be done in several ways but we chose the most optimum of solutions which is the IC 7493 based counter.
As said in the intro, this instructable is not only to tell you the steps needed but also to tell you why they are needed. If you covered all the steps, you would understand this by now.
For more detail: Learning Sequential Logic Design for a Digital Clock