As part of the Content Creation course for my MLIS degree (Our class blog: http://scumakers.wordpress.com/ ), I needed to come up with a final project and wanted to learn to use an Arduino. In the end I came up with this device to automatically sense when the soil in my garden is dry and turn on a switch to water it.
I know there are other devices out there that do the same thing and probably do it better, but other than using the little idea here and using some existing code and I came up with this method on my own.
If you are ever stuck anywhere use the Arduino Forums for help. If you have a question about something, the chances are somebody else has asked it before… no matter how simple or silly you may thing it is.
I also had to reteach myself basic electronics and the Spark Fun Tutorials were great from that.
 Step 1: Lets start with the complicated concepts…. the circuits!
This project consists of three circuits that when broken down individually aren’t that difficult. I’m going to diagram them each and then we will take a look at everything put together.
Parts needed for the Curcuits:
Sunkee Soil Hygrometer
28 Jumper wires
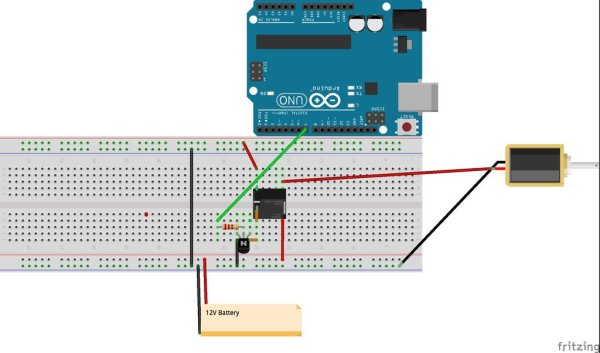
Step 2: The Relay Circuit
This circuit allows the Arduino (which runs at 5V) to turn on the water valve (which runs at 12V). Without this type of switch, it wouldn’t be possible (or would be really difficult) to get these two different pieces to work together.
Parts:
5v Relay
10K resistor
NPN transistor
12 V solenoid
12 V battery
11 Jumper wires
Step 3: The Soil Sensor Circuit
This is the most simple circuit of the three and requires the Sunkee Soil Hygrometer. Another brand of Hygrometer will work as well, but the wiring might be a little different.
This one comes with it’s own little shield that has four pins on it. The first (from left) goes to 5v on the Arduino, the second to ground, the third is the digital pin, and the fourth is the analog. We won’t be using the digital pin, as that just tells the Arduino two values – High or Low, we actually want the analog pin that will give the Arduino a value from 400 to 1023. By doing this, we can be more specific about when we want the valve to turn on.
Parts:
Sunkee Soil Hygrometer
3 Jumper wires
Step 4: LCD Circuit
Step 5: That’s all of the circuitry
That’s it for circuits, if you put those three together on one Arduino and one breadboard, we are ready to move onto the code and then the box for it!
Step 6: Let’s do some code!
Thankfully we have some resources online that provide us with most of the code, we just have to get it to work together.
This is the code for the Sunkee Sensor from Steve Spence’s Blog
//The (int soil=0) is the soil variable which turns the reading that comes in on the sensor into a %, this will be an important variable in this project
int soil=0;
// the setup routine runs once when you press reset, and sets up communication with the serial port:
void setup() {
// initialize serial communication at 9600 bits per second:
Serial.begin(9600);}
// the loop routine runs over and over again forever:
void loop() {// read the input on analog pin 0:
int sensorValue = analogRead(A0);
sensorValue = constrain(sensorValue, 485, 1023);
// print out the value you read:
//Serial.println(sensorValue);
//map the value to a percentage
soil = map(sensorValue, 485, 1023, 100, 0);
// print out the soil water percentage you calculated:
Serial.print(soil);
Serial.println(“%”);
delay(1000); // delay in between reads for stability, the delay is in millieseconds so this is a 1 second delay}
The following is public domain code used from the Arduino website. This code sends whatever message we want to the LCD Screen. In this instance it displays “Hello World” on the first line and a count of the seconds since reset on the second.
#include
// initialize the library with the numbers of the interface pins
LiquidCrystal lcd(12, 11, 5, 4, 3, 2);
void setup() {// set up the LCD’s number of columns and rows:
lcd.begin(16, 2);
// Print a message to the LCD.
lcd.print(“hello, world!”);}
void loop() {
// set the cursor to column 0, line 1
// (note: line 1 is the second row, since counting begins with 0):
lcd.setCursor(0, 1);
// print the number of seconds since reset:
lcd.print(millis()/1000);}
Step 7: Putting the Code Together
The next step is to modify those two pieces of code and then put a loop in it that will turn on the relay when soil moisture falls to a certain point. When that is all said and done, it looks like this:
//This first section sets up our variables and initializes the LCD screen
int soil=0;
int Relay = 7;
int relay_level=60;
#include
LiquidCrystal lcd(12, 11, 5, 4, 3, 2); // the setup routine runs once when you press reset:
void setup() {// initialize serial communication at 9600 bits per second:
Serial.begin(9600); // set up the LCD’s number of columns and rows:}
// the loop routine runs over and over again forever:
void loop() {// read the input on analog pin 0:
int sensorValue = analogRead(A0);
sensorValue = constrain(sensorValue, 485, 1023);
// print out the value you read: Serial.println(sensorValue);
// initialize the digital pin as an output.
pinMode(Relay, OUTPUT);
//map the value to a percentage
soil = map(sensorValue, 485, 1023, 100, 0);
// print out the soil water percentage you calculated to the LCD Screen:
Serial.print(soil);
Serial.println(“%”);
// set the cursor to column 0, line 1
// (note: line 1 is the second row, since counting begins with 0):
lcd.begin(16, 2);
// Print a message to the LCD.
lcd.clear();
lcd.print(“Soil Saturation:”);
lcd.setCursor(0, 1);
// print the number of seconds since reset:
lcd.print(soil);
lcd.print (“%”);
// delay in between reads for stability
delay(1000);
// This next loop turns on the relay for one minute if the moisture is below the level we want (in this case 60%), if the moisture is above that level, it keeps testing. If the level of moisture is below that level it turns the relay (and subsequently the water valve for as long as you would like (in this case it is set for 60000 milliseconds (1 minute)). It then waits another minute before testing the soil again in order to see if it is wet enough.
if (soil < relay_level) {digitalWrite(Relay, HIGH);
// turn the Relay on (HIGH is the voltage level)
delay(60000);
// wait for a minute
digitalWrite(Relay, LOW);
// turn the LED off by making the voltage LOW
delay(60000);
// wait for a minute}}
 Step 8: We then compile the code from the Arudino window and send it to the board.
Here is a link for the software:
http://arduino.cc/en/Main/Software
All this code stuff is confusing, the best way to learn it is to read through the tutorials and then play around with it. Some great tutorials are here:
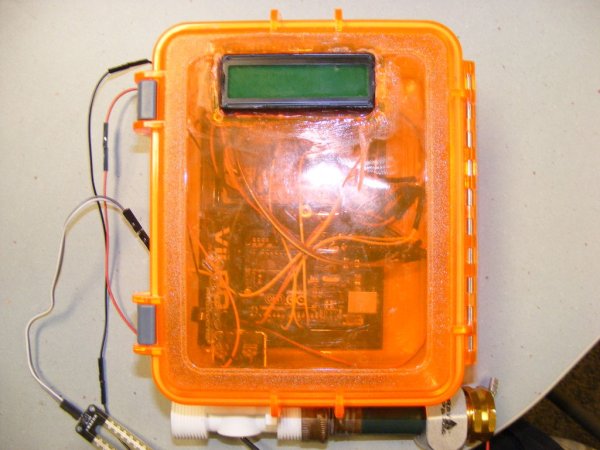
Step 9: Installing it in the Container
I bought a Plano box for about $15 which is more than I wanted to pay, but I did soak it with water and it stayed dry so I have no complaints.
Step 10: Spot for the LCD Screen
I traced the screen with a pencil and then used a Dremel cutting blade to cut the hole to a rough size. I then used a small Dremel grinding wheel to get the fit perfect.I put clear silicon caulk on top of the board and installed it in the hole. I then put a small bead on the top side around the screen. Before doing this, make sure your wires are connected as you will no longer be able to see the labels on the board.
For more detail: Automatic Garden Watering Device – Arduino