This alarm is a good way to alert you if somebody messes with your bike. I had a bicycle stolen a while back and decided there had to be a better way to keep my bike secure. When I searched for bicycle alarms, all I could find were alarms that responded to sudden movement or when a lock was cut. Also, the reviews of these products rated them mediocre at best and said they often did not work or gave a lot of false positives.
I therefore decided to create a bicycle alarm to SUPPLEMENT my lock. This alarm in no way keeps people from stealing your bike. It simply draws attention to anyone who messes with your bike without turning off the alarm first. Never use this alarm instead of a lock. Also, I am not responsible for any consequences coming from the reading, construction or use of this Instructable and any materials contained in it.

As far as the lights are concerned, biking at night is dangerous. Legally you must have an approved light system to ride at night. This light set is not approved, so technically you should supplement it with another approved light set. I used only this set for a while and it worked great for me, but you are responsible if you choose to use it. I in no way take any responsibility for your choice to build or use this Instructable.
With that out of the way, let’s move on to the construction of the alarm.
Step 1: Things You’ll Need
1- Key switch, SPDT, Key removable in both positions, Goldmine Electronics #G8081
1- NC Reed Switch, Digi-Key #CH406-ND
1- SPST NO Pushbutton
1- 6V DC Buzzer, RadioShack #273-054
1- 5×2.5×2″ Project Enclosure, RadioShack #270-1803
1- 47 Ohm Resistor
1- MPS6717 or Equivalent NPN Transistor
1- 28 Pin IC Socket, Digi-Key #3M5480-ND
1- 16.00MHz Ceramic Resonator, Digi-Key #X908-ND
1- 5V Voltage Regulator, Digi-Key #MC7805CT-BPMS-ND
1- Arduino Bootloader Loaded Atmega168, Adafruit Industries
1- 4 AA Battery Holder
Cable Zip Ties
Various Wires
Prototyping Board
Solder
Magnet from Bicycle SpeedometerOptional Parts for Adding Night Riding Lights
4- Super Bright White LED’s
8- Super Bright Red LED’s or Purchased Taillight
1- Toggle or Slide Switch
1- 270 Ohm Resistor
Other Optional Parts
Battery Connectors
Silicone Caulk
Tools
Soldering Iron
Wire Strippers
Screwdriver
Drill and Bits
Arduino
Computer
Step 2: Arduino Code
Attached is the code for the Arduino. Copy and paste the code into the Arduino program and use it to load the program onto your Atmega168. Once the upload to the board is complete, remove the Atmega168 from the Arduino if you want to use it as standalone. If you don’t, keep it in the board and just put the board into the project. If you don’t use it as standalone, skip the next step.
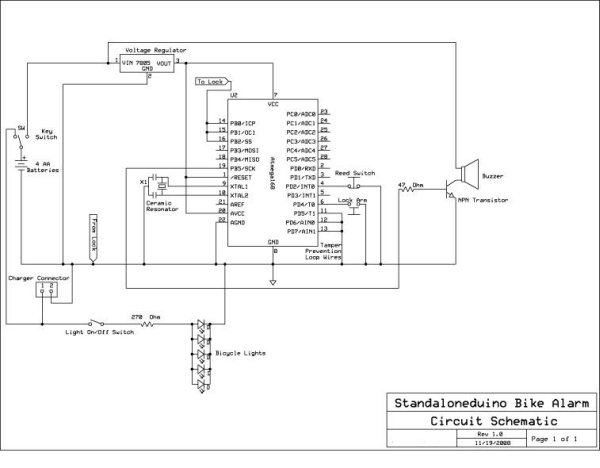
Step 3: Schematic
Below is a picture of the schematic. If you want to make any modifications, see the program for details of changes already programmed in. Using the parts previously mentioned, build the circuit.
NOTE: Do not solder directly to the Atmega168 if you are not experienced. Instead, solder in the socket and then insert the Atmega168 into the socket.
If you are modifying the schematic and not using an input, be sure and solder it to ground. If you are not using an output, leave it disconnected.
Step 4: Mount Bicycle Alarm in a Case
NOTE: The battery connector is in place on my alarm should I choose to ever use a rechargeable battery pack. If you never plan on using a rechargeable battery pack, you can leave it off.
 Step 5: Attach to Bicycle
Attach the alarm anywhere on your bicycle that you want. I chose to mount mine under the seat for a number of reasons. One, it is not as noticeable. Two, it is protected from contact and water. Three, it was out of the way. I attached mine to the bicycle using a few zip ties. This method holds the alarm on, but makes it relatively easy for a thief remove from the bicycle, so be sure to run one of the tamper prevention loops through the frame in such a way it cannot be removed without being cut.
If you have a pouch already attached to the seat post, if you want the alarm more for alert than physical theft prevention, you could consider keeping it in the pouch with one of the tamper prevent loops connected to the bike.
For more detail: Arduino Bicycle Alarm and Lights