Introduction
Having been a CodeProject member for several years, and not having got round to ever publishing an article, left me feeling a bit disappointed in myself. I have thought many a time on what kind of article I can produce. Then after coming across some great articles by jeffb42 here on CodeProject, my problem was solved.
I started playing with the Arduino hardware platform about two months ago, after looking for something suitable for a couple of projects I had in mind for use in the house. In order to get to the stage of being able to make use of the device, I had to first get to know its capabilities.
 This article will be looking at how to overcame the problem of running a SIMON game clone using the Arduino platform, as this demonstrates methods of dealing with the main application Loop constraint and code reuse on this hardware platform.
For those of you not familiar with SIMON, this was an early electronics game from the 70’s, where the user basically had to repeat back a sequence to the console to progress to the next level. In my implementation of the game, the user can play the Progressive Mode, where the game re-uses the previous level as the start of the next level before adding a random step at the end, or Random Mode, where every level of the game produces a new random sequence, each step longer than the previous.
jeffb42‘s Introduction to Arduino and Interfacing with LCD articles provide more details on the Arduino platform specifics, and on my website, I have various examples of some of the IO basics, so there is no need to repeat this here.
Background
The challenge to building this game on the Arduino is the way in which the platform works. Within the source code, there are three areas in which to place code: the initialisation area, the setup method, and the loop method. These are executed in that order.
//initialisation section
// Library references and variable/constant declarations contained here

void setup()
{
    //This method runs once
    //Hardware allocation done here e.g. input/output pin directions
}

void loop()
{
    //This method will run until power is removed or a new program is
    //uploaded to the platform
}
The challenge is being able to make the code operate in such a way that a game can be played over and over again, in either of the two modes, without ever leaving a never ending loop.
Using the Code
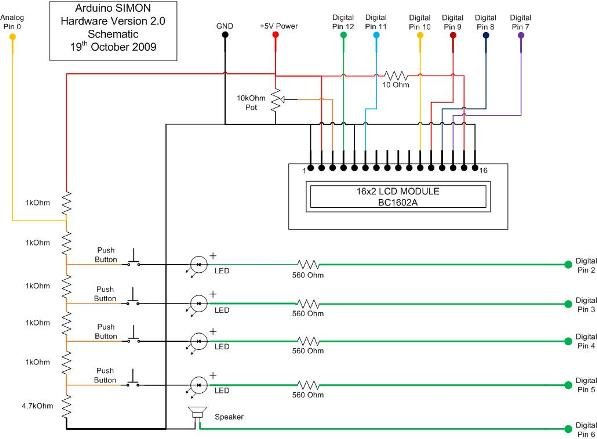
The schematic of the hardware requirements is included in the download file, as well as the source code. If you own the necessary components, you can build the game and upload the code to the Arduino to make it work. Alternatively, if you are just starting out with the platform or something similar, the code may provide you with ideas on how to achieve similar goals in your own projects.
The Game Structure
We need to be able to keep the game code running within an endless loop, and one method to achieve this is by using flags. Boolean variables which are either True or False is one of the easiest ways to achieve this. Looking at how the game works, there are a few basic flags that are required. They hold the state of the game, i.e., has it started, has it been played, and if the game is now over. A couple of other variables are also required to keep track of what the sequence of steps generated is and what level the user is currently on. These requirements as well as the hardware pin allocations are identified in the initialisation section of the code:
#include <LiquidCrystal.h>

//initialise the library with the numbers of the interface pins
LiquidCrystal lcd(13,12,11,10,9,8);

int userInput = 0;      //Analog pin for user input from buttons
int led1 = 2;           //LED 1
int led2 = 3;           //LED 2
int led3 = 4;           //LED 3
int led4 = 5;           //LED 4
int speaker = 6;        //Speaker

//Game Stats
boolean started = false;    //Has the game started yet
boolean gameover = false;   //Has the game ended
int level = 0;              //What level is the user on (Score at end = level -1)

int gameMode = 0;           //Which game mode is being used
                            // 1 = Progressive
                            // 2 = Random

boolean soundEnabled = true;  //Is the sound enabled or not

int lastLevelSeq[50];        //The sequence for the steps used
                             //in progressive mode previous level
                             //Also used by game over to replay correct sequence back
                             //Nobody can get passed 50, surely!
The next section of the code is the setup() method. This is where the hardware pins are initialised.
void setup()
{
  pinMode(led1, OUTPUT);
  pinMode(led2, OUTPUT);
  pinMode(led3, OUTPUT);
  pinMode(led4, OUTPUT);
  pinMode(speaker, OUTPUT);

  //Set up the LCD Col and Row count
  lcd.begin(16,2);
  delay(100);
  lcd.clear();
  lcd.print("Welcome to");
  lcd.setCursor(0,1);
  lcd.print("Arduino SIMON");

  //...........rest of setup code snipped. see the download.
From here, the next thing that is executed is the loop() method, which is run endlessly, hence the requirement to keep track of the game status. Also, to keep the code shorter and more efficient, a number of helper methods are used to meet the reuse requirements mentioned at the start of the article.
For more detail: Arduino Platform – SIMON Game Implementation