Interface single and Dual IR Infrared sensor with Arduino and LCD
Introduction- Multiple Sensor Interface to Arduino
In this another tutorial on sensors for beginners, we are going to interface single and multiple Infrared IR sensors with Arduino Uno development board, working simultaneously and have the status displayed either on an ( 4X16 LCD ) LCD module (jhd162a) or an LED. We are going to cover three chapters in single tutorial in simple step by step fashion. The purpose of this tutorial is to serve the basics for beginners with Sensor interface on Arduino for being able to use these concepts and to develop various other sensor based applications (robotics, Automation Projects etc.). We will use the same Object Detection Proximity IR Sensor Module that we made in our precedent tutorial. In our previous Proximity Sensor tutorials we have learned how to interface IR sensor with various other microcontrollers such as PIC18F4550 and 18F2550; However, today we are going to learn how to interface the same infrared sensor with the famous Arduino Uno board.
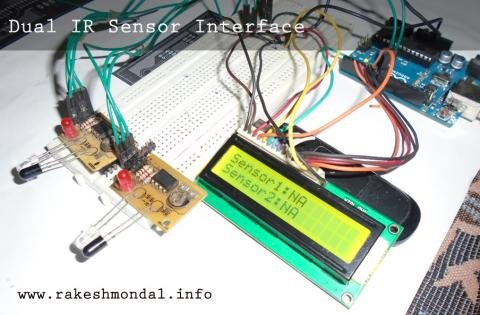
To begin easy, first we are going to interface a Single IR sensor for sensing the distance and read the value of the sensor using an Arduino board and have status displayed on a LED. On the next level we are going to do same with two IR sensors working simultaneously. At last we will interface (add) an LCD (Liquid Crystal Display) and have the status of both the Infrared sensors displayed on a 4X16 LCD Display unit. The Concepts for Reading the IR sensor is still same as explained in previous lessons, the only difference is the Arduino board.
Tutorials
- Single Infrared Sensor Interface to Arduino Microcontroller
- Dual IR Infrared Sensor interface with Arduino
- Dual IR sensor interface to Arduino –Display Result on LCD
Requirements
– Arduino Uno
– Infrared IR sensor Module
– JHD162a 4X16 LCD
– Resistors
– LEDS
Infrared IR Sensor Module

We will use the IR Infrared Sensor Circuit module that we made in our previous project, which is an inexpensive (Low Cost) sensor circuit module. You can find the schematic and PCB design in my previous post. There are three pins in the Schematic – Two pins for providing the input voltage and GND, and the third pin from the IR module is the IR control pin. This Control Pin from the IR sensor Module will be interfaced to the Arduino for reading the value from sensor. We will use two identical copies of the sensor for our tutorial.
For more detail: Interface single and Dual IR Infrared sensor with Arduino and LCD