Arduino Uno is an opensource physical computing platform based on ATmega328 microcontroller and provides a development environment for writing software for the board. It can be used for a variety of projects.
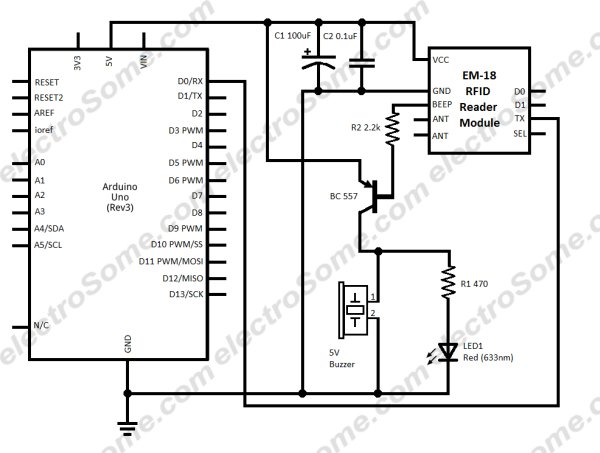
EM-18 RFID reader is one of the commonly used RFID reader to read 125KHz tags. It features low cost, low power consumption, small form factor and easy to use. It provides both UART and Wiegand26 output formats. It can be directly interfaced with microcontrollers using UART and with PC using an RS232 converter.
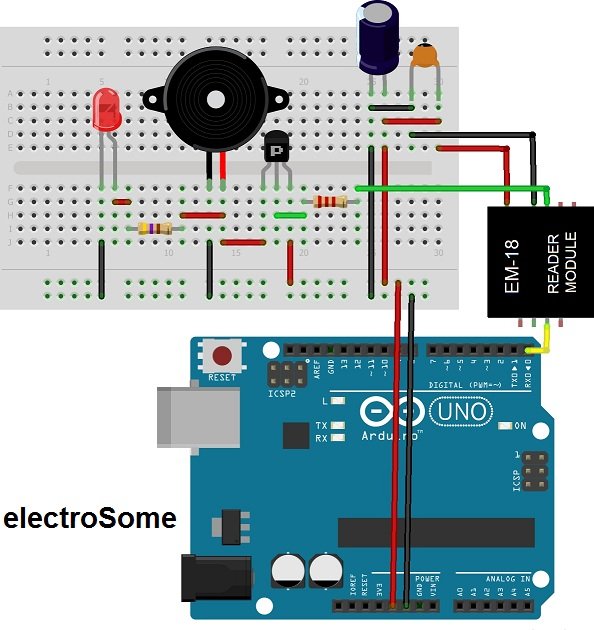
Working of EM-18 RFID module
The module radiates 125KHz through its coils and when a 125KHz passive RFID tag is brought into this field it will get energized from this field. These passive RFID tags mostly consist of CMOS IC EM4102 which can get enough power for its working from the field generated by the reader.
By changing the modulation current through the coils, tag will send back the information contained in the factory programmed memory array.
| Pin No. | Name | Function |
|---|---|---|
| 1 | VCC | 5V |
| 2 | GND | Ground |
| 3 | BEEP | BEEP and LED |
| 4 | ANT | No Use |
| 5 | ANT | No Use |
| 6 | SEL | HIGH selects RS232, LOW selects WEIGAND |
| 7 | TX | UART TX, When RS232 is Selected |
| 8 | D1 | WIEGAND Data 1 |
| 9 | D0 | WIEGAND Data 0 |
Arduino Sketch
int count = 0;                                          // count = 0
char input[12];                                         // character array of size 12
boolean flag = 0;                                       // flag =0
void setup()
{
   Serial.begin(9600);                                  // begin serial port with baud rate 9600bps
}
void loop()
{
   if(Serial.available())
   {
      count = 0;
      while(Serial.available() && count < 12)          // Read 12 characters and store them in input array
      {
         input[count] = Serial.read();
         count++;
         delay(5);
      }
      Serial.print(input);                             // Print RFID tag number

      if((input[0] ^ input[2] ^ input[4] ^ input[6] ^ input[8] == input[10]) &&
         (input[1] ^ input[3] ^ input[5] ^ input[7] ^ input[9] == input[11]))
            Serial.println("No Error");
      else
            Serial.println("Error");
   }
}
The output consists of 12 character ASCII data, where first 10 bits will be the tag number and last 2 bits will be the XOR result of the tag number which can be used for error correction. For eg : If the RFID tag number is 500097892E, output of EM-18 Reader will be 500097892E60, where 60 is 50 xor 00 xor 97 xor 89 xor 2E.
For more detail: Interfacing EM-18 RFID reader with Arduino Uno