The Hackaday writers and readers are currently working hand-in-hand on an offline password keeper, the mooltipass (click to see the project description).
Next in our Developed on Hackaday series, we present the first version of our schematics. There’s already been a lot of discussions going on in our dedicated Google group, mainly about the project’s basic functionality. Because our firmware developers wanted to get to work, we decided to send the first version of our hardware into production a few days ago. Before going through the schematics, let’s review the required list of the mooltipass’s core components:
- an easily-readable screen
- a read-protected smart-card
- large flash memory to store the encrypted passwords
- an Arduino-compatible microcontroller with USB connectivity
We’ve been drowning in component suggestions from motivated hobbyists, so we figured we’d make the mooltipass v1 as simple as possible and then move from there. Given this device is developed on Hackaday, we also wanted future users to modify it, building completely new projects based around these main components. Keep reading for our schematics…
For the core of the platform, we opted for the ATmega32U4 from Atmel. It is the same microcontroller used in the Arduino Leonardo, allowing us to use the numerous libraries that have been developed for it. In the final schematics, we’ll add an expansion connector so users may connect additional peripherals (we may switch to a 4 layers PCB at this point). The microcontroller’s USB lines are protected from ESD by the IP4234CZ6 from NXP.
For encrypted passwords storage, we found the cheap 1Mbit AT45DB011D FLASH which also has 2/4/16Mbits pin compatible versions. If our beta testers find that 1Mbit is not enough, upgrading the mooltipass would be easy. A few readers may already know it, but when picking a flash memory, special attention should be paid to the minimum amount of data that can be erased in the chip. If the flash doesn’t have an internal buffer (like the one we selected does), the microcontroller must read a complete chunk of data, modify the relevant part and resend the modified chunk to the memory. Given the ATmega32U4 only has 2.5KBytes of RAM, this may have been problematic.
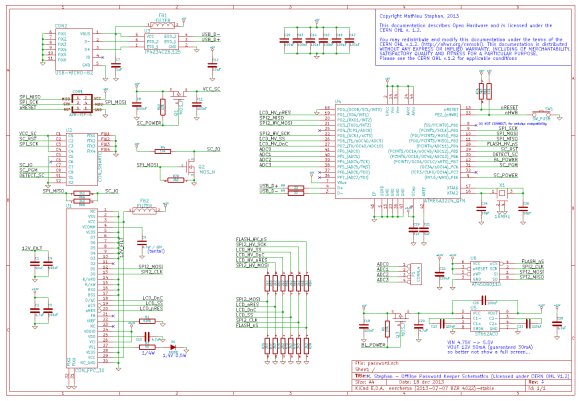 Finding a smart-card that could provide the desired security functions wasn’t the problem, but finding a supplier that could send us relatively low quantities (<1M) was. We did, however, find the quite old AT88SC102 from Atmel, a 1024bits read/write protected EEPROM. It can be sourced for less than a dollar and our security assessor didn’t object to this choice. It also uses an odd bus for communications (SPI-like with an open drain data line), which is why we used the N-Mosfet Q2.
For more detail: Developed on Hackaday: First Version of the Hardware