*** Additional info at http://droidalyzer.com/talkingbreathalyzer/index.html ***
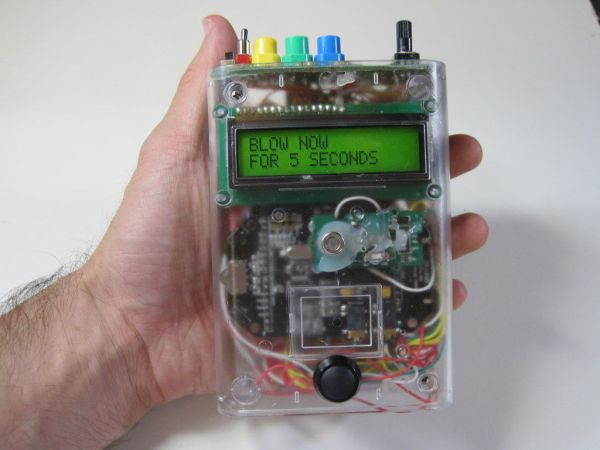
A customizable Breathalyzer that talks and tells you how much you’ve had to drink. It’s also open source and can easily be modified with your own text on the LCD screen and audio MP3 files.
When tethered to a PC with a USB cable, it has additional features including character animations, Breathalyzer Tweets, text to speech, weather and stock read-outs, and a Photobooth feature.
The Talking Breathalyzer is not a professional Breathalyzer and should be used for Amusement Purposes Only.
Part List
Seeeduino or Arduino – $25
Seeed Music Shield – $27.50
Seeed Twig Alcohol Sensor – $7.90
Seeed Twig Serial LCD – $13.90
Seeed Twig Cables – $4.90
2 GB MicroSD card (cards larger than 2GB will not work) – $7
Protoboard
10k Potentiometer
4 Momentary Switches
1 Off/On Switch (for power)
5 10k Resistors
1 Toggle Switch
Enclosure of your Choice
LIPO Battery – $23
LIPO Rider – $9.50
Talking Breathalyzer Software – Free
Head Phones
Mini USB Cable
USB Charger
Solar Panel Optional
Speaker Amp and Speaker Optional
*** A cell phone based version of this project is at http://droidalyzer.com ***
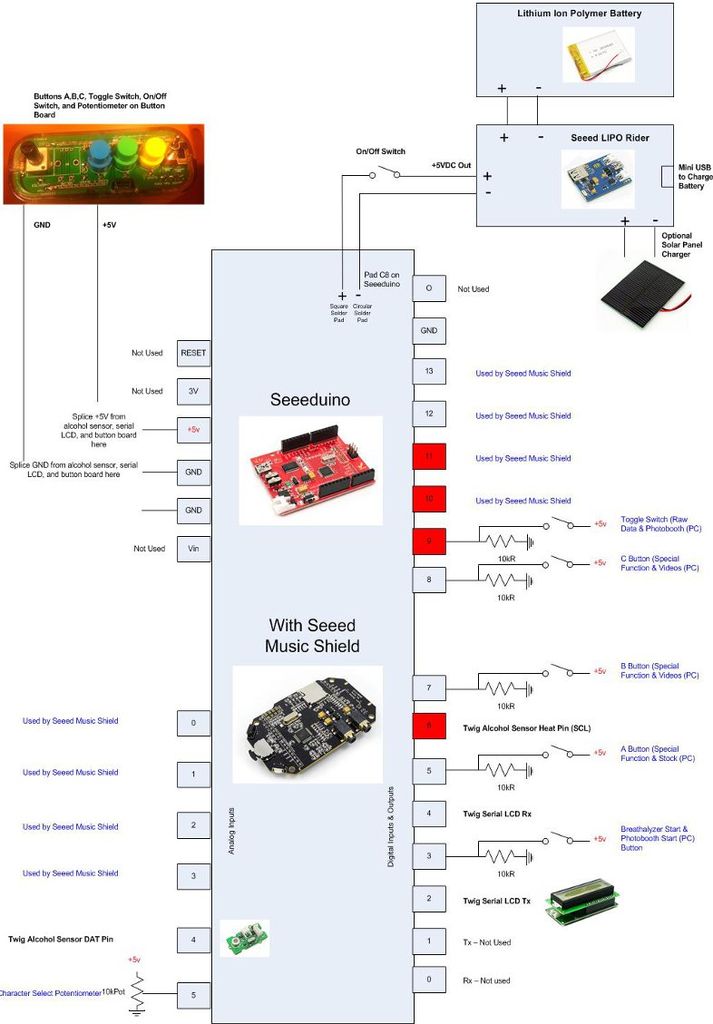
Step 1: Schematic and Assembly
Assemble following the schematic below. The assembly and layout will vary depending on the enclosure you are using. I used Adafruit’s Arduino case but note that the Serial LCD used made by Seeedstudio is an older model, the new Serial LCD from Seeed will not fit into this case so you’ll either need to find a bigger case or go with an alternative Serial LCD. I had a custom PCB board made but you can just as easily use a generic proto board and simply cut out the shape you need. This video describes the components of the Talking Breathalyzer.
Step 2: Using the Breathalyzer in Portable Mode
The Breathalyzer comes presetup for stand alone mode. In stand alone mode, the Breathalyzer runs on its own battery power without a connection to a PC.
The Breathalyzer has 4 buttons. Button 1 starts the Breathalyzer function by first heating up the alcohol sensor for 20 seconds and then prompting the user to blow. After the user has blown, the Breathalyzer results are announced (LCD screen and Audio) and then the alcohol sensor is powered down and the Breathalyzer goes into an idle state. While in idle, the LCD screen, Arduino microcontroller, and speaker amp will continue to draw power so it’s best to power off the Breathalyzer while not in use to conserve the battery. Buttons 2,3, and 4 are open to be programmed for custom functions.
The toggle switch changes the Breathalyzer back and forth from normal operation to raw data operation. When operating in raw data, the alcohol sensor is heated up and alcohol sensor value is displayed on the LCD screen. Note: Keeping the alcohol sensor heated up in this mode will increase the drain on the battery. Raw data operation is useful if you want to overwrite the default Breathalyzer calibration settings and also to see the alcohol sensor data values.
Turning the knob will change the character that speaks the Breathalyzer results. You’ll hear a different character sound as you turn the knob and the character changes. Stop turning when you’ve got the desired character.
Step 3: Using the Breathalyzer USB Tethered to a PC (PC Mode)
Step 4 describes how to switch the Breathalyzer to PC mode which involves downloading a new Arduino firmware to the Breathalyzer and then USB connect the Breathalyzer to your PC. In PC mode, the Talking Breathalyzer includes additional features:
- Animated Readouts of Breathalyzer Results with 4 Characters (Spooky, New York Cabbie, Old English, and Pirate), See the Characters here
- Tweeting of Breathalyzer Results (optional and turned off by default)
- Weather and Stock Readouts
- Photobooth Feature
- Customizable Breathalyzer Audio Responses with Text to Speech or User Supplied MP3s
[box color=”#985D00″ bg=”#FFF8CB” font=”verdana” fontsize=”14 ” radius=”20 ” border=”#985D12″ float=”right” head=”Major Components in Project” headbg=”#FFEB70″ headcolor=”#985D00″]Seeeduino or Arduino
Seeed Music Shield
Seeed Twig Alcohol Sensor
Seeed Twig Serial LCD
Seeed Twig Cables
2 GB MicroSD card[/box]
For more detail: The Talking Breathalyzer using an Arduino