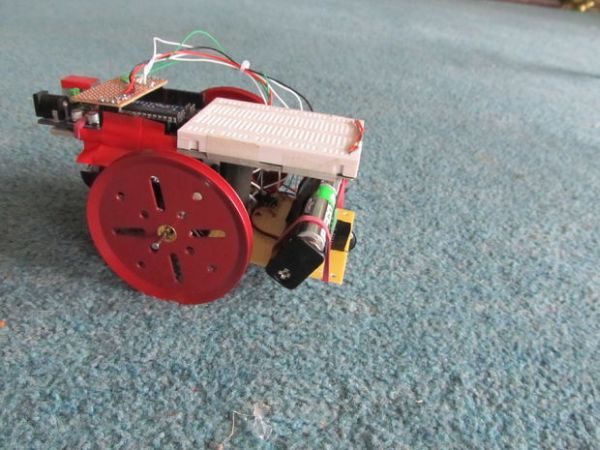
in this instructable i will show you how to make a very simple robot, using an arduino. this robot could be the base for a wide range of projects, i am planning on adding LDRs to mine so it can seek put light and also follow a line. it uses a small shield I made out of a piece of stripboard on the arduino so i can easily remove it from this robot and use it in other projects. this also means that there is no danger of the wires falling out as it often bumps into things!
Sprot is an acronym of SimPle ROboT
Step 1: What you’ll need
Parts List:
arduino
breadboard
2x geared motors http://www.hobbytronics.co.uk/robotics/worm-drive-gearbox
motor driver chip (http://www.hobbytronics.co.uk/motor-control/h-bridge-driver-sn754410 or you could make your own out of transistors)
medium sized piece of perfboard
small strip of strip board
ir distance sensor (http://www.hobbytronics.co.uk/sensors/sensors-proximity/sharp-distance-sensor-10cm)
1 marble
assorted wire
wheels (i used mechano wheels but you could easily make your own)
glue(bostik and superglue)
headers
elastic bands
tape
battery casing +batterys
Tools you might need:
soldering iron
hacksaw
screwdriver
Step 2: Making the chassis
the chassis of the robot is where the motors are held onto the rest of the robot, it is a piece of perfboard with the motors attached to the back using superglue, I origionally used bostik but it was to bendy and kept coming loose so i used a craft knife and scored lots of lines onto the base of the motor holder and the perfboard, this helped the superglue to grip the two parts and hold them together. I also used two right angle brackets from the same mechano set that I stole the wheels from and they are superglued in place. It would be much more secure to drill into the perfboard and screw the motors on but I didn’t have a drill bit that was the right size.
the axles on the motors had to be cut down so the would ft side by side, you could use the hacksaw to do this.
The marble caster at the front was made out of a marble and some gardening wire, the wire was wrapped around the marble leaving the tip exposed, I then soldered two leads coming from the marble onto the perfboard.
Step 3: Wheels
i eventually used wheels out of a mechano set, i origionally meant to make them, the robot in this instructable is the second one that I made, the first didnt really work, the motors weren’t strong enough but I made wheels for it out of bottle caps with elastic bands wrapped around them, I made a hole in the centre of the cap with an old soldering iron and glued a pulley wheel into this hole with bostik, this made a really grippy wheel, I originally intended to do this for the larger axles on my geared motors but i couldn’t find pulleys with wide enough holes, this meant I had to use the wheels from my mechano set which fit perfectly onto the axles.
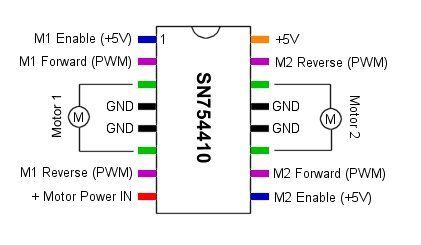
Step 4: Controlling a motor
i used a H-Bridge Motor Driver 1A – SN754410 chip to drive my motors, each chip can drive two bi-directional motors, i used the schematic to bild the circuit on a breadboard then soldered it onto the perfboard the motors are attached to. you could easily make the an h-bridge out of transistors but it would take up much more space than the chip on the board.
you may want to use a heat sink if your chip heats up excessively, mine does slighlty but as I only run it for a few minutes I decided it wouldnt be necessary
For more detail: SPROT, my SimPleROboT