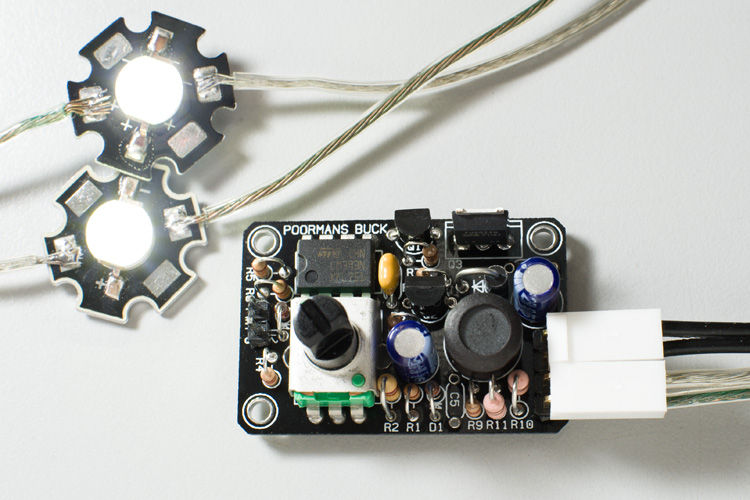
However I realize that the finding and configuring the power supply is still not as simple as it can be; commercially available LED drivers are convenient, but often overkill or not flexible. Even my own Universal LED Driver can be overkill at times. Some projects call for a bear minimum, simple driver.
Poorman’s Buck – Simple, Constant Current LED Driver
So I created the “Poorman’s Buck” – simple switch-mode (buck) constant current LED driver that’s built without a microcontroller or a specialized IC. All of the parts are easy to obtain, “off-the-shelf”, though-hole parts.
Even though this driver is minimalistic, I added a current adjust function that doubles as a dimmer, and an input to control the output with PWM. This makes the “Poorman’s Buck” perfect building block for Arduino or other microcontroller based LED projects – you can control many high-power LEDs from a microcontroller simply by sending PWM signal. With Arduino you can simply use “AnalogWrite()” to control the brightness of high-power LEDs.
Step 1: Features
- Inductor “switch mode” (buck) converter for high energy efficiency.
- Wide supply voltage range of 5 to 20V. Great with batteries as well as AC adaptors.
- Cycle-by-cycle, true constant current circuit
- Configurable output current up to 1A
- Up to 15W maximum output power. (at supply voltage 20V with five 3W LEDs connected)
- Current control potentiometer (trims the output current down to about 9%)
- Current control can be used as a built-in dimmer
- Output short-circuit protection
- PWM control input – controllable via external microcontroller including Arduino.
- Compact design – only 1 x 1.5 x 0.5 inches (excluding the pot shaft)
Step 2: The Circuit
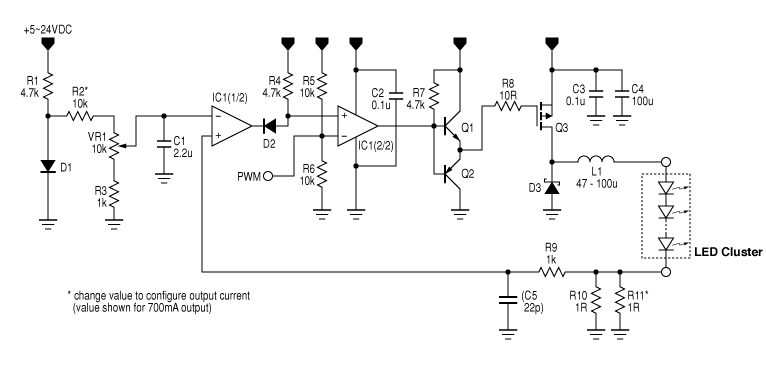
The output LED current flows through R10 and R11 (current sensing resistors). The resulting voltage is proportional to the current according to the Ohms Law. This voltage is compared to the reference voltage by a comparator. As the Q3 turns on, current flows through L1, LEDs, and the current sensing resistors. Inductor does not allow current to shoot up immediately, so the current increases gradually. As the current gets higher, the voltage at the comparator’s negative input pin increases as well. When it gets higher than the reference voltage, the comparator trips, which turns off Q3, which turns off current flowing into the inductor.
Now because inductor is “charged”, current doesn’t stop flowing immediately. Current then flows through the Schottky diode D3 to power the LEDs. This current gradually decays, and as the current decays so does the voltage across the current sense resistors. Eventually the comparator flips back again, and the cycle starts over. This method of controlling current is often called “cycle by cycle” current limiting. (This “true” current limiting also works as a buit-in short circuit protection. Shorting the output doesn’t harm the circuit.)
This whole cycle above happens very quickly – as fast as 500,000 times a second. (This frequency changes depending on the supply voltage and LEDs forward drop voltage and current. Anywhere between 100k – 500kHz.)
The reference voltage is generated by an ordinary diode. Forward voltage drop of a diode is about 0.7V and stays relatively constant. Then potentiometer VR1 trims the voltage – because the output current is compared against this voltage, this in turn controls the output current. The range of the change is about 11:1 or 100% – 9%. This is pretty narrow compared to a real dimmer, however it is quite handy. Sometimes after installing the light you realize that LEDs are much brighter than expected. Then you can simply trim the current down until the brightness is just right.
You can omit the potentiometer and replace with resistors if your project doesn’t call for it.
The beauty of a switch-mode controller is that it controls the output current without “burning” the excess energy. Energy from the power supply is used only as much as needed to get the required output current. Some energy is lost in the circuit due to the resistance and other factors, but not that much. A typical buck converter has efficiency of 90% or higher.
The Poorman’s Buck doesn’t get very hot when operating – only get warm. Unlike linear regulators, no heat sinking needed.
References
Buck Converter: http://en.wikipedia.org/wiki/Buck_converter
Comparator: http://en.wikipedia.org/wiki/Comparator
Configuring Output Current
The Poorman’s Buck can be configured to deliver anywhere between 350mA to 1A of output current. Combination of R2’s value and wether you connect R11, you can change the output current.
Here are samples of a few configurations:
| Output Current | R2 Value | Use R11? |
|---|---|---|
| 350mA (1W LED) | 10k | No |
| 700mA (3W LED) | 10k | Yes |
| 1A (5W LED) | 2.7k | Yes |
The current control pot VR1 controls the output current from about 9-100% of the set current. So if you configure the unit to deliver 1A, you can trim it down to about 90mA just by turning the pot. This can be used as a dimmer (although the dimming range is somewhat limited).
PWM Input
The basic operation of this circuit can be done with just one comparator. However the most popular comparator IC (LM393) has two comparators in it. So rather than letting one of the comparators sitting doing nothing, I added a few extra parts to make it PWM controllable. the second comparator in the circuit works as an AND gate so that the PWM input has to be open (or logic high) for the output LEDs to turn on. Usually this pin can be left open (no connection) and the Poorman’s Buck will operate without PWM. But when you need that extra control, you can connect Arduino or other microcontroller and control the high-power LEDs connected to Poorman’s Buck. With Arduino, control is just as easy as using “AnalogWrite()” command. Up to 6 Poorman’s Buck can be controlled by one Arduino.
This PWM control works within the current level set by the current control pot. So if you lower the current, the same 10% PWM level can be darker, for example.
The source of the PWM control is not limited to microcontrollers. Anything that produce voltage between 0 – around 5V can be used to turn the output on and off. Be creative – use photo resistors, timers, logic ICs… The upper limit of PWM frequency is about 2kHz, but I think 1kHz would be the optimum.
This PWM input can also be used simply as a remote on/off switch. However the LEDs will be on when the switch is open, and off when closed – opposite of usual power switch.
Step 3: Parts, PCB and Assembly
Parts List
- 1 or 2x 1 ohm 1W – R10, R11 (use only one to get 350mA, or 500mA (with R2=2.7k) output current)
- 1x 10 ohm – R8
- 2x 1k ohm – R3, R9
- 3x 4.7k ohm – R1, R4, R7
- 3x 10k ohm – R2, R5, R6 (change R2 to 2.7k ohm to get 1A output current)
- 1x 10k ohm potentiometer – VR1
- 1x 22pF/35V – ceramic capacitor C5 (optional)
- 2x 0.1uF/35V ceramic capacitor – C2, C3 (optional)
- 1x 2.2uF/10V electrolytic capacitor – C1
- 1x 100uF / 35V electrolytic capacitor – C4
- 1x 47-100uH / 1.2A – L1
- 1x GPN (5551, 2222, 3904, etc.) – Q1
- 1x GPP (5401, 2907, 3906, etc.) – Q2
- 1x P-ch MOSFET (NTD2955 or IRFU9024) – Q3
- 2x 1N4148 diode – D1, D2
- 1x SB140 or 1N5819 Schottky diode- D3
- 1x LM393 dual comparator – IC1
* All resistors are 1/8W or 1/4W carbon film unless otherwise noted.
Substitutions
Inductor L1 can be anywhere between 47 to 100 uH, rated at least at 1.2A. C1 can also be anywhere from 1 to 10 uF. C4 can be as small as 22 uF, making sure that it’s rated at least at 35V DC.
Similarly, Q1 and Q2 can be almost any general purpose type transistors. Q3 can be substituted by other P-ch MOSFETs capable of minimum 2A of drain current, drain-source voltage at least 30V, and gate threshold lower than 4V (logic gate).
Assembly
Solder the parts starting with the lowest profile ones, in this case, IC1. All resistors and diodes are installed vertically. Be careful with the orientation of polarized parts, such as diodes, transistors, and MOSFET.
I designed the PCB in single layer, so home etching can be done easily. Gerber files and PDF are provided.
I’m offering the fab-manufactured PCBs as well as the full kits on my website.
 poormansbuckPCB.pdf12 KB


 PoormansBuck2.2a-gbr-instructable.zip