During PCR, a mixture of DNA, primer and DNA polymerase is cycled between three different temperature settings, over and over again. This project uses an arduino to control two high-power resistors to heat up the sample, a computer fan to cool down, and a thermocouple to keep track of the temperature. The design supports two samples at a time, though it could probably be extended to support more.
The parts are all off-the shelf, and the assembly should take a few hours. You will need access to a shop (at the very least a ban saw and drill press).
This project is still a work in progress by Stacey Kuznetsov ([email protected]) and Matt Mancuso ([email protected]). Please email us if you have any questions or feedback! Also, huge thanks to Rich Pell, James Lata and the ATX Hackerspace for materials & feedback.
Step 1: More on PCR

PCR consists of 3 steps that are cycled over and over again:
Denaturation (~94C) At this step, DNA ‘breaks apart’, splitting from a double helix into single strands
Annealing (~60C) Primers bond to the single-stranded DNA
Extension (~72C) Polymerase compliments the DNA, synthesizing strands that are of the target sequence
Each of these phases can be 20-30 seconds long and repeated 30+ times, depending on the protocol. Most protocols also suggest having a longer initial denaturation step and a longer final extension step.
A simple tutorial:
http://www.dnalc.org/resources/animations/pcr.html
There’s also a bunch of related resources here: http://www.lab-manual.com/lm_209.htm
The results of PCR can be visualized using gel electrophoresis. DNA samples are loaded into a gel, and a high voltage is applied across it. Because DNA is negatively charged, it will travel through the gel at different speeds depending on its size. This process will effectively separate out the pieces you want, and you can see them by staining the gel. Here’s a good tutorial and if you’re trying to DIY it, the Macgyver Project is a pretty good resource.
PCR can be performed using 3 water baths (each kept at one of the three temperature settings). A human could physically move the samples from one bath to the next 30+ times. PCR machines were developed to automate the process, but most lab-quality ones cost thousands of dollars. But they don’t need to! Today there is a growing number of open source PCR projects, among them OpenPCR (600$), LavaAmp ($200), and the Coffee Cup PCR (350$).
Step 2: Materials
2 Wiremound resistors, 150 ohms/50 Watts each (10$ total)
Arctic Silver Thermal Epoxy (14$)
Solid state relay, such as 25A AC/DC SSR ($8.50)
Aluminum block, final dimensions ~64mm x 64mm x 26mm. check ebay (free – $5)
Arduino board, we used the mini ($20)
MAX31855 breakout (I used this one for $11, but the Adafruit one might be more reliable for $17.50)
Thermocouple wire ($10)
60mm fan ($4)
12V transistor (TIP120 should be fine, $0.70)
12DC, 0.5A power supply ($1)
Regular power cable
Plywood (if you want to make a case)
A few different length bolts and nuts (if you’re making the case) we used 6×1″ and 2×2″ #6 bolts w matching nuts
You’ll also be using:
Some wires
Breadboard (small one)
Wire cutters/strippers
Electric tape
Soldering iron/solder
Screw driver
Bansaw & drill press
Laser cutter (if you want to make a case)
Wood glue (if you want to make a case)
Step 3: The aluminum block
The images below have our rough dimensions (in mm). Matt was really precise cutting it, but I don’t think it has to be super exact.
Step 4: The circuit overview
When hooking up the electronics for the first time, I suggest breadboard, not solder. If you end up making a case, you’ll have to disconnect and re-connect a few things to make them fit!
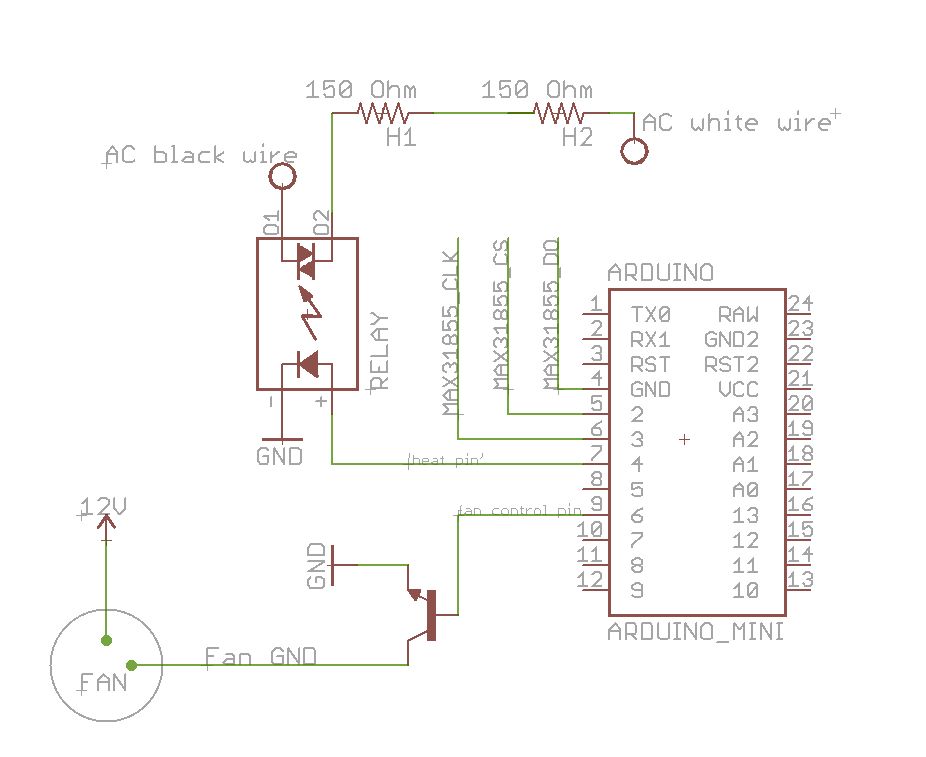
Step 5: The circuit- resistors
Black wire -> pin 1 (AC pin) on the relay
White wire-> one of the resistors. Connect the second resistor in series. Connect the second resistors to pin 2 (AC pin) on the relay.
Connect arduino to the relay
Arduino pin 7 -> pin 3 (+DC pin) on the relay
Arduino GND -> pin 4 (-DC pin) on the relay
Cover all connections w electrical tape!!!
—- some math —
With 2 150ohm resistors in series, the total resistance should be 300 ohms. So with the U.S. outlet voltage being 120V, the current should be 0.4Amps, which makes the wattage 48Watts. The resistors are rated for 50 Watts, so this should be OK, but please double check the math, especially if your outlet runs on 230V (you’ll need different resistors with higher Wattage).