I am presenting a compact design of a stripboard Arduino board (DIYduino) that includes a 2A motor driver and has additionally the functionality of a sensor shield. The 2-channel version cost approximately $29.43 and is more affordable compared to $39.00 for a commercially available system consisting of an Arduino Uno, $21.50, a sensor shield, $8.50, and a motor shield, $9.00. The cost can be further reduced to $27.44 by building a “bare bones” version that omits parts that are not required for the functionality of the device but are rather added for convenience. Such parts are LEDs and their resistors and screw terminals.
I am presenting a total of five different versions:
1. DIYduino
2. DIYduino with integrated sensor and 1-channel motorshield – no speed control
3. DIYduino with integrated sensor and 1-channel motorshield – with speed control
4. DIYduino with integrated sensor and 2-channel motorshield – no speed control
5. DIYduino with integrated sensor and 2-channel motorshield – with speed control
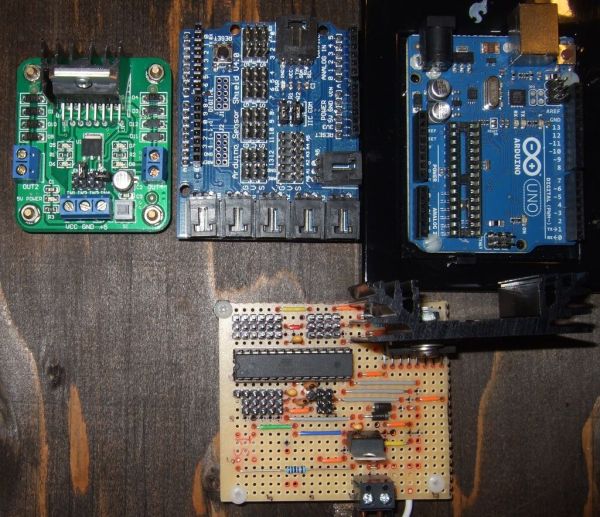
My pictures represent the third version, which is the one I chose for a particular robot application that I am currently building.
Step 2: Tools and Hardware
The picture shows most of the hardware that I used:
1) Solder iron & solder – to solder everything together
2) Carpet knife – to separate copper traces between holes
3) Hand saw with skinny blade – to cut strip board to size
4) File, not too coarse – to deburr strip board after cutting it
5) Wire cutters – to shorten legs of soldered electronic component
6) Fine tipped pliers – to bend component legs
7) Red, black, blue sharpie markers and pencil – to transfer layout to stripboard
8) Third Hand (invented by rstraugh …thanks) – to hold parts and board when needed
9) Track Cutter (invented by scraptopower …much obliged) – to separate copper traces at holes
10) Voltmeter with test leads – to confirm functionality of separation cuts and debugging
11) Scanned in strip board pattern – to develop stripboard schematic
12) ArduinoISP Bootloader/Programmer Combination Shield (not shown) & Arduino with USB to serial chip (e.g. Arduino Uno) – to upload the bootloader and sketches to DIYduino. You can also use a USBtoSerial programmer for uploading a sketch and work around the Bootloader Shield and use the DIYduino you build here to load the bootloader.
13) Cables to plug onto male/female connectors (not shown) – to make connections for testing
14) Variable power supply with voltage range of roughly 3V to 12V – to test voltage regulator and provide power to stripboard (not shown)
15) Computer with Arduino software – to test functionality of DIYduino & motor driver (not shown)
16) Drill and drill bits (not shown) – to widen/drill holes for stand offs and drill hole in heat sink
Step 3: Combining Schematics of DIYduino & Motor Driver
To create the strip board layout I determined the schematic I wanted to create first. You can essentially do a strip board design with any schematic no matter if you invented it, downloaded it, or re-engineered it. For me the official Arduino schematic was a tad too complicated and essentially overkill for my purpose. Instead I altered the much simpler schematic of the minimalist Arduino as shown in the first figure. This schematic was published and discussed on http://thetransistor.com/projects/arduino/.
In the schematic shown here I marked my changes in red color:
1. I crossed out the items that weren’t part of my built.
2. I changed the values of the capacitors that smooth potential voltage peaks at the 5V regulator. These are the values that I had available in my stock and they’ll do the job.
3. I crossed out the LED/resistor connected to Pin13 to safe parts. I only connected an LED/resistor temporarily to test the functionality of the DIYduino as described later.
4. I removed the +5V from the Aref as recommended in a comment with respect to this tutorial: http://arduino.cc/forum/index.php/topic,7569.0.html
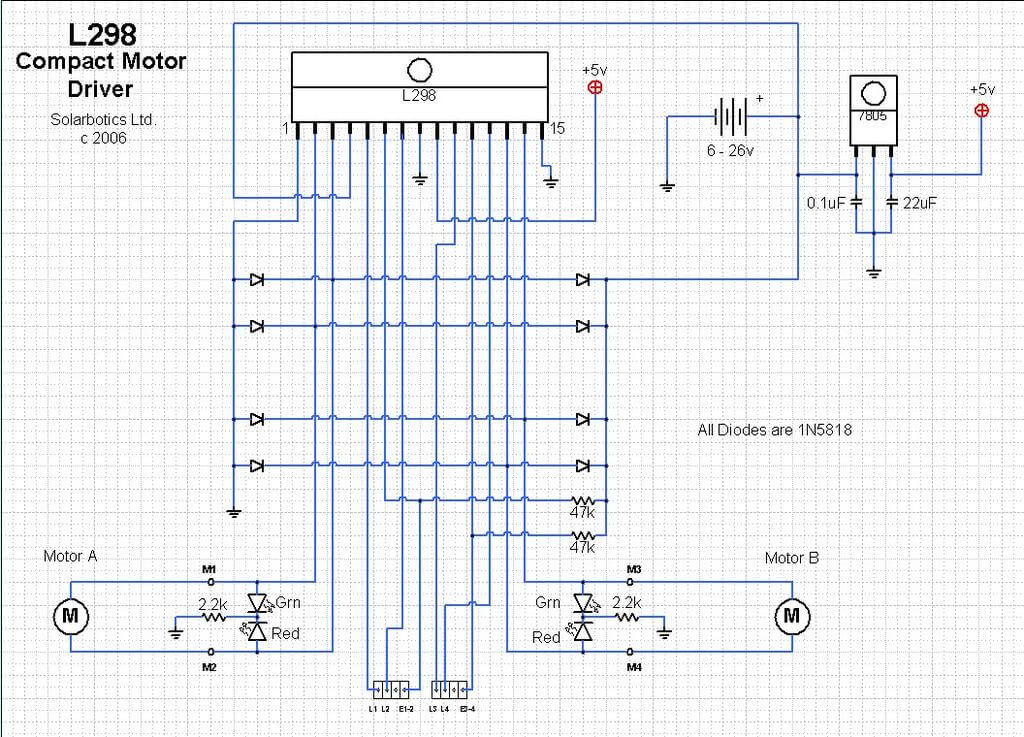
Then I combined the minimalist Arduino schematic with a schematic of a L298N motordriver that I found on solarbotics’s site. I did this by connecting L1, L2, L3, and L4 (L298N pins 5, 7, 10, & 12) to the ATMEGA’s digital pins 7, 8, 13, & 12, respectively. Pins E1-2 and E3-4 (L298N pins 6 & 11) are connected to +5V for maximum motor speed at all times or to Arduino PWM pins 9 & 6 for adjustable motor speed, respectively. I am also showing the ATMEGA 168/328 pin map, which help me to assign the proper ATMEGA pins and which can be found at http://arduino.cc/en/Hacking/PinMapping168.
[box color=”#985D00″ bg=”#FFF8CB” font=”verdana” fontsize=”14 ” radius=”20 ” border=”#985D12″ float=”right” head=”Major Components in Project” headbg=”#FFEB70″ headcolor=”#985D00″]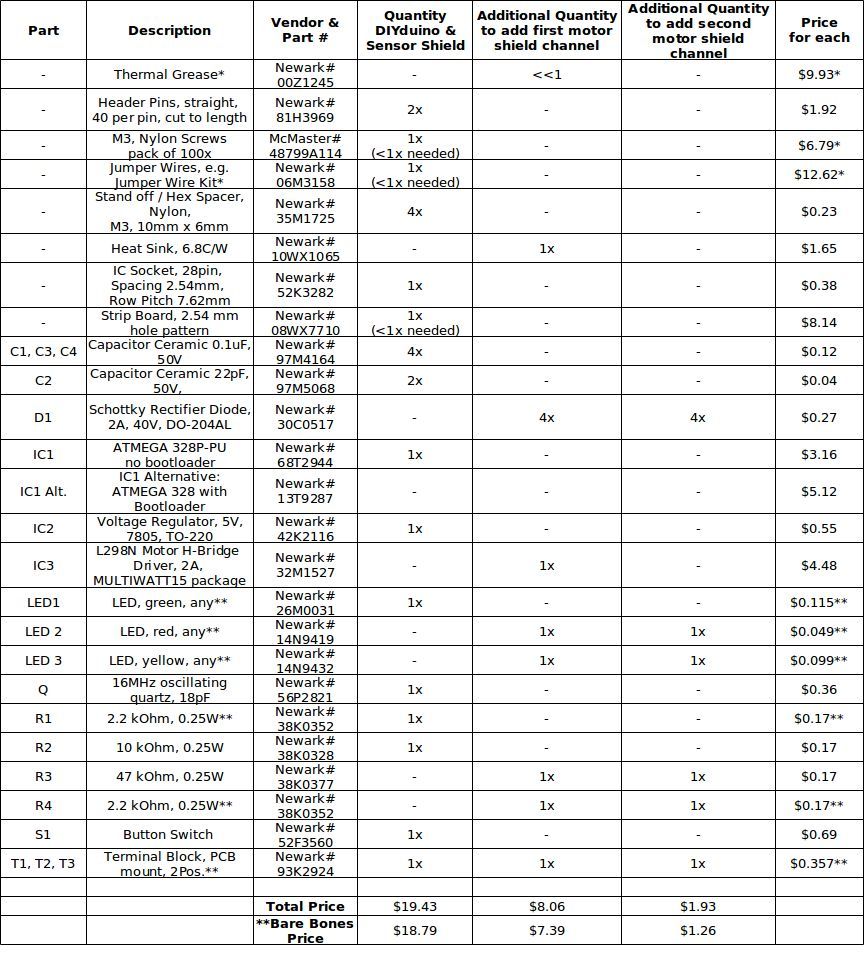 [/box]
The table shows all the parts for the devices including prices from Jan, 2013. I considered some of the parts, such as jumper wires or resistors, as standard inventory that is likely purchased in bulk and not as individual parts. Therefore I typically listed individual parts and noted with an asterisk when you would have leftovers, such as for example extra strip board which you can use on other projects.
I did not consider the prices marked with the single asterisk for the total price of the device. Further note that item prices at Newark drop when you order a certain number of parts, typically if you order more than 10x. I listed the highest individual prices here and also ignored any special offers or promotions. If you buy more the price will go down. On another note, not all of the parts listed here are really necessary for operation. The parts that you can omit are marked with a double asterisk. The ‘bare bones price’ is also indicated at the bottom of the table.
Last not least, the ATMEGA 328 that I used required a bootloader. I recently created an instructable called ArduinoISP Bootloader/Programmer Combination Shield that addressed how to upload a bootloader to a “virgin” ATMEGA. You can also buy ATMEGAs that have a bootloader installed. They are almost double the price. For completion I listed one in the table.
The component prices were taken from www.newark.com and www.mcmaster.com. You can find order numbers and prices in the table.
For more detail: Compact 3-in-1 Stripboard DIYduino with Integrated Sensor and L298N Motor Shield