The concept is an EL Wired hat with 8 sequenced EL wires controlled by a wired remote. Multiple speed controllable sequence modes are pre-programmed into an Arduino UNO, including a sound activation feature.
Features:
7 sequence modes (speed controlled)
1 sound activated mode (sensitivity controlled)
1 sequence mode that goes through all 7 previously mentioned sequences.
The brain behind my baby is an Arduino Uno Rev. 3 with a Spartkfun EL Escudo Dos shield.
This psychedelic fashion accessory was built for a festival, so it needed to be quite tough. Also it was built in a bit of a hurry, so steps were not documented during time of build. With that in mind, I will do my best to guide you through what I went through in as much detail as possible.
 Remove these ads by Signing Up
Step 1: Materials and Tools
Arduino UNO Rev3
Sparkfun EL Escudo Dos
8 x 1m EL Wires
DFRobot Sound Sensor
1K-Ohm Potentiometer
Potentiometer Knob
Push Button Switch (Normally-Open)
Toggle Switch
220 Ohm Resistor
1K-Ohm Resistor
Green LED
Red LED
Header Pins
Right angle Header Pins
4meters of Multicore cable (Ethernet)
Prototype Circuit Boards
9 x JST female connectors (2mm pitch)
Cable Ties
Heat Shrink (various diameters)
Gauge waterproof grommets
8 “AA” Battery Holder with Snap Connector
8 x 1.5V AA Batteries
Snap Connector
2.1mm Right Angle DC Power (Solder Plug End Connection)
1meter Spiral Cable Wrap (3/4inch)
Plastic Universal Enclosure 100 x 25 x 50 mm(Remote)
Plastic Universal Enclosure 135 x 95 x 45 mm(Brain)
2 x 4-way El Wire splitters
Stackable Headers
Hot Glue Gun and Glue
Soldering Iron and all the stuff that goes with it
Drill and various drill bits
Set of files
Needle and thread
Step 2: The Hat
Attaching the EL wire to the Hat *
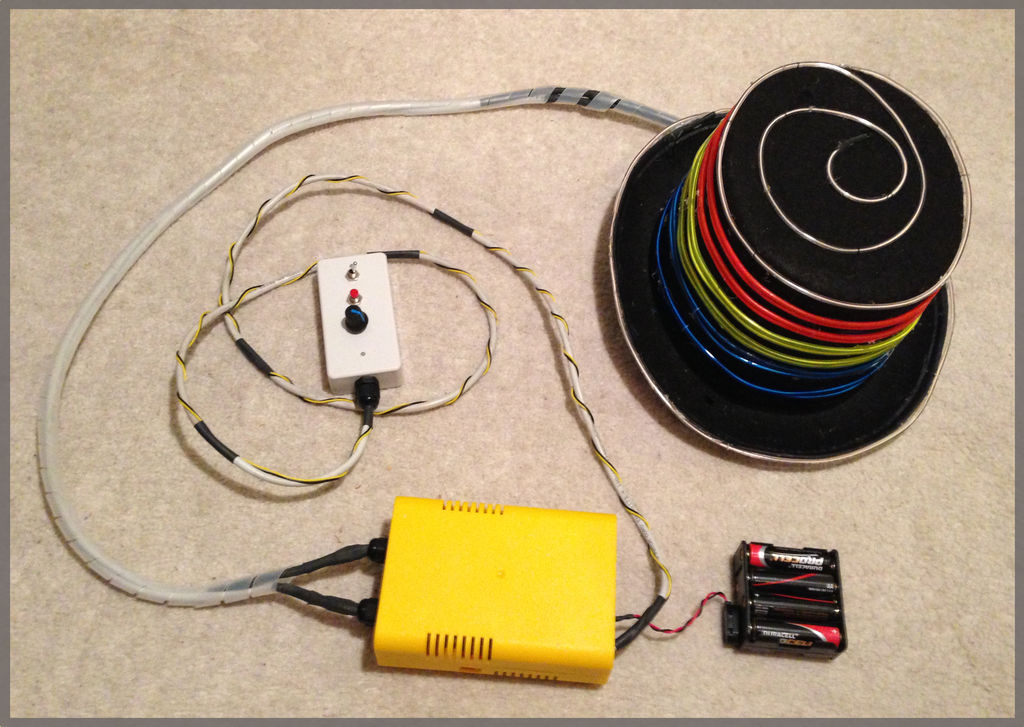
– Start by selecting a colour sequence that appeals to you. Each 1meter EL wire wrapped nicely around the hat twice. The wire on the brim made it once around and I decided to spiral the last wire around top of the hat.
– Make holes in the hat where you can tread the EL wire through, concealing the power cables inside the hat. This can been seen in picture #2 where you see the inside of the hat with power cables coming through.
– Use a Hot Glue Gun to secure the EL wires to the hat. After the 4day festival, I noticed that some of the wires started coming off, so I reinforced them by using a needle and thread in a few strategic places.
– In picture #3, you can see the numbered tails of the EL wire connectors hanging out the back of the hat. I chose not to hardwire these wires to the Main Unit (Brain), as I wanted it to be detachable so I could travel with only the hat as carry-on hand luggage on a flight. This is not 100% necessary.
– Wrap the tails in a small section of Spiral Cable Wrap and Hot Glue the spiral wrap to the back of the Hat.
There is no need to be shy with the Hot Glue. Even if you do land up with cob webs, these can be easily picked off.
Step 3: Umbilical Cord
I used 2 x 1meter ethernet (8 core) cables.
The Hat Side…
– Cut the female connectors off the EL Wire splitters and solder them to the one end of the ethernet cables (polarity does not matter as it is AC)
– Insulate them by using heat shrink
(repeat for all 8 connectors)
The Brain (Main unit )Side…
As the Umbilical cord would be exposed to the elements, I wanted to restrict rain from making its way into the Brain. This is why I took extra precaution to insulate the cables’ entry into the Brain (Hence the use of gauge waterproof Grommets).
– Drill appropriately sized holes in Brain’s casing.
– Attach Grommets to the Brain’s casing
– Slip the appropriate heat shrink on to the ethernet cables
– Slip on and tighten the Grommet locking nut
– Feed the ethernet cables through the grommets as the JST connectors will struggle to fit through the grommets
– Solder the JST Connectors to the ethernet cable (once again, polarity does not matter).
– Heat shrink the soldered cables to insulate
– Slip the ethernet cables back out the grommets to leave just the JST cables and connectors showing on the inside part of the Brain.
– Use the remaining heat shrink to conceal the loose cables outside the brain.
Wrap the Spiral Cable Wrap around the cables.
Helpful hints:
– don’t forget to number the cables appropriately
– If you dont have a continuity meter: buy one, or make a note of what colour coded cables are attached to which numbered connector
Step 4: Remote Control
Now I am sure there are better techniques to do some of these steps, but I will guide you through the methods I used.
Aligning the parts and mounting them on a Prototype Circuit Board preparing them for the Remote Control casing
– Cut a piece of Prototyping Circuit Board to the appropriate size to fit in the casing (hopefully neater than my attempt).
– Cut another piece of plastic to the same size as the Prototype Circuit Board. This will be used as frame to temporarily mount the switches and Potentiometer for correct height and placement. I will refer to this piece of plastic as “the frame” from now on.
– Drill the appropriately sized holes in the frame at the appropriate places for where you would like to mount your controls and LEDs
– Attach controls (switches and potentiometer) and LEDs to the frame.
– Flip over the frame, so the the legs of the components point upwards.
– Place the Prototype Circuit Board on top of the components legs, parallel and aligned with the frame. You will notice that the legs will most likely not all be the same height.
This is the tricky part… I used header pins and right angle header pins inserted into the Prototype Circuit Board to fill the gap between the board and components.
– Solder these pins to the back of the Prototype Circuit Board in the correct place and on the components side, cut them to the appropriate length for each component.
– Solder the components to the protruding pins.
– Remove the frame.
– For the DFRobot Sound Sensor, use a row of 3 right-angled pins so the connector lies flush with the Prototype Circuit Board.
Wiring
– On the underside of the Prototype Circuit Board (see pic), create tracks using short pieces of wire from the components to the base of the Prototype Circuit Board. I soldered rails along the left and right of the circuit board for Negative and Positive power (ground and +5v from Arduino). This was helpful to simplify the wiring in the remote control.
– At the base of the Prototype Circuit Board, solder a row of right-angle header pins (optional step – explained a few steps later).
Remote Control Casing
– Use the frame to mark the position of the holes on the Small Plastic Universal Enclosure (Remote control casing) and drill the same sized holes.
– Drill a small hole in the top of the remote control casing for the DFRobot Sound Sensor (you may need to do this later to get exact positioning of this hole correct)
– Drill a hole in base of the remote control casing for the Gauge Grommet.
– Attach gauge grommet to the case and secure with locking nut.
– Feed the remote cable through the gauge grommet in the enclosure.
Connecting the Remote Control Cable
Under the “Wiring” heading I mentioned that it was optional to have the header pins on the prototype circuit board. This is because the wires from the remote control cable can be soldered directly onto the board.
– On the header pins, solder the ethernet cable onto the pins and heat shrink to insulate.
Closing the Remote Control
– Insert the DFRobot Sound Sensor in the casing with microphone pointing in the direction of the top of the casing. I mounted mine perpendicular to the prototype circuit board due to a space limitation (this can be seen in the picture).
– Align the components with the casing
– Insert board
– On the outside of case, attach the nuts to the Potentiometer, Mode Switch and Power Switch.
– Screw the case closed
– Pop on the Potentiometer rubber knob
Remote…DONE!
Notes:
You may have noticed the Black and Yellow cable wrapped around the ethernet cable. Because I used two cables for the Main Power Positive and 2 cables for the Main Power Negative, I ran out of cable and wrapped two extra cables around. I used 4 cables for Main Power as I had no clue whether one cable would be sufficient for powering the entire system – so to be sure, I wanted to be as power conscience as possible.
Step 5: Remote Control Shield
– Make a hole in side of the Yellow Plastic Universal Enclosure 135 x 95 x 45 mm (Brain) big enough for the remote cable (see picture).
– Slip some heat shrink over the remote control cable (will be used to protect the cable from wear)
– Pass the end of remote control cable through the hole
– Strip the insulation from this cable revealing the individual cables.
– Cut a piece of Prototype Circuit Board to a width of 20 x 20 points.
– Solder on two rows of Header Pins corresponding to the position of the header ports of the Arduino/EL Escudo Dos (see picture).
– Cable Tie the remote cable to secure it to the board.
– Solder the Remote control cable to the correct pins.
My cable colour coding for this project is as follows…
Signal
Yellow: DFRobot Sound Sensor
White/Blue: 1K-Ohm Potentiometer
Blue: Mode LED (Red)
White/Brown: Mode Push Button
Arduino Power
Brown: Arduino +5 V
Black: Arduino Ground
Main Power
Orange & White/Orange
Green & White/Green
(The two double black cables at the top of picture will be explained in the next step)
Secure the Remote Cable from being tugged with a cable tie.
Step 6: The Brain
This is the core of the system.
(Once again, please refer to the pictures below for guidance)
Main components are…*
Arduino UNO Rev3
SparkFun EL Escudo Dos
Remote Control Shield
12V EL Wire Inverter (Inverter)
Yellow Plastic Universal Enclosure (135 x 95 x 45 mm)
EL Escudo Dos Stackable Headers *
Out of the box, the EL Escudo Dos comes without Stackable Header Pins.
– Solder a set of stackable header pins onto this board.
Inverter Connector *
The connector of the Inverter is one that connects to the EL Wire cable. The EL Escudo does not use this connector.
Either cut this connector off and solder on a JST connector (2mm pitch) or make a jumper cable as seen in picture of inverter. This is useful if you plan to use the Inverter for a simpler project in the future.
Polarity of this cable does not matter as it is AC power.
Connect the output of the inverter to the EL Escudo Dos “AC from inverter” connector.
Battery Pack Power *
Just as what we did for the Remote Control Cable in step 5, make a hole in the side of the Yellow Plastic Universal Enclosure 135 x 95 x 45 mm (Brain), big enough for the battery Snap Connector cable.
Slip some heat shrink over the cable to protect it from wear.
Main Power cabling
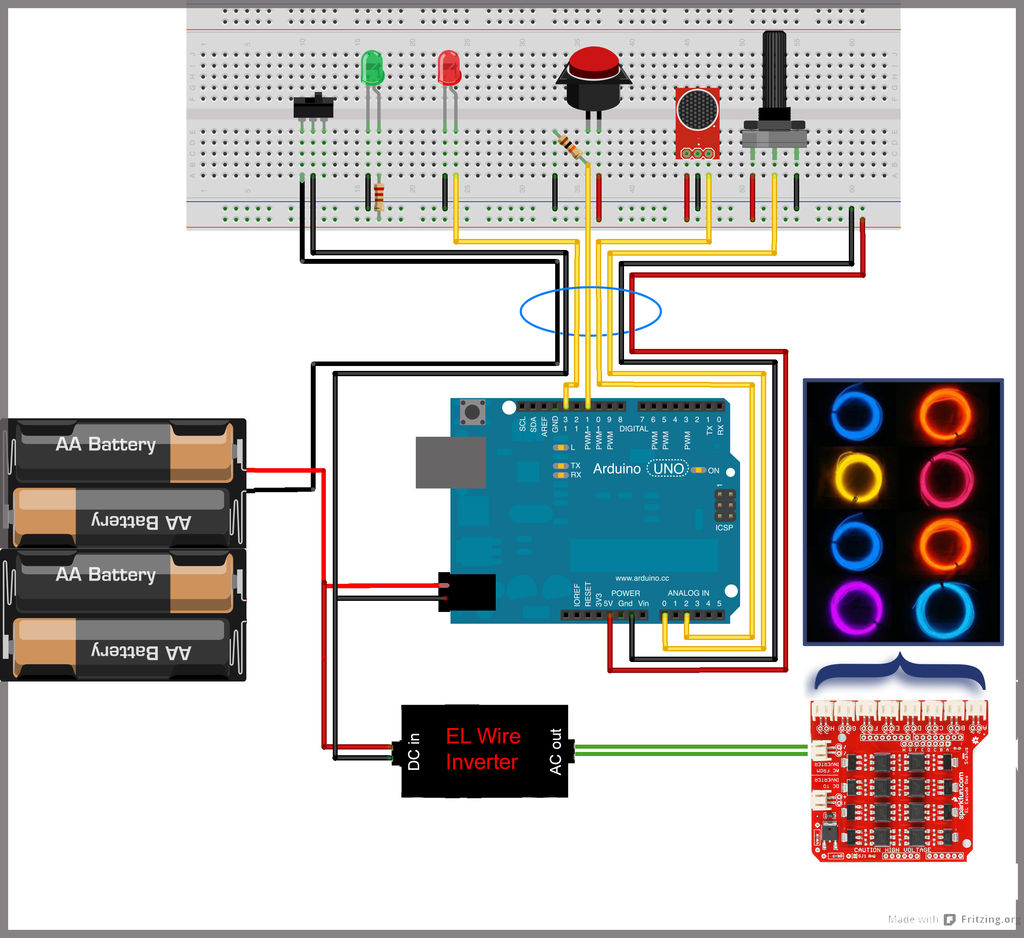
Please refer to the Circuit Diagram illustration for guidance with this step.
The Main Power is controlled via the Remote Control.
The positive from the battery snap connector is permanently wired to the Arduino and to the Inverter.
The negative from the battery snap connector is soldered onto the Remote Control Shield (step 5). It passes through the Remote Control’s Main Power Switch and then connects to the negative of the Arduino and Inverter, completing the circuit when the switch is closed.
Stacking *
– Stack the Boards: Arduino at the bottom, EL Escudo in the middle, and the Remote Control Shield on the top.
EL Escudo EL Wire Connection *
– Attach the 8 EL wire JST connectors of the Umbilical Cord to the El Escudo Dos.
USB Access *
– Place the entire stack and Inverter inside the yellow case, and make sure that the USB port is pointing towards the side of the case.
Once completely assembled, you will not have access to the USB port of the Arduino so we will need to make a hole in the side of the case in order to update our code without needing to disassemble the entire Brain.
– Mark the area where the USB port is on the Yellow Plastic Universal Enclosure (135 x 95 x 45 mm)
– Drill a hole in the side of the case
– Use a file to tweak the shape until square and large enough to insert a USB cable.
Packing *
– Place the entire stack and Inverter inside the yellow case.
Close the Skull (Yellow Case) and Voilá !!! If all is good, all the hard work is done.
The entire Brain and battery pack can go into a backpack, giving you full control by using the remote.
Next… The code for the Arduino….
Step 7: Functionality and The Code
FUNCTIONALITY
The code is rather self-explanatory and (I believe to be) relatively well commented. There is also a serial println command at every step of the way for debugging especially if you need to tweak the code for the calibration of the potentiometer.
When you power up the device, the EL wire will “Initialise”. In other words, they each flash once in sequence, from pin 2 to pin 9.
We are now in a waiting state until the mode button is pressed. Each press of the mode button toggles through a different sequence and flashes the Mode LED (Red) once, so the operator can confirm a mode change (as operator is wearing the hat).
There are 7 sequences that loop continuously between mode changes. During these modes, if the operator adjusts the Potentiometer, the speed of the sequence changes.
Sequenced Modes
Mode 1 – Step through all
Mode 2 – Fill up from bottom then empty from bottom
Mode 3 – Up and Down
Mode 4 – Sweep in botton to top, sweep out top to bottom
Mode 5 – Stack and unstack
Mode 6 – Alternate flashing
Mode 7 – Criss cross
Sound Sensor Mode
Mode 8 – When you reach this mode, the Mode LED with flash 10 times quickly in order to let you know that you are in this special mode.
The potentiometer now becomes your sound sensitivity control.
All Sequences
Mode 9 – This exits the Sound Mode and continuously runs through multiple loops of each of the Modes from 1 to 7 (Speed control on the potentiometer is now active). When the Mode Button is pressed, we return to Mode 1.
For more detail: EL Wire Hat: Sequenced and Sound Activated with Remote Control
The concept is an EL Wired hat with 8 sequenced EL wires controlled by a wired remote. Multiple speed controllable sequence modes are pre-programmed into an Arduino UNO, including a sound activation feature.
Features:
7 sequence modes (speed controlled)
1 sound activated mode (sensitivity controlled)
1 sequence mode that goes through all 7 previously mentioned sequences.
The brain behind my baby is an Arduino Uno Rev. 3 with a Spartkfun EL Escudo Dos shield.
This psychedelic fashion accessory was built for a festival, so it needed to be quite tough. Also it was built in a bit of a hurry, so steps were not documented during time of build. With that in mind, I will do my best to guide you through what I went through in as much detail as possible.
Remove these ads by Signing UpStep 1: Materials and Tools
Arduino UNO Rev3
Sparkfun EL Escudo Dos
8 x 1m EL Wires
DFRobot Sound Sensor
1K-Ohm Potentiometer
Potentiometer Knob
Push Button Switch (Normally-Open)
Toggle Switch
220 Ohm Resistor
1K-Ohm Resistor
Green LED
Red LED
Header Pins
Right angle Header Pins
4meters of Multicore cable (Ethernet)
Prototype Circuit Boards
9 x JST female connectors (2mm pitch)
Cable Ties
Heat Shrink (various diameters)
Gauge waterproof grommets
8 “AA” Battery Holder with Snap Connector
8 x 1.5V AA Batteries
Snap Connector
2.1mm Right Angle DC Power (Solder Plug End Connection)
1meter Spiral Cable Wrap (3/4inch)
Plastic Universal Enclosure 100 x 25 x 50 mm(Remote)
Plastic Universal Enclosure 135 x 95 x 45 mm(Brain)
2 x 4-way El Wire splitters
Stackable Headers
Hot Glue Gun and Glue
Soldering Iron and all the stuff that goes with it
Drill and various drill bits
Set of files
Needle and thread
Step 2: The Hat
Attaching the EL wire to the Hat *
– Start by selecting a colour sequence that appeals to you. Each 1meter EL wire wrapped nicely around the hat twice. The wire on the brim made it once around and I decided to spiral the last wire around top of the hat.
– Make holes in the hat where you can tread the EL wire through, concealing the power cables inside the hat. This can been seen in picture #2 where you see the inside of the hat with power cables coming through.
– Use a Hot Glue Gun to secure the EL wires to the hat. After the 4day festival, I noticed that some of the wires started coming off, so I reinforced them by using a needle and thread in a few strategic places.
– In picture #3, you can see the numbered tails of the EL wire connectors hanging out the back of the hat. I chose not to hardwire these wires to the Main Unit (Brain), as I wanted it to be detachable so I could travel with only the hat as carry-on hand luggage on a flight. This is not 100% necessary.
– Wrap the tails in a small section of Spiral Cable Wrap and Hot Glue the spiral wrap to the back of the Hat.
There is no need to be shy with the Hot Glue. Even if you do land up with cob webs, these can be easily picked off.
Step 3: Umbilical Cord
I used 2 x 1meter ethernet (8 core) cables.
The Hat Side…
– Cut the female connectors off the EL Wire splitters and solder them to the one end of the ethernet cables (polarity does not matter as it is AC)
– Insulate them by using heat shrink
(repeat for all 8 connectors)
The Brain (Main unit )Side…
As the Umbilical cord would be exposed to the elements, I wanted to restrict rain from making its way into the Brain. This is why I took extra precaution to insulate the cables’ entry into the Brain (Hence the use of gauge waterproof Grommets).
– Drill appropriately sized holes in Brain’s casing.
– Attach Grommets to the Brain’s casing
– Slip the appropriate heat shrink on to the ethernet cables
– Slip on and tighten the Grommet locking nut
– Feed the ethernet cables through the grommets as the JST connectors will struggle to fit through the grommets
– Solder the JST Connectors to the ethernet cable (once again, polarity does not matter).
– Heat shrink the soldered cables to insulate
– Slip the ethernet cables back out the grommets to leave just the JST cables and connectors showing on the inside part of the Brain.
– Use the remaining heat shrink to conceal the loose cables outside the brain.
Wrap the Spiral Cable Wrap around the cables.
Helpful hints:
– don’t forget to number the cables appropriately
– If you dont have a continuity meter: buy one, or make a note of what colour coded cables are attached to which numbered connector
Step 4: Remote Control
Now I am sure there are better techniques to do some of these steps, but I will guide you through the methods I used.
Aligning the parts and mounting them on a Prototype Circuit Board preparing them for the Remote Control casing
– Cut a piece of Prototyping Circuit Board to the appropriate size to fit in the casing (hopefully neater than my attempt).
– Cut another piece of plastic to the same size as the Prototype Circuit Board. This will be used as frame to temporarily mount the switches and Potentiometer for correct height and placement. I will refer to this piece of plastic as “the frame” from now on.
– Drill the appropriately sized holes in the frame at the appropriate places for where you would like to mount your controls and LEDs
– Attach controls (switches and potentiometer) and LEDs to the frame.
– Flip over the frame, so the the legs of the components point upwards.
– Place the Prototype Circuit Board on top of the components legs, parallel and aligned with the frame. You will notice that the legs will most likely not all be the same height.
This is the tricky part… I used header pins and right angle header pins inserted into the Prototype Circuit Board to fill the gap between the board and components.
– Solder these pins to the back of the Prototype Circuit Board in the correct place and on the components side, cut them to the appropriate length for each component.
– Solder the components to the protruding pins.
– Remove the frame.
– For the DFRobot Sound Sensor, use a row of 3 right-angled pins so the connector lies flush with the Prototype Circuit Board.
Wiring
– On the underside of the Prototype Circuit Board (see pic), create tracks using short pieces of wire from the components to the base of the Prototype Circuit Board. I soldered rails along the left and right of the circuit board for Negative and Positive power (ground and +5v from Arduino). This was helpful to simplify the wiring in the remote control.
– At the base of the Prototype Circuit Board, solder a row of right-angle header pins (optional step – explained a few steps later).
Remote Control Casing
– Use the frame to mark the position of the holes on the Small Plastic Universal Enclosure (Remote control casing) and drill the same sized holes.
– Drill a small hole in the top of the remote control casing for the DFRobot Sound Sensor (you may need to do this later to get exact positioning of this hole correct)
– Drill a hole in base of the remote control casing for the Gauge Grommet.
– Attach gauge grommet to the case and secure with locking nut.
– Feed the remote cable through the gauge grommet in the enclosure.
Connecting the Remote Control Cable
Under the “Wiring” heading I mentioned that it was optional to have the header pins on the prototype circuit board. This is because the wires from the remote control cable can be soldered directly onto the board.
– On the header pins, solder the ethernet cable onto the pins and heat shrink to insulate.
Closing the Remote Control
– Insert the DFRobot Sound Sensor in the casing with microphone pointing in the direction of the top of the casing. I mounted mine perpendicular to the prototype circuit board due to a space limitation (this can be seen in the picture).
– Align the components with the casing
– Insert board
– On the outside of case, attach the nuts to the Potentiometer, Mode Switch and Power Switch.
– Screw the case closed
– Pop on the Potentiometer rubber knob
Remote…DONE!
Notes:
You may have noticed the Black and Yellow cable wrapped around the ethernet cable. Because I used two cables for the Main Power Positive and 2 cables for the Main Power Negative, I ran out of cable and wrapped two extra cables around. I used 4 cables for Main Power as I had no clue whether one cable would be sufficient for powering the entire system – so to be sure, I wanted to be as power conscience as possible.
Step 5: Remote Control Shield
– Make a hole in side of the Yellow Plastic Universal Enclosure 135 x 95 x 45 mm (Brain) big enough for the remote cable (see picture).
– Slip some heat shrink over the remote control cable (will be used to protect the cable from wear)
– Pass the end of remote control cable through the hole
– Strip the insulation from this cable revealing the individual cables.
– Cut a piece of Prototype Circuit Board to a width of 20 x 20 points.
– Solder on two rows of Header Pins corresponding to the position of the header ports of the Arduino/EL Escudo Dos (see picture).
– Cable Tie the remote cable to secure it to the board.
– Solder the Remote control cable to the correct pins.
My cable colour coding for this project is as follows…
Signal
Yellow: DFRobot Sound Sensor
White/Blue: 1K-Ohm Potentiometer
Blue: Mode LED (Red)
White/Brown: Mode Push Button
Arduino Power
Brown: Arduino +5 V
Black: Arduino Ground
Main Power
Orange & White/Orange
Green & White/Green
(The two double black cables at the top of picture will be explained in the next step)
Secure the Remote Cable from being tugged with a cable tie.
Step 6: The Brain
This is the core of the system.
(Once again, please refer to the pictures below for guidance)
Main components are…*
Arduino UNO Rev3
SparkFun EL Escudo Dos
Remote Control Shield
12V EL Wire Inverter (Inverter)
Yellow Plastic Universal Enclosure (135 x 95 x 45 mm)
EL Escudo Dos Stackable Headers *
Out of the box, the EL Escudo Dos comes without Stackable Header Pins.
– Solder a set of stackable header pins onto this board.
Inverter Connector *
The connector of the Inverter is one that connects to the EL Wire cable. The EL Escudo does not use this connector.
Either cut this connector off and solder on a JST connector (2mm pitch) or make a jumper cable as seen in picture of inverter. This is useful if you plan to use the Inverter for a simpler project in the future.
Polarity of this cable does not matter as it is AC power.
Connect the output of the inverter to the EL Escudo Dos “AC from inverter” connector.
Battery Pack Power *
Just as what we did for the Remote Control Cable in step 5, make a hole in the side of the Yellow Plastic Universal Enclosure 135 x 95 x 45 mm (Brain), big enough for the battery Snap Connector cable.
Slip some heat shrink over the cable to protect it from wear.
Main Power cabling
Please refer to the Circuit Diagram illustration for guidance with this step.
The Main Power is controlled via the Remote Control.
The positive from the battery snap connector is permanently wired to the Arduino and to the Inverter.
The negative from the battery snap connector is soldered onto the Remote Control Shield (step 5). It passes through the Remote Control’s Main Power Switch and then connects to the negative of the Arduino and Inverter, completing the circuit when the switch is closed.
Stacking *
– Stack the Boards: Arduino at the bottom, EL Escudo in the middle, and the Remote Control Shield on the top.
EL Escudo EL Wire Connection *
– Attach the 8 EL wire JST connectors of the Umbilical Cord to the El Escudo Dos.
USB Access *
– Place the entire stack and Inverter inside the yellow case, and make sure that the USB port is pointing towards the side of the case.
Once completely assembled, you will not have access to the USB port of the Arduino so we will need to make a hole in the side of the case in order to update our code without needing to disassemble the entire Brain.
– Mark the area where the USB port is on the Yellow Plastic Universal Enclosure (135 x 95 x 45 mm)
– Drill a hole in the side of the case
– Use a file to tweak the shape until square and large enough to insert a USB cable.
Packing *
– Place the entire stack and Inverter inside the yellow case.
Close the Skull (Yellow Case) and Voilá !!! If all is good, all the hard work is done.
The entire Brain and battery pack can go into a backpack, giving you full control by using the remote.
Next… The code for the Arduino….
Step 7: Functionality and The Code
FUNCTIONALITY
The code is rather self-explanatory and (I believe to be) relatively well commented. There is also a serial println command at every step of the way for debugging especially if you need to tweak the code for the calibration of the potentiometer.
When you power up the device, the EL wire will “Initialise”. In other words, they each flash once in sequence, from pin 2 to pin 9.
We are now in a waiting state until the mode button is pressed. Each press of the mode button toggles through a different sequence and flashes the Mode LED (Red) once, so the operator can confirm a mode change (as operator is wearing the hat).
There are 7 sequences that loop continuously between mode changes. During these modes, if the operator adjusts the Potentiometer, the speed of the sequence changes.
Sequenced Modes
Mode 1 – Step through all
Mode 2 – Fill up from bottom then empty from bottom
Mode 3 – Up and Down
Mode 4 – Sweep in botton to top, sweep out top to bottom
Mode 5 – Stack and unstack
Mode 6 – Alternate flashing
Mode 7 – Criss cross
Sound Sensor Mode
Mode 8 – When you reach this mode, the Mode LED with flash 10 times quickly in order to let you know that you are in this special mode.
The potentiometer now becomes your sound sensitivity control.
All Sequences
Mode 9 – This exits the Sound Mode and continuously runs through multiple loops of each of the Modes from 1 to 7 (Speed control on the potentiometer is now active). When the Mode Button is pressed, we return to Mode 1.