This is not CGI, it is honest work of a papercraftsman.
These are, in fact, 16 different papercubes that switch places in each frame. That technique is commonly known as replacement stopmotion.
Problem: It only works on the screen and not in reality.
Therefore, some good guy invented the zoetrope and some younger guy invented the stroboscope, and combined, they unleash their combined real life magic.
It is a wooden plate that you turn, making the stroboscope strobe in the frequency that makes the cubes look animated.
Problem: This doesn‘t work really well on the screen anymore. It is a bit like the Heisenberg uncertainty principle.
 Remove these ads by Signing Up
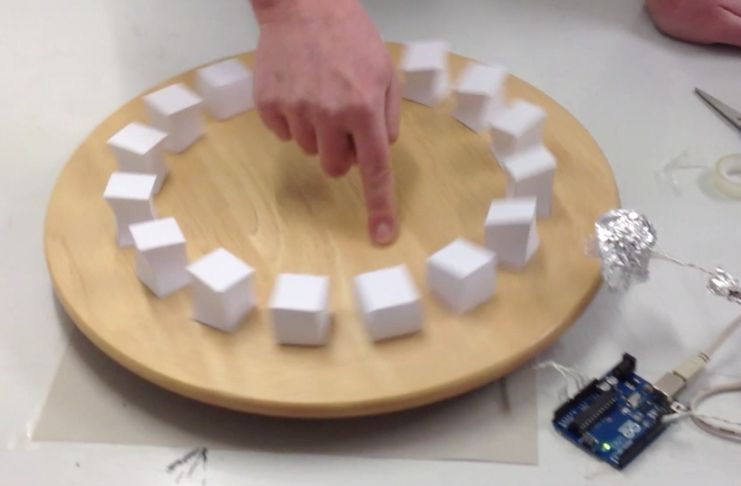
Step 1: The modeling
But hark, I bring good news to thee. You will not have to spend money on 3D-software:
There are many great freeware options for 3D beginners and experts, such as Blender (expert) and Anim8or (beginner).
To be honest, creating a short 3D animation loop isn’t easy, so you should be familiar with the program already. There are some great tutorials on their websites or in the whole web.
So I will give you only a short instruction on how to animate and not to animate your model, as this defers greatly from program to program.
- You need a looping animation with 12, 16, 20 or 24 frames, these are good numbers for a stopmotion animation, they can divided by 4 and are a good amount of phases to handle.
- Work low-poly; You will have to make this from paper.
- It is no coincidence that I chose a cube to animate. When you animate a whole character, you have a pleasant afternoon with cutting, folding and glueing the almost similar model 16 times.
- In case you also want to animate a cube, especially in shortage of alternatives, you can mess around with the deformer tools like bend, curvature, stretch etc.
- Remember one important rule from Disney: Movements are always curved in speed and space, this means: The object doesn’t move from A to B with constant speed, it has to accelerate and decelerate. In my case, when you watch the animation, you can see that the cube stays in its extreme positions for a long time, but rushes through the point where the cube is fat. These movements make it look natural.
- Remember another important rule from Disney: The cube does always have the same volume, meaning when it stretches to the top, it tears itself together and vice versa. You can imagine it like a real wobbly cube that would do the same when you stretch or push it.
- The model should always stay on the ground with one face. When you make a rolling or jumping cube, for example, you would have phases where it stands on the edge or is in the air, making it impossible to fix the single phase on the ground.
In the end, you should save the different animation phases next to each other like on the picture. I already put them in the right place, but that is optional. The next step will be making them ready for crafting.
Step 2: The Unfolding
http://www.tamasoft.co.jp/pepakura-en/
The most important tool is the knife: You can choose which edges have to be open on the 3D model. You don’t have to select all open edges, and you can still join edges back in the unfolded view.
When you hit Unfold, you can choose between auto and manual, you should choose manual, or you will get 10 cm big cubes. You would need a tractor wheel for making a zoetrope with them. My cubes are only 3 cm high, for example, that is about 1 inch.
On the right half, you see a preview of the instructions now. With right-click, you can modify the flaps, rearrange faces and flaps etc.
In case you have a similar model like mine, you could get in trouble when you don’t know any more in which angle you have to put it after you have glued it together. So I unfolded every cube in the same way: The top face has all the side faces on its edges, and the front face has the bottom face attached to it. So the face with the 2 faces over and under it is always the front face… Sounds complicated.
Really important: Do always number your phases for example on the bottom of it. There is a function for writing text on the unfolded sheet.
I also printed one of that sheets with the blue quarter circle, then I could use it as a stencil to arrange the cubes later.
Step 3: The Crafting
As you can see on the picture, I didn’t mind of the flaps on the sides, because they are too much and too little, but I cut curved instead of the angular lines and fixed them with sticky tape on the inside.
Therefore, I cut a hole in the bottom, because who cares. No one will see that.
I also turned them inside out, meaning that the printed lines are on the inside of the cubes. When you do that with every cube, it doesn’t matter for the animation, it is just mirrored (mine is symmetrical, anyway).
Make sure that your cubes are numbered on the bottom! And make sure that you know which is the front side!
Step 4: A) Stopmotion
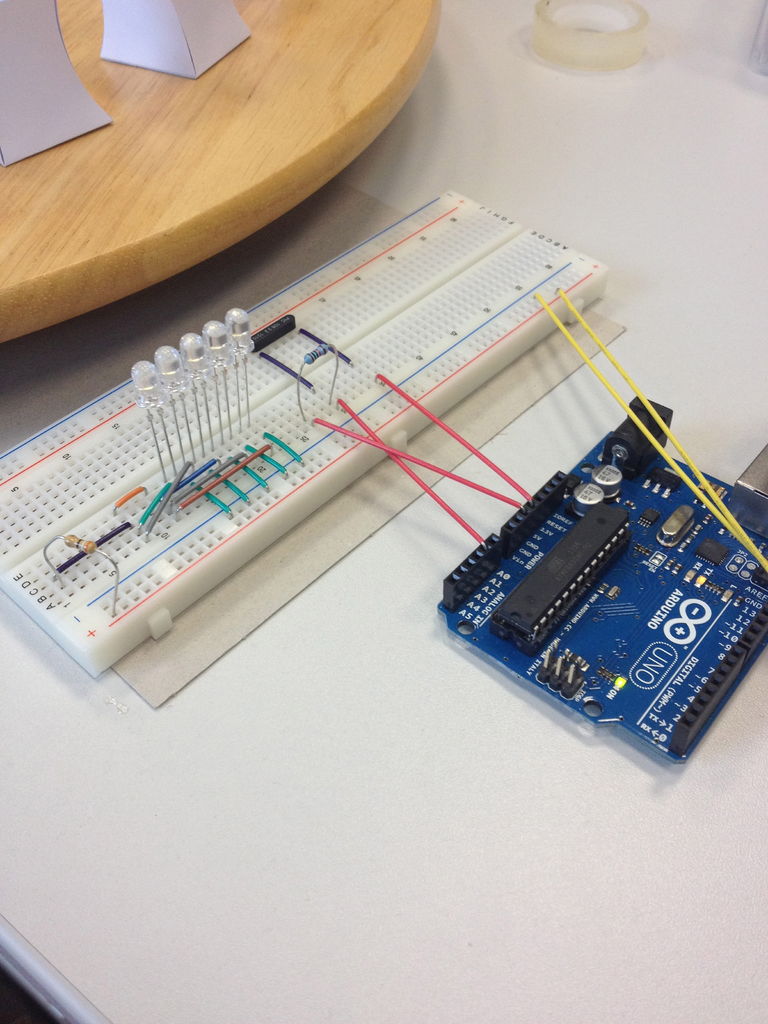
Therefore, you need:
A camera – Or even an iPhone. There are some stopmotion apps where you have the movie right on your device already.
A tripod – The heavier, the better. A infrared trigger for the camera guarantees a still image.
A background – That doesn’t move. Sky does move. And natural light changes quickly.
A video editing software – Or Photoshop.
The camera has to make all images with the same settings, so find the optimal settings and turn white balance and auto focus off.
Then mark the spots where the objects are on the underground, you can either animate only one object or a few at once. They just can’t do exactly the same motion then, the closest would be one animation phase of difference.
Then, don’t ever touch the camera again and make your shots. After each shot, replace the current object with the next one.
When you are done, make a quick preview with scrolling through the images on your camera. Sometimes there are little movements in the background that you could not notice.
When everything is fine, transfer them onto your PC and place them in sequence into your video editing software, every picture showing up for one frame.
Photoshop has an animation feature, which allows you to animate the frames when you have them in different layers. The advantage would be that you can equate tiny movements of the camera through moving the layers a bit with the cursor keys. When you set the blending mode to Difference, you have a great overview of the shift. This tutorial shows you how to generate a GIF out of the frames: http://creativetechs.com/tipsblog/build-animated-gifs-in-photoshop/
For more detail: 2 Ways to Papercraft Stopmotion