At first, let me give a brief introduction about relay to you.
Relays are used where it is necessary to control a circuit by a low-power signal (with complete electrical isolation between control and controlled circuits). It acts as a “low voltage controlled switch to control high voltage”, For example, if you want to control power of your washer or air conditioner, which is oftern110v or 220v,by microchip such as AVR or PIC, it is necessary and safe to make your microchip control the relay first, and then control the power supply of those device with the relay.
With the GSM SMS, it is possible to control the relay remotely. You can send a message via phone to control the relay on&off. With this, it will convenient to control any device wirelessly, especially helpfully on irrigation, smart home, outdoor remote control etc.
So, let’s make such a “SMS controlled Relay” with Arduino, GPRS/GSM and a Relay module.
Step 1: Prepare your tools and parts.
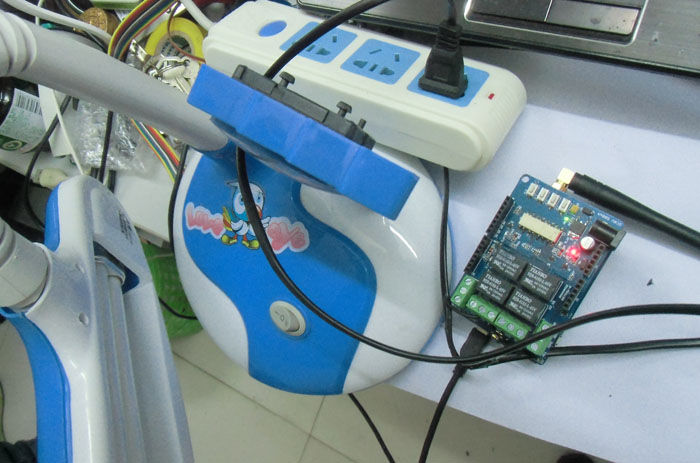
Select the module you need, a Xduino, a GPRS/GSM module and relay module is essential. The GPRS/GSM and relay in “Shield” would be more Convenient if works with Arduino:
The modules I used in this application are as below:
Crowduino
GPRS/GSM Shield
Relay Shield
Notice that the Rated Current of the relay Is important, make sure it meets your requirements. Otherwise it maybe dangerous. Here, I use a 2A rating current relay, which is enough for my application to control a lamp. Usually, home appliances consume currents as below
Device Max current(A)
Electric Fan 1
Lamp 2
TV 2
Refrigerator 2
Microwave Oven 8
Air Conditioner Depends on the power, usually <20
Of course, you will need some tools, such as the Insulating tape, Scissors…
Step 2: Insert a SIM card to the GPRS shield.
Step 3: Communicate with Crowduino/Arduino by hardware serial.
There are three pins 2*3 pins in the GPRS shield. You can see the silk mark in both side of pins, one side is Xduino(this is connect to the hardware serial port), and the other side is SWserial(this side is used as software serial port). Just as the picture, plug the jumper caps to the Xduino side.
Step 4: Upload the program.
Download the code :
Using_SMS_to_Control_Relay_Hardware Serial.ino
Before the compiling, please Open the file: SoftwareSerial.h in arduino\libraries\SoftwareSerial, and modify the
#define _SS_MAX_RX_BUFF 64 // RX buffer size
To
#define _SS_MAX_RX_BUFF 128 // RX buffer size
With this modification, the Arduino would have more buffer for the received message to avoid any communication bugs.
If you have not got ready to comprehend the details, you can just copy the codes into your Arduino IDE and down it to Arduino to continue.
Then, open this file by Arduin IDE. Upload the program to the Crowduino, please note that don’t connect the GPRS shield to Crowduino when uploading program, very important!!!!
Step 5: Plug Relay+GPRS Shields to the Crowduino
Step 6: Have A Try:Control the Relay shield by manually.
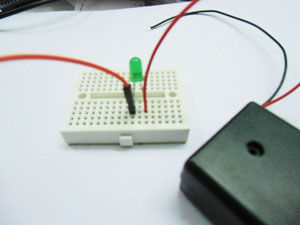
Step 7: Have a test for the manual control.
Before remote control the lamp, we can make a test. Here, we need a breadboard, a LED, two AA battery and some breadboard cables.
Plug the anode wire(the red one) of power supply to the anode of LED via the breadboard, using the same method, plug the breadboard jumper wire to the cathode of LED.
As we only need one relay here, we use the relay U3, which was controlled by the Arduino Pin5.
There are 3 terminals for U3 relay: COM3, NC3 and NO3. The COM3 is the common port, while the “NO” means “Normally Open” and NC means “Normally Connected”. That’s to say, the logic between these 3 terminals is:
When the relay is not active:
COM3 connected to NC3 and disconnected to NO3;
When the relay is active:
COM3 disconnected to NC3, and connected to NO3;
Insert the cathode wire(black one) of power supply to NO3, insert the cathode wire(orange) of LED to COM3 and tighten the terminal with a screwdriver.
Now, you can control the LED on or off via button 3, it is funny, hah…
For more detail: Remote control via GPRS/GSM SMS(Arduino)