Thanks to: http://jeonlab.wordpress.com/
For relatively small (less number of pins than ATmega328) projects, ATtiny series, ATtiny45 or Attiny85 are good choice in terms of its physical size (8-DIP or 8-SOIC) and low power consumption.
There are many ways to program it. One of the popular device is USBtinyISP and DASA. Both of them work very well with WinAVR (AVRdude).

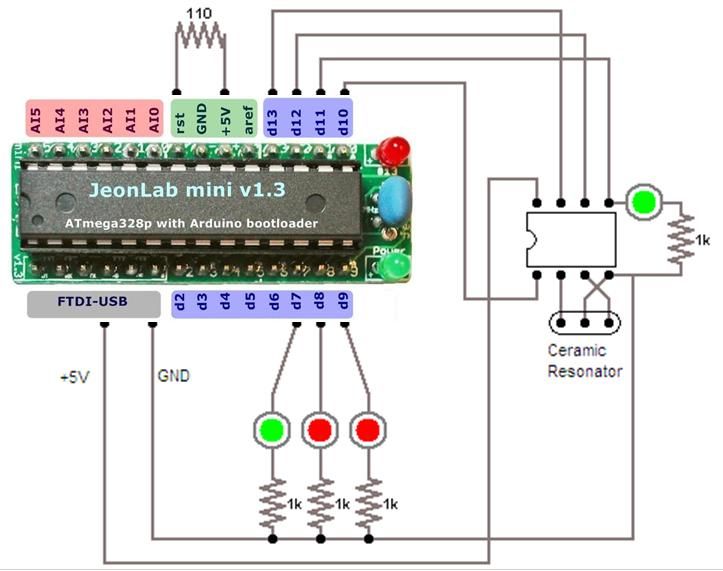
I’d like to share how I program ATtiny85 with JeonLab mini 1.3. The idea has been adapted from High-Low Tech Group and provideyourown.com. One missing note from High-Low Tech Group is that you need to add a 110-120 ohm resistor between VCC and Reset pins of JeonLab mini (or Arduino) to prevent Auto reset on serial connection as explained in here and here.
Step 1: Schematic diagram
You will need a JeonLab mini or Arduino or any Arduino compatible board with FTDI USB interface. Here is an example with JeonLab mini v1.3.
Step 2: Assembly on a prototype board
I used a piece of prototype board to assemble a JeonLab mini v1.3, 6pin male header for the FTDI basic board (Sparkfun), 3 indicating LEDs, a 8pin DIP socket, and a ceramic resonator for ATtiny (if you are using internal oscillator, you don’t need it). I also added another LED to the ATtiny PB0 (pin 5) in order for quick debugging, but if you don’t need or want it, just ignore it. The function of those indicating LEDs in ArduinoISP sketch you will upload later are:
9 (red, right): Heartbeat – shows the programmer is running
8 (red, middle): Error – Lights up if something goes wrong
7 (green, left): Programming – In communication with the slave
You can also use a bread board as shown in the 3rd picture.
Step 3: Programming environment (Arduino IDE)
Now go visit High-Low Tech Group and download ATtiny 45/85 support hardware files and extract them to hardware folder in Arduino folder. Once this is done, connect the board to USB port of your computer and run Arduino and load ArduinoISP sketch from example. Check your board setting (see below picture) and COM port number and upload ArduinoISP to the JeonLab mini or Arduino.
As you can see in the 2nd picture, there are new hardware (board) options, ATiny45 and ATtiny85.
Now your JeonLab mini or Arduino has been transformed into a ATtiny 45/85 programmer!
[box color=”#985D00″ bg=”#FFF8CB” font=”verdana” fontsize=”14 ” radius=”20 ” border=”#985D12″ float=”right” head=”Major Components in Project” headbg=”#FFEB70″ headcolor=”#985D00″]Arduino
Attiny[/box]
For more detail: ATtiny programmer using Arduino ISP