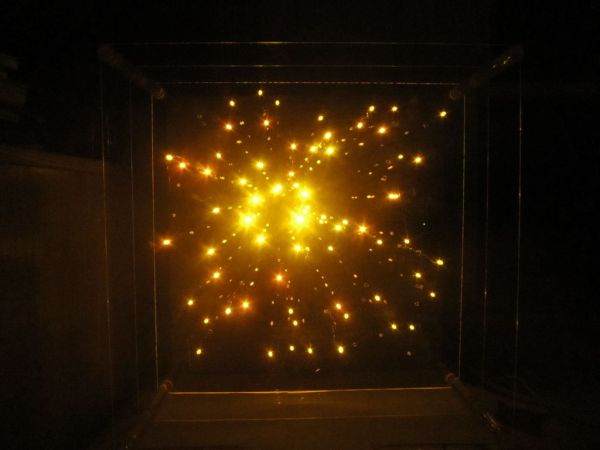
This instructable will guide you through the process of making your very own star-cluster from LEDs and acrylic.
I made this piece for my electronics final project at college and had access to a machine shop. This instructable assumes that you have access to similar tools.
This project was very much inspired by http://www.instructables.com/id/working-progress-n-how-to-make-a-multilayered-a/#step8.
Step 1: The Materials
Materials:
• 80 LEDs (Amber, 3000 mcd)
• 80 68 ohm resistors (or other small resistance of your choice)
• 80 1k ohm resistors
• 10 4051 multiplexers
• 20 7404 not-gates
• 30 16-pin sockets
• perforated pc board
• lots and lots and lots of wire
• arduino uno
• 5v power source
• 3 layers of acrylic board, 20” by 20”
• 1 layer of plywood, 20” by 20”
• 4 feet of ¾-inch diameter acrylic rod
• 1 foot of ¼-inch diameter acrylic rod
Tools:
• soldering iron
• solder
• wire-cutters
• wire-strippers
• lathe
• drill press
• band saw
• 1-meter telescope (optional)
Step 2: The Design
Before gathering your materials, I recommend getting a 1-meter telescope and observing a star field for about 30 hours in the i,r and g bands. After a laborious data-reduction and correction process, create a false-color image.
Alternatively, you could just go to the Hubble image database and pick your favorite image of a star cluster to download.
Once you have a suitable image, open it in photoshop or a similar image editing software and scale your image to the physical size you would like your sculpture to be. Create a transparent layer and place markers over every star that will go in the first layer. I chose to put 8 stars in the top layer, 16 in the middle, and 56 stars in the background layer, to convey the ratios of bright to dim stars in the cluster. Once you’ve created your first layer, add another transparent layer. Place dots on the all the stars that will be in this layer, and then place larger circles on top of the stars that will be in the first layer. This is extremely important, because the LEDs for the first layer must be pulled through the second and third layers. When you go to cut the layers, the circles should be sightly larger than the LEDs, so that it is easy to thread the LEDs and their wires through. Repeat this process for the third layer, making sure that all the stars in the first and second layers have been marked on the third.
Step 3: The Acrylic
Once the layouts for the three layers are complete and have been printed to scale, it’s time to cut the acrylic. I had access to a single very large sheet, and I cut that into my three layers using a bandsaw. The acrylic comes covered in a plastic coating, and you should leave this on until you’re ready to put the whole thing together, to prevent scratching.
When the three layers are cut to the proper size, it’s time to drill the holes for the LEDs. You should measure the diameter of the LEDs with calipers and use the closest possible drill bit to ensure the LEDs will fit snuggly into the plastic. I used a 0.1905″ diameter drill bit for the LED holes, and a quarter-inch bit for the pull-through holes. I used a drill press to do the drilling.
Tape the printed layout for the first layer to the acrylic, making sure it’s flat on the surface and lines up well with the edges. I brushed mineral oil on the bit to keep it cool as I went, since it will start to melt the plastic as it heats up. When the first layer is done, take care to check that the second layer’s pattern lines up well with the holes you’ve already drilled for the first layer.
When all three layers are done, stack them together and make sure that the holes line up well.
The next step is cutting the acrylic rods that will support the layers. I used 3/4″ diameter rod, and cut it into four inch lengths. I did the initial cut with the bandsaw, and then used the lathe to cut them to the exact same size. The 3/4″ rod sits between each layer, holding them up. But to hold it all together, I used 1/4″ plastic rod as screws. You could use conventional screws, or any number of other methods to hold the layers together, but I wanted the entire thing to clear.
I replaced the lathe’s cutting tool with the 1/4″ drill bit, and drilled about a quarter-inch into each end of each 3/4″ rod segment. If you’ve been used an angled drill bit, as I had, replace it with a flat-headed one, so that the 1/4″ rod will fit nicely into place.
Returning for a moment to the acrylic sheets, keep them stacked together tightly and mark out where the support rods will go in each corner. Use the 1/4″ drill bit and the mill press to drill a hole in each corner. I recommend doing this for all three at once to ensure that these holes are aligned perfectly, otherwise you may not be able to put the piece together.
[box color=”#985D00″ bg=”#FFF8CB” font=”verdana” fontsize=”14 ” radius=”20 ” border=”#985D12″ float=”right” head=”Major Components in Project” headbg=”#FFEB70″ headcolor=”#985D00″]• 80 LEDs (Amber, 3000 mcd)
• 80 68 ohm resistors (or other small resistance of your choice)
• 80 1k ohm resistors
• 10 4051 multiplexers
• 20 7404 not-gates
• 30 16-pin sockets
• perforated pc board
• lots and lots and lots of wire
• arduino uno
• 5v power source
• 3 layers of acrylic board, 20” by 20”
• 1 layer of plywood, 20” by 20”
• 4 feet of ¾-inch diameter acrylic rod
• 1 foot of ¼-inch diameter acrylic rod[/box]
For more detail: 3-dimensional Star Cluster using an Arduino